My RC2014 - Z80 Homebrew Computers

Introduction - RC2014 Pro
This page describes my experience with RC2014 8-bit computers, based on famous
Zilog
Z80 processor.
8-bit computers, based on famous
Zilog
Z80 processor.
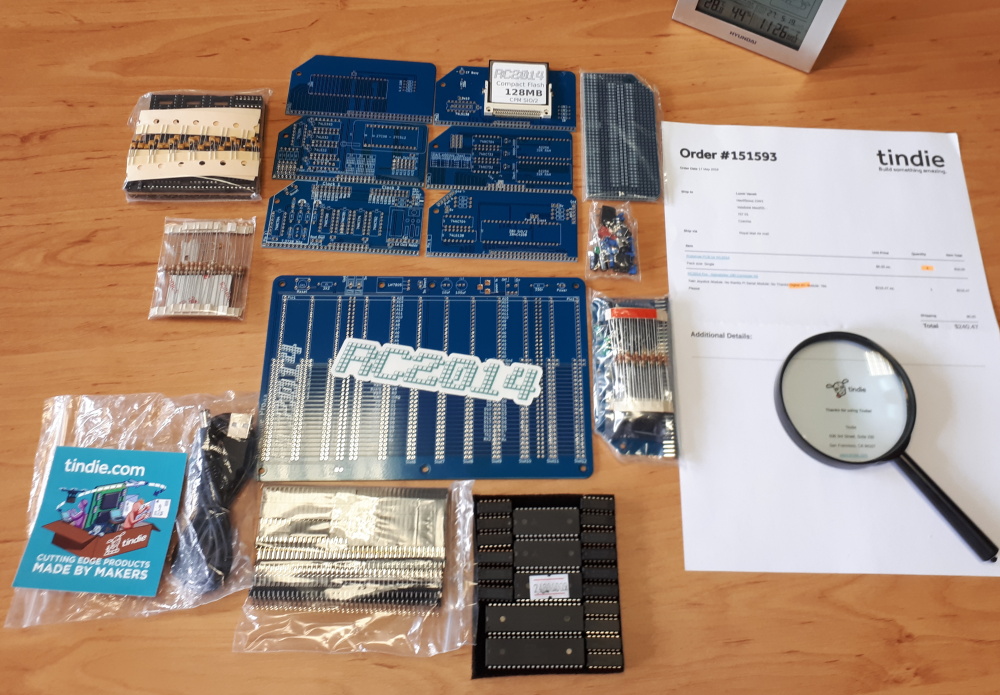
I ordered RC2014 Pro kit on Tindie
and received bunch of PCB's and components ...
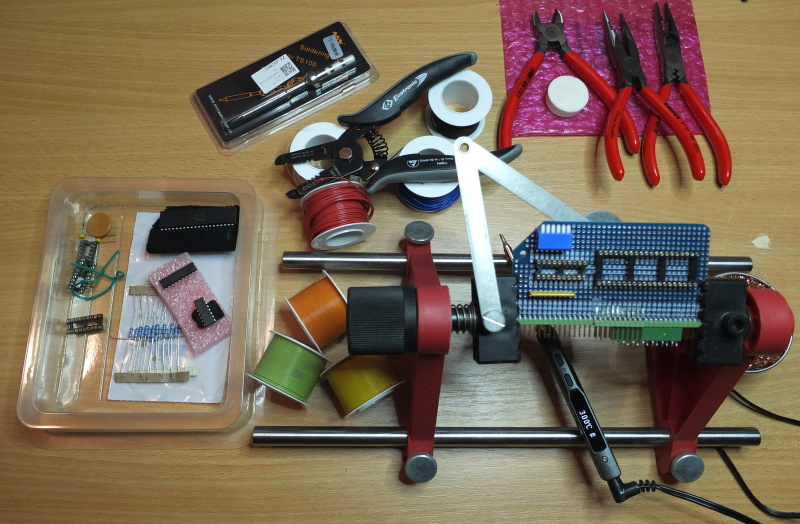
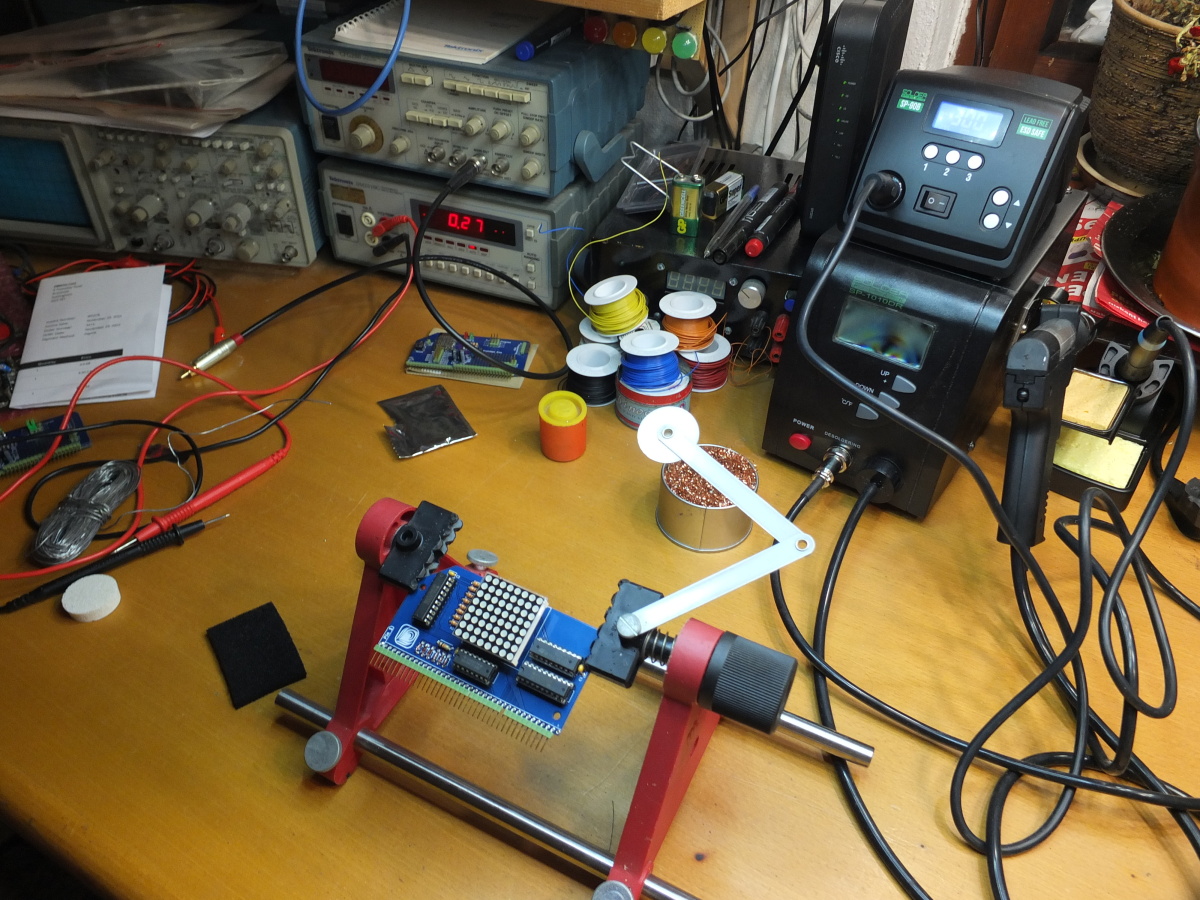
Assembling
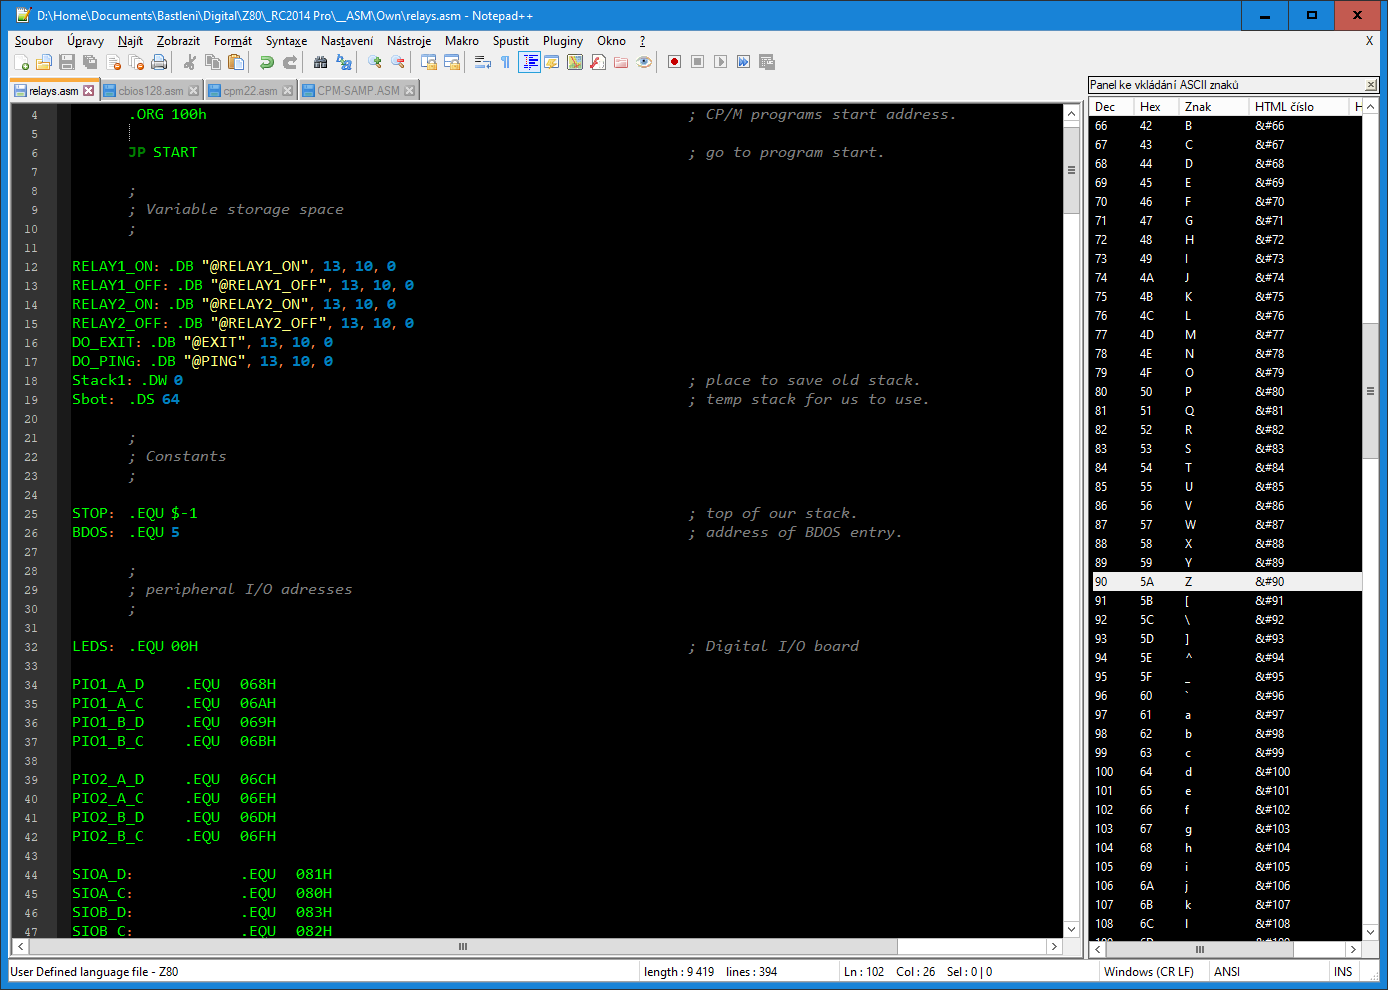
... then I spent two afternoons and nights with soldering. Everything is perfectly documented and if you do assembling and soldering closely it works without any troubleshoting.
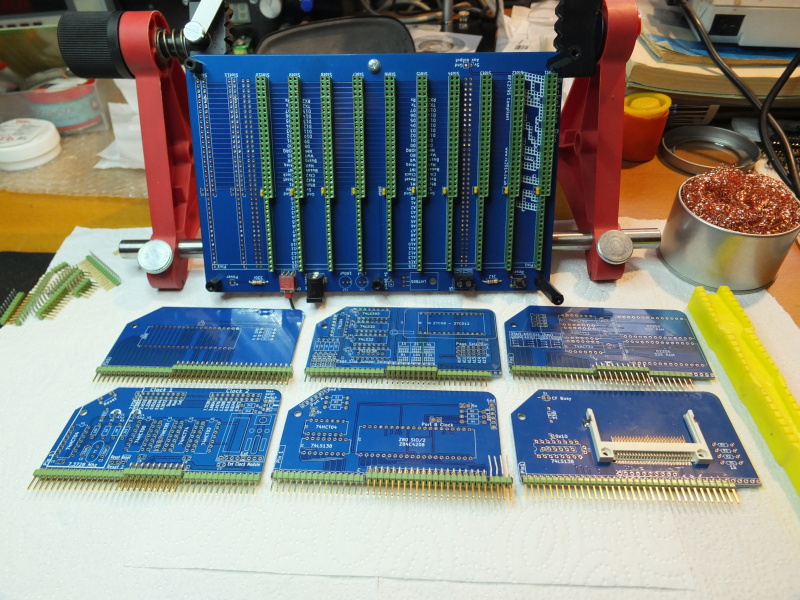
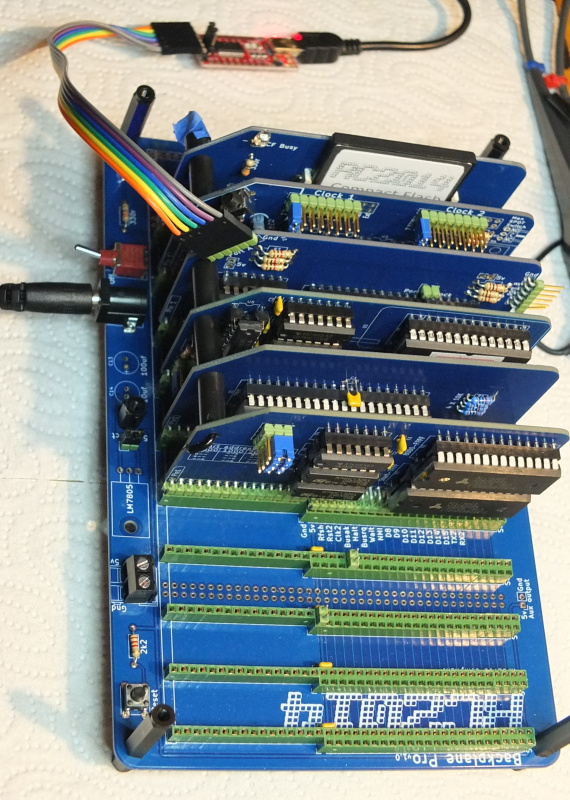
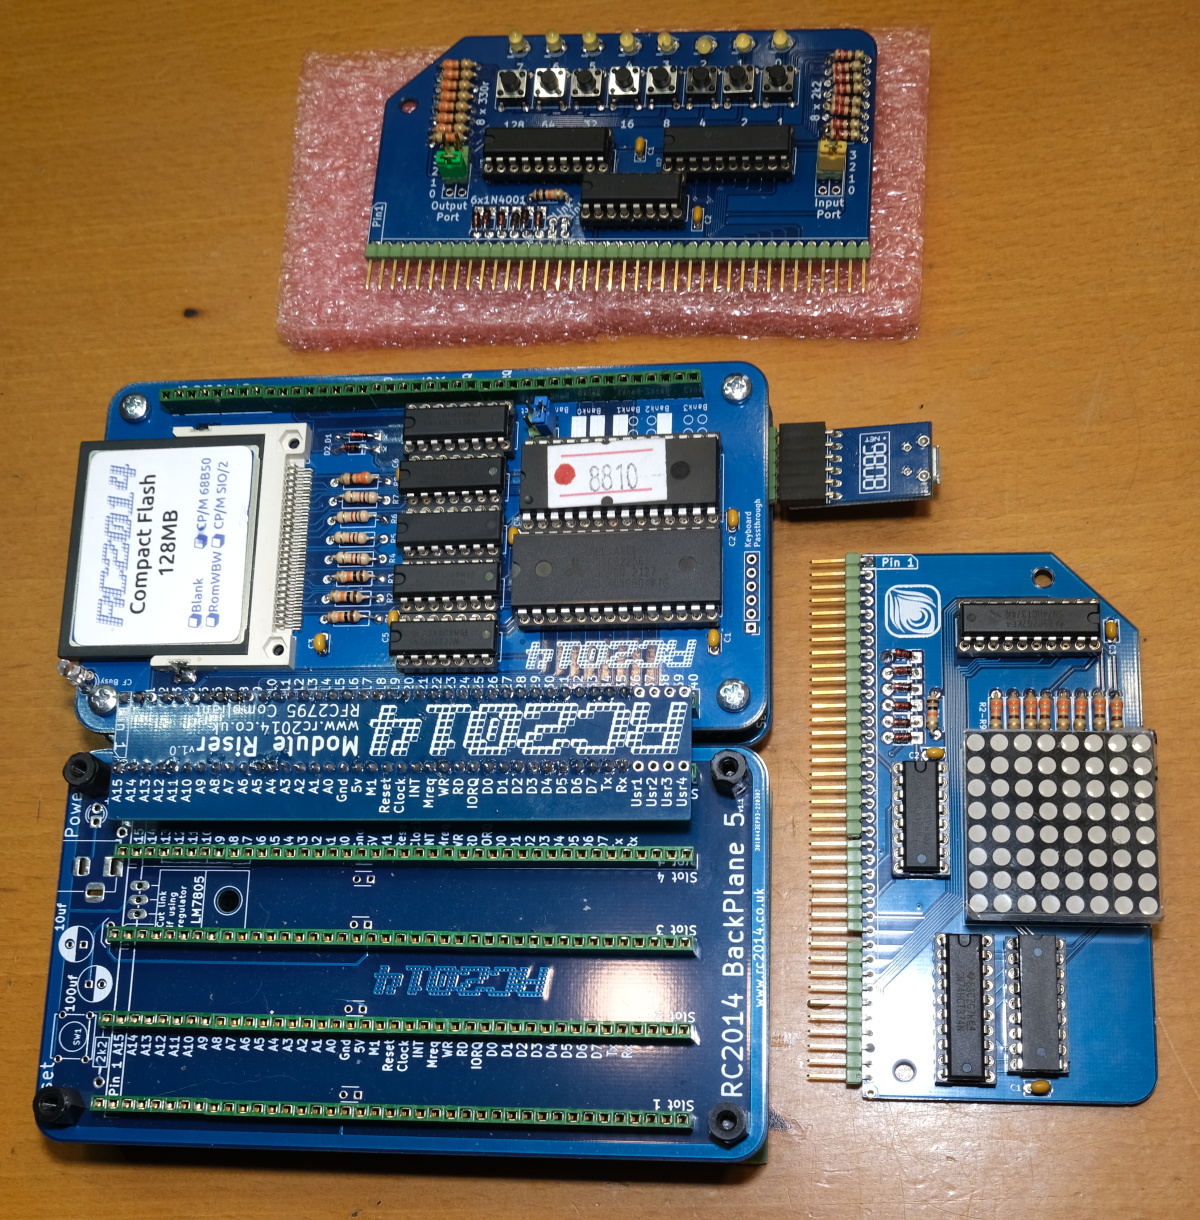
RC2014 Pro consist from 7 boards:
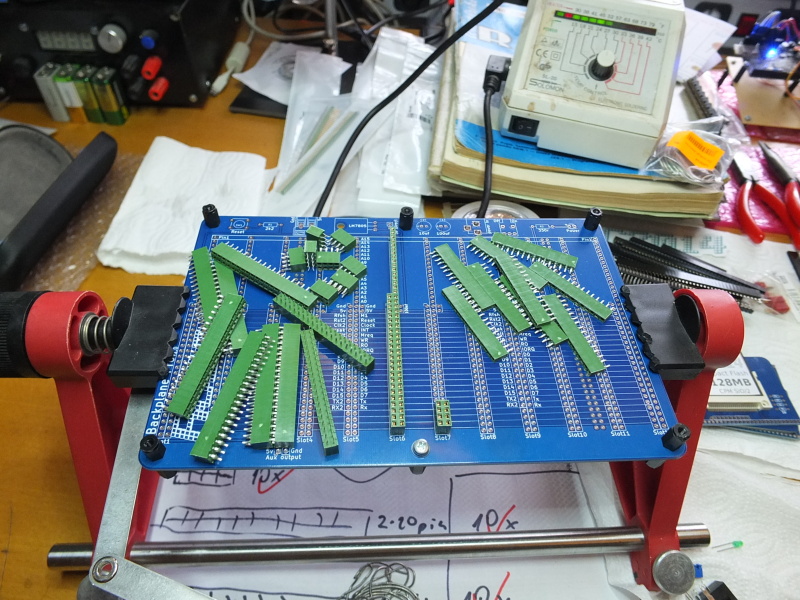
- Main board - it's passive backplane, it contains bus connectors, input jack, power switch and indication LED. It's possible to add 7805 stabilizer for powering from voltage over 5V.
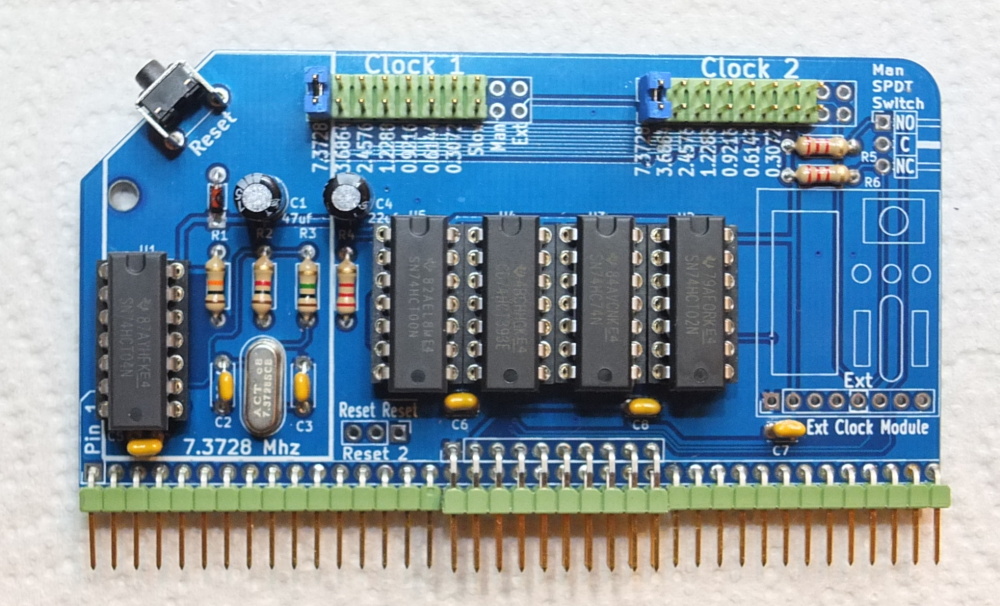
- Dual clock board - there is crystal, frequency dividers and jumpers for choosing output frequency. It generates clock for processor and serial board.
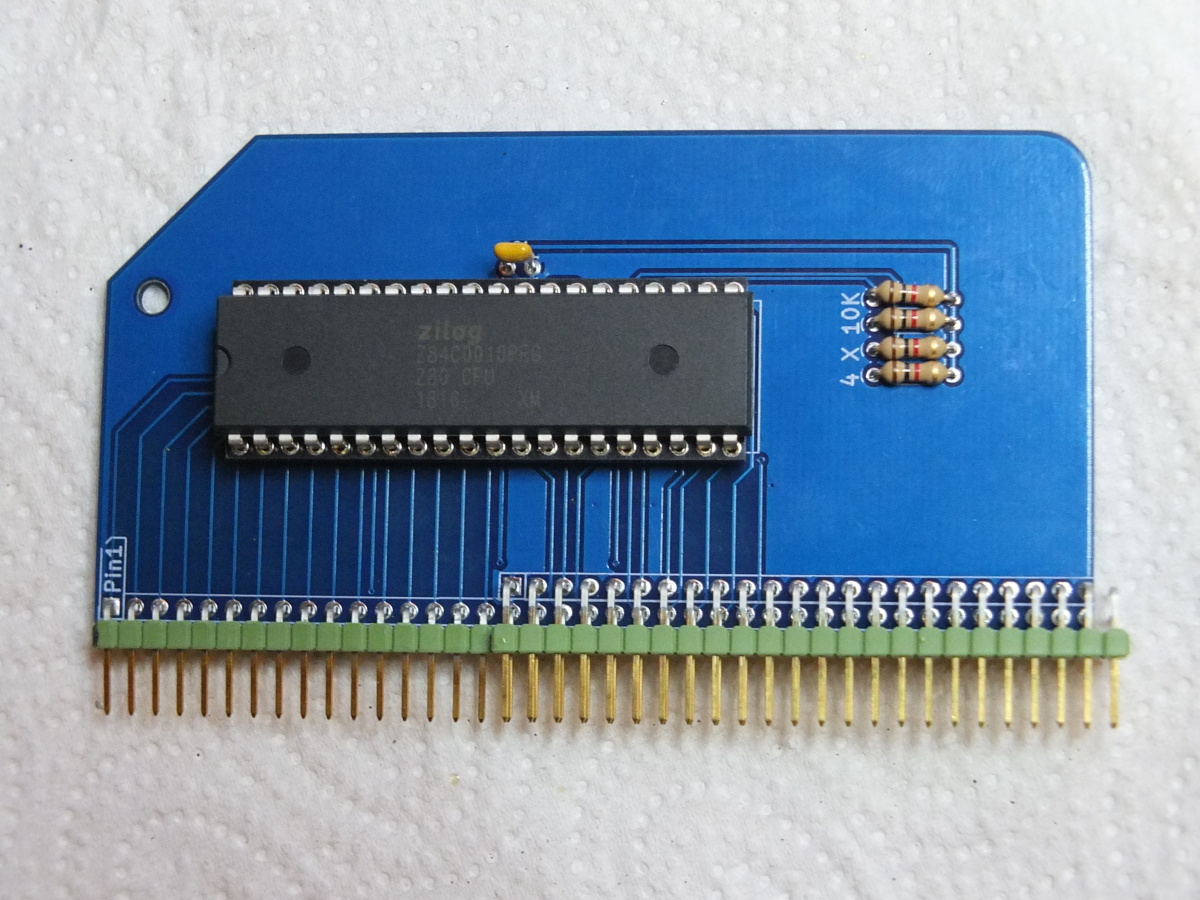
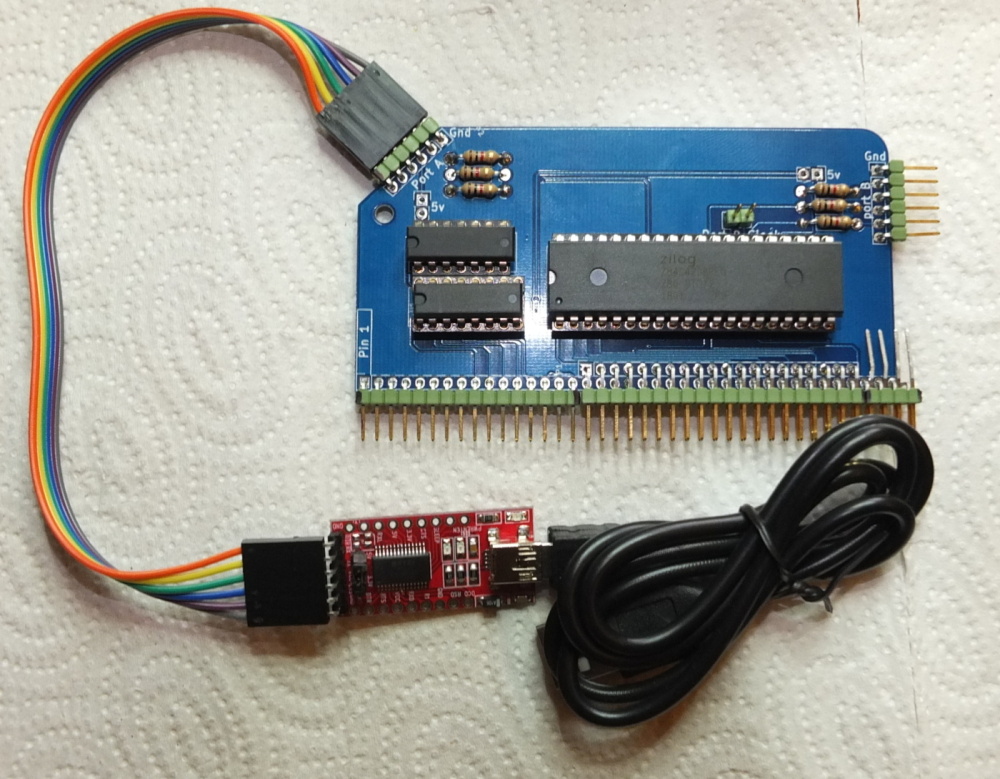
- Processor board, there is only Z80 CPU and four pull-up resistors.
- 64 kB RAM board.
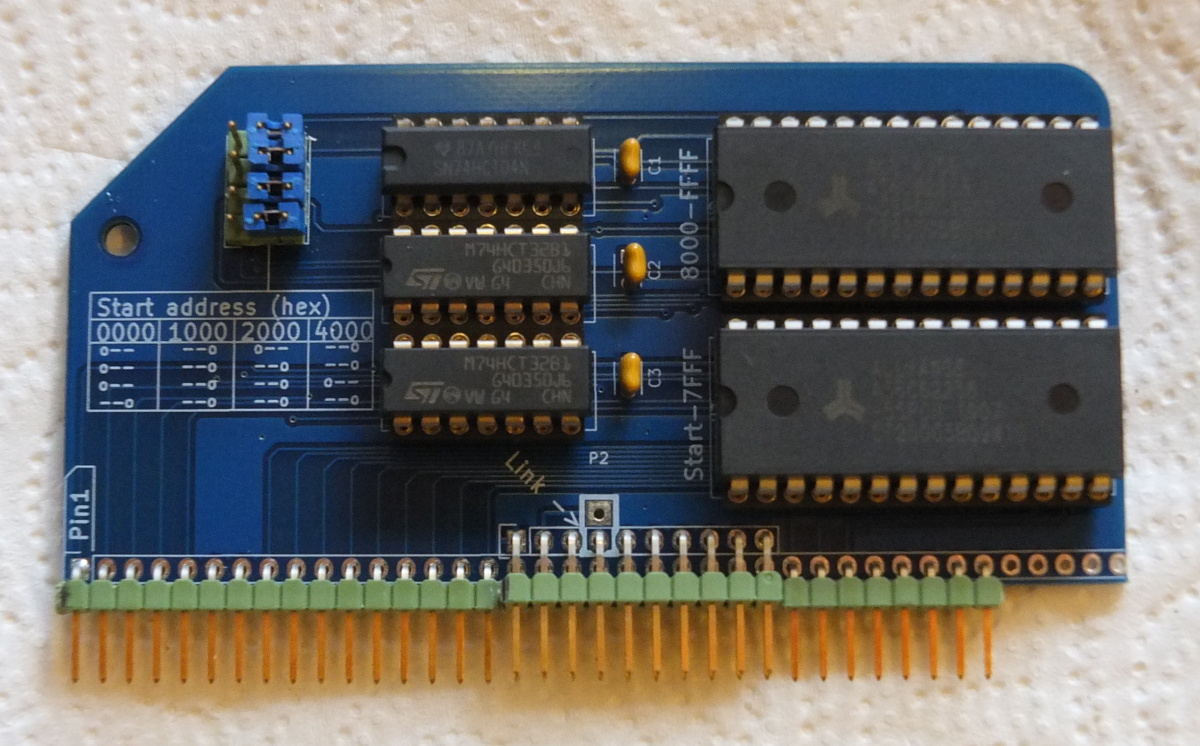
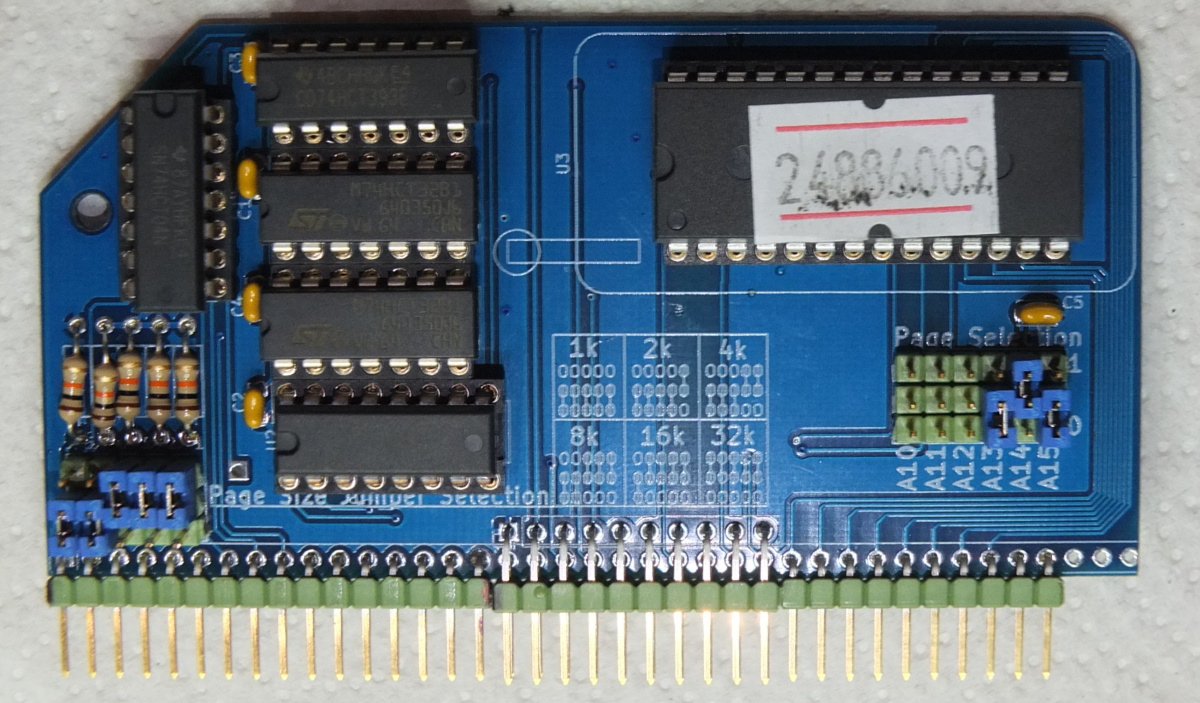
- Pageable ROM board - it's divided to pages, that contains different content: BASIC, CP/M loader and some pages are void.
- Serial board - there is Z80 SIO/2 dual serial port. First channel is obviously used for connection to PC via FTDI converter. Second one is free for custom use.
- Compact Flash Storage Module - CP/M for RC2014 is modified to be able use it as emulated Floppy disc. User can use
A:-P:drives. A 128MB CF card is split in to 15 x 8MB drives and 1 x 2MB drive.
| Boards | |||||
|---|---|---|---|---|---|
Main board |
Z80 CPU |
64 kB RAM |
|||
Pageable ROM |
Dual clock |
SIO/2 serial port |
|||
Aditional modules
Digital I/O board
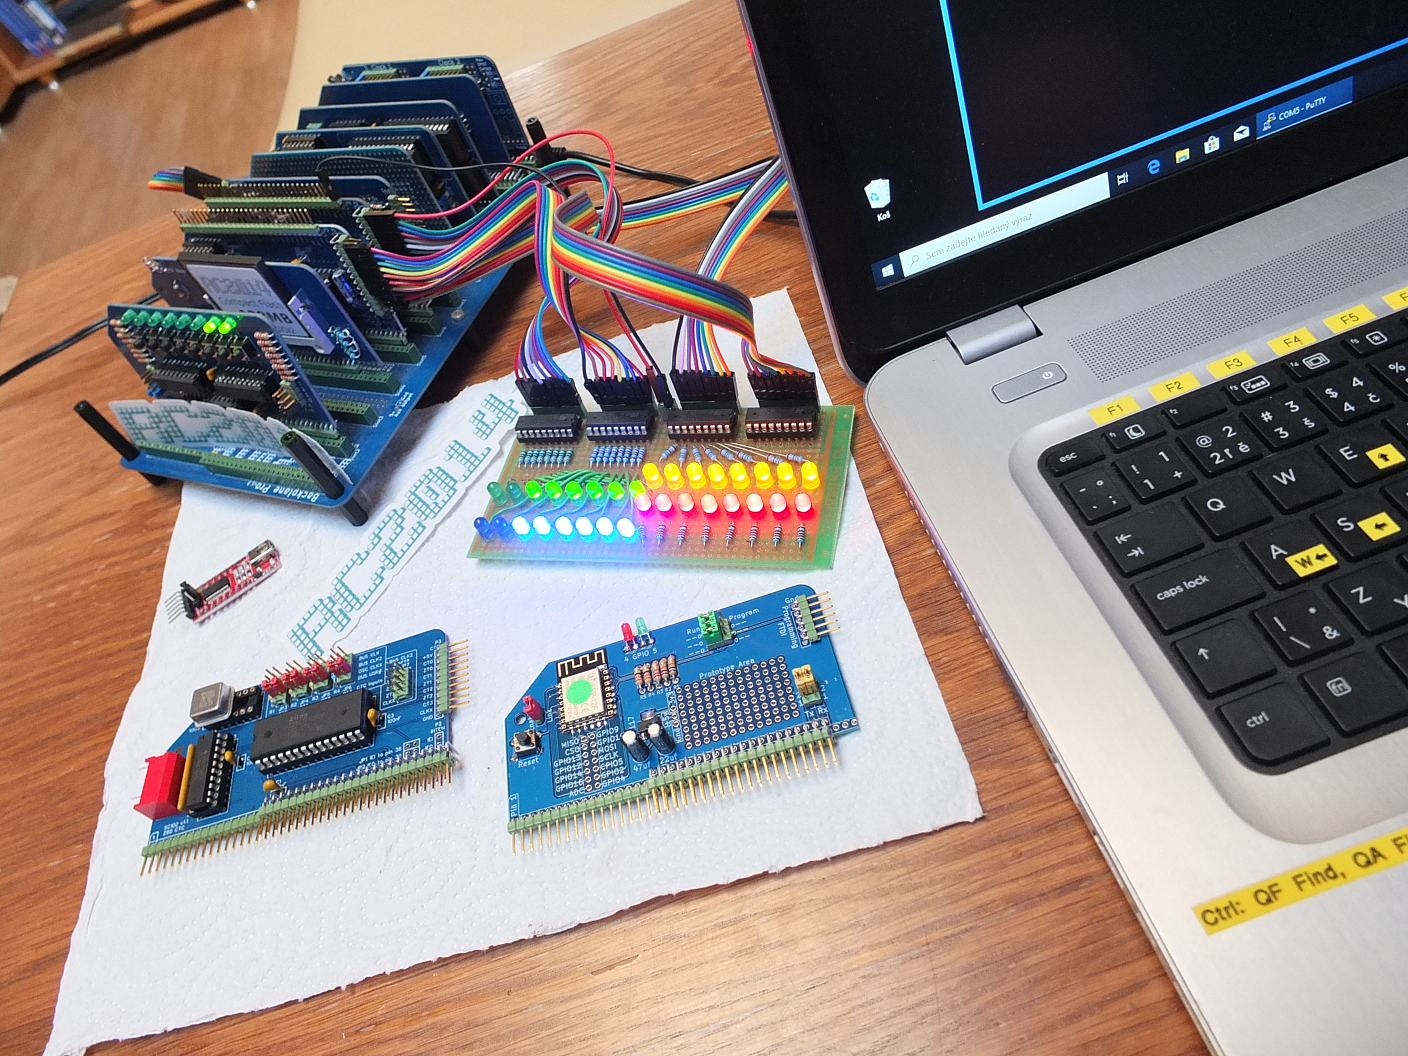
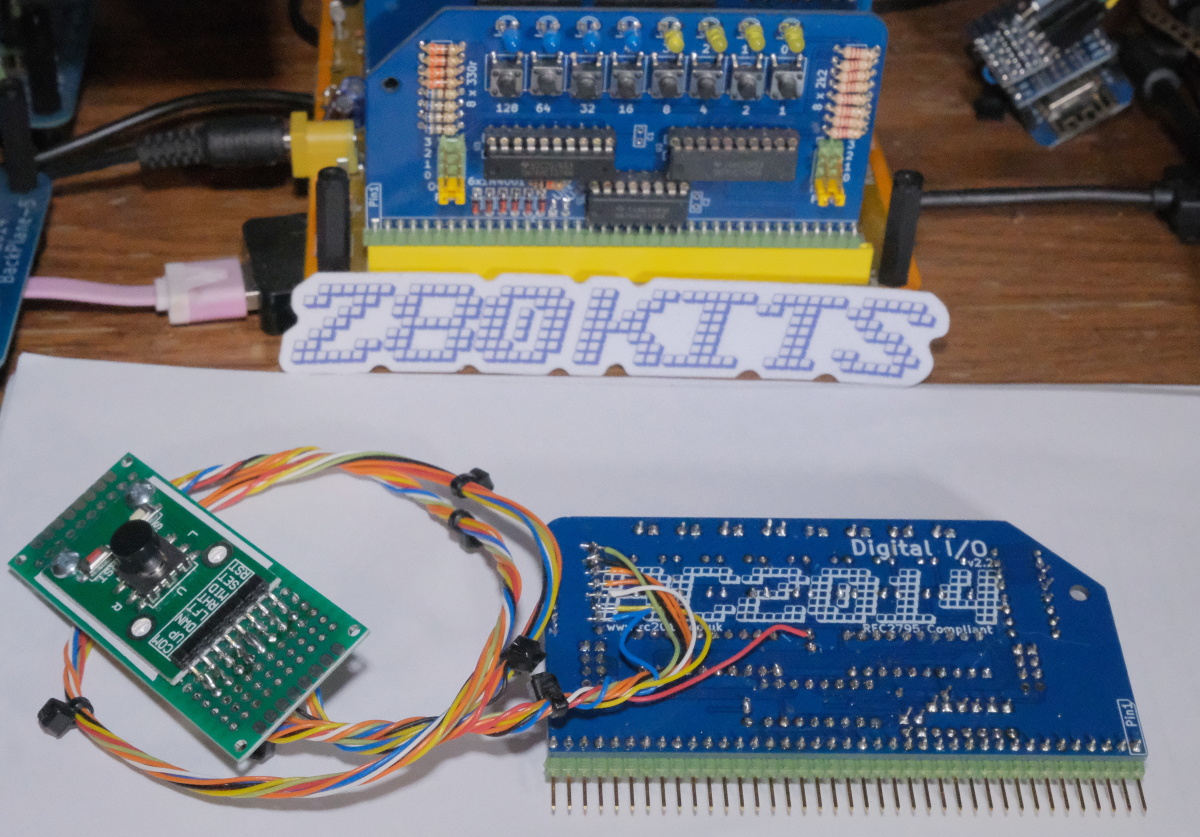
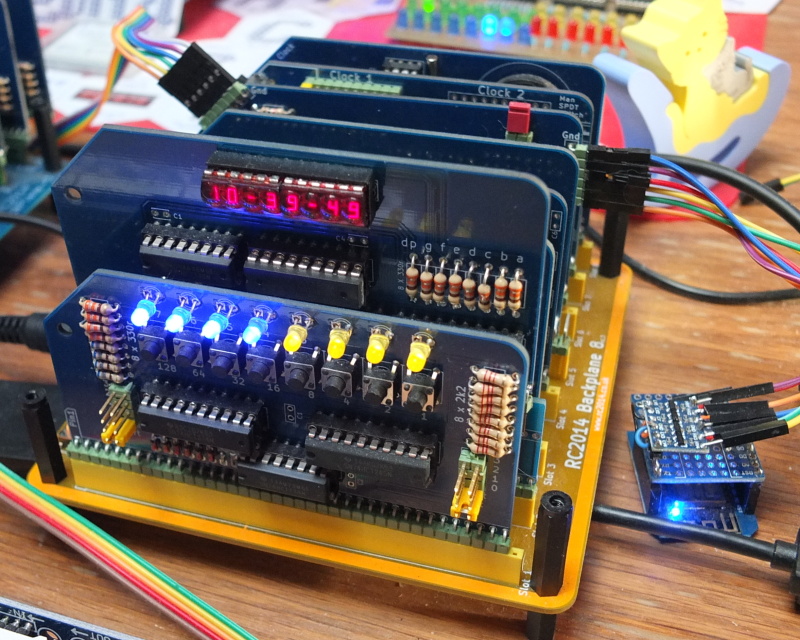
There is 'must have' module: Digital I/O
board, that contains 8 buttons and 8 LED's. It's perfect for learning basic I/O operations.
Z80 PIO, Z80 CTC
I have four
SC103
Z80 PIO modules and one
SC102
with
Z80 CTC from
Small Computer Central.
| Z80 PIO, Z80 CTC modules | |||
|---|---|---|---|
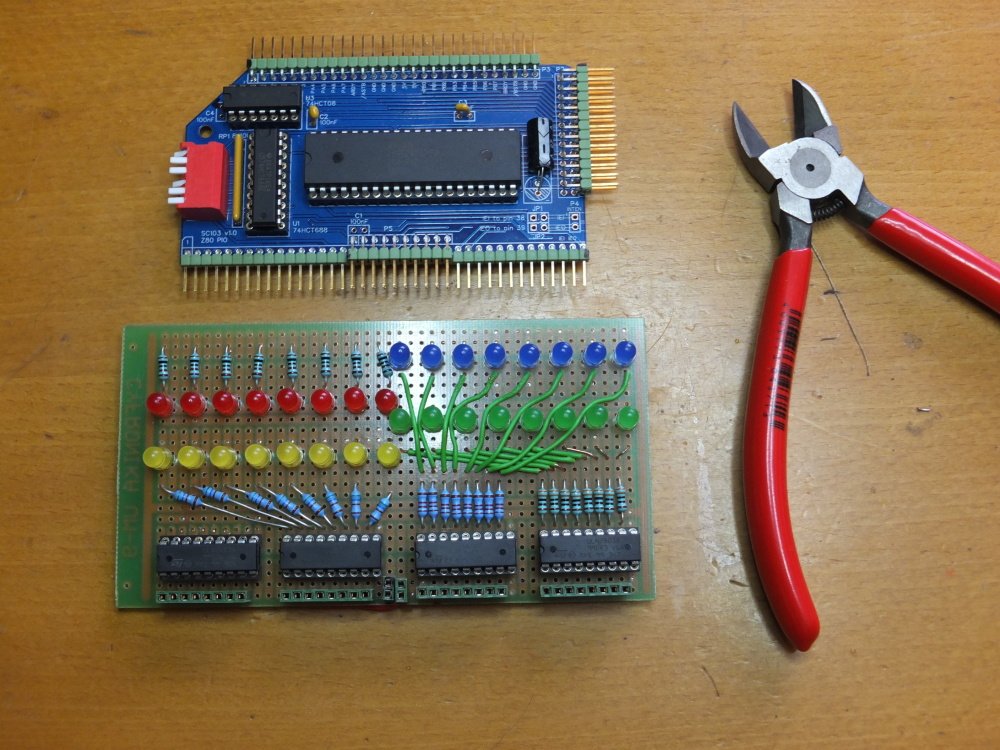
Z80 PIO and 32 LED's |
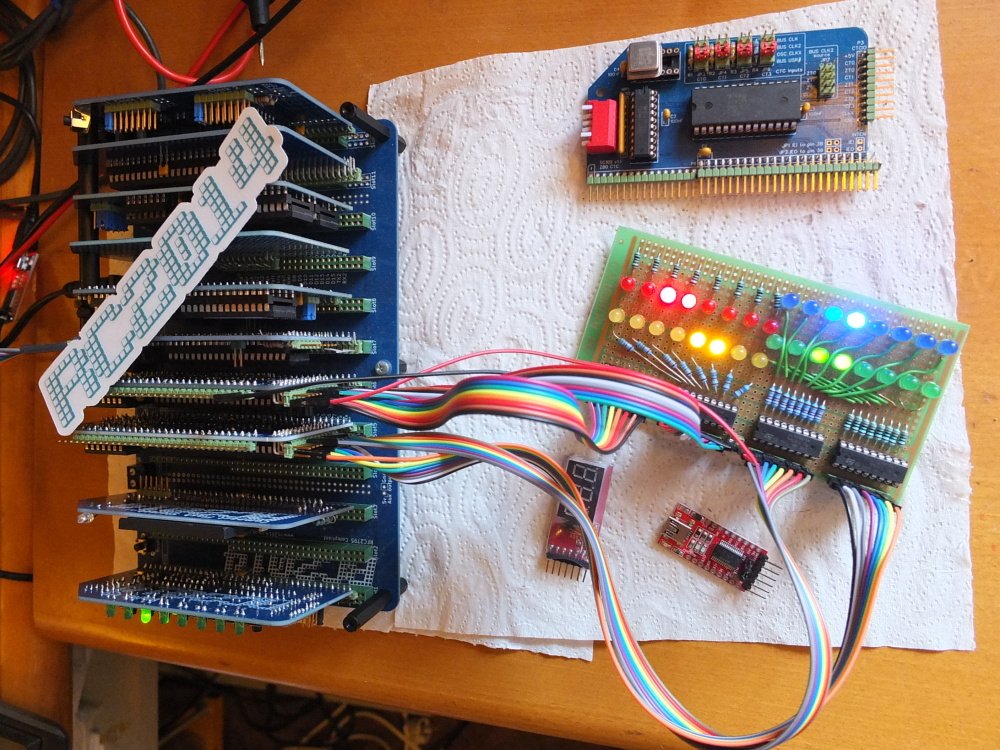
Two PIO's driving 32 LED's |
IEO connecting to bus |
Int. daisy-chain with official SIO/2 module |
PIO's are connected to LED's using ULN2803A Darlingtons. It's perfect for learning
how shift and rotation instructions works.
I wrote the program
that periodically fires interrupts from Z80 CTC.
This program fires two independent interrupt routines - from channels #0 🡺 #1 and #2 🡺 #3.
Those routines use
RRC
/
RLC
/
RR
/
RL
instructions to make
rotation effects.
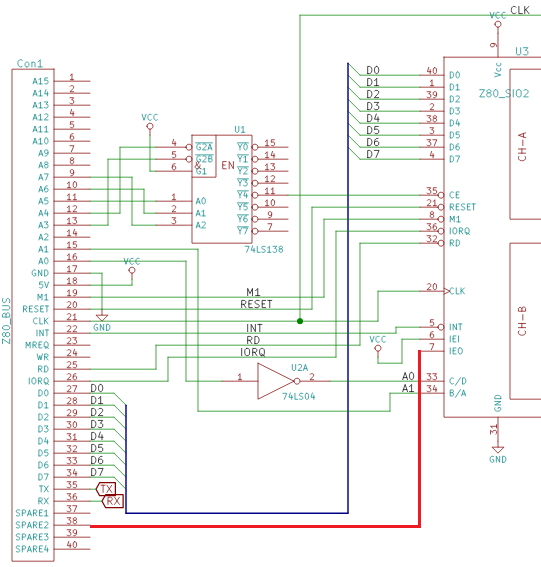
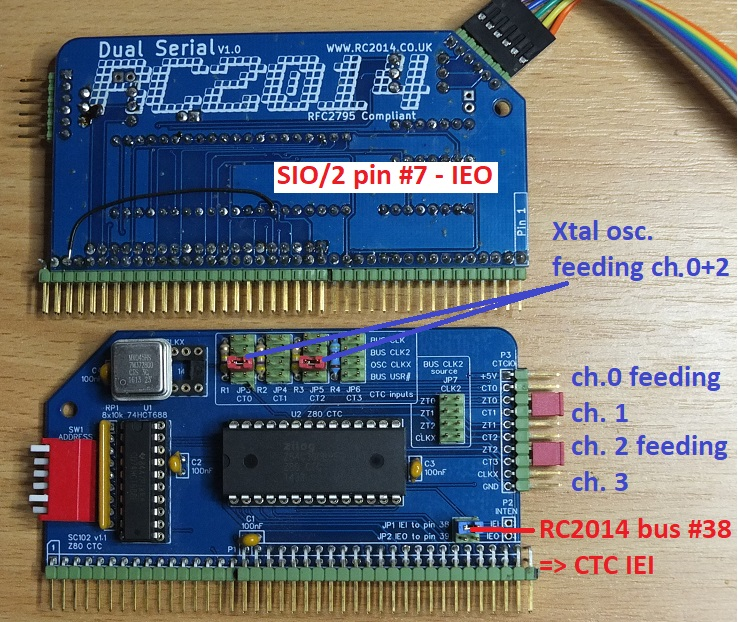
For correct function is necessary to connect IEO signal (pin #7) on SIO/2 module
to bus pin #38 and put jumper on CTC board that
connect this line to IEI pin on CTC.
This establishes Interrupt Daisy-Chain (page #9).
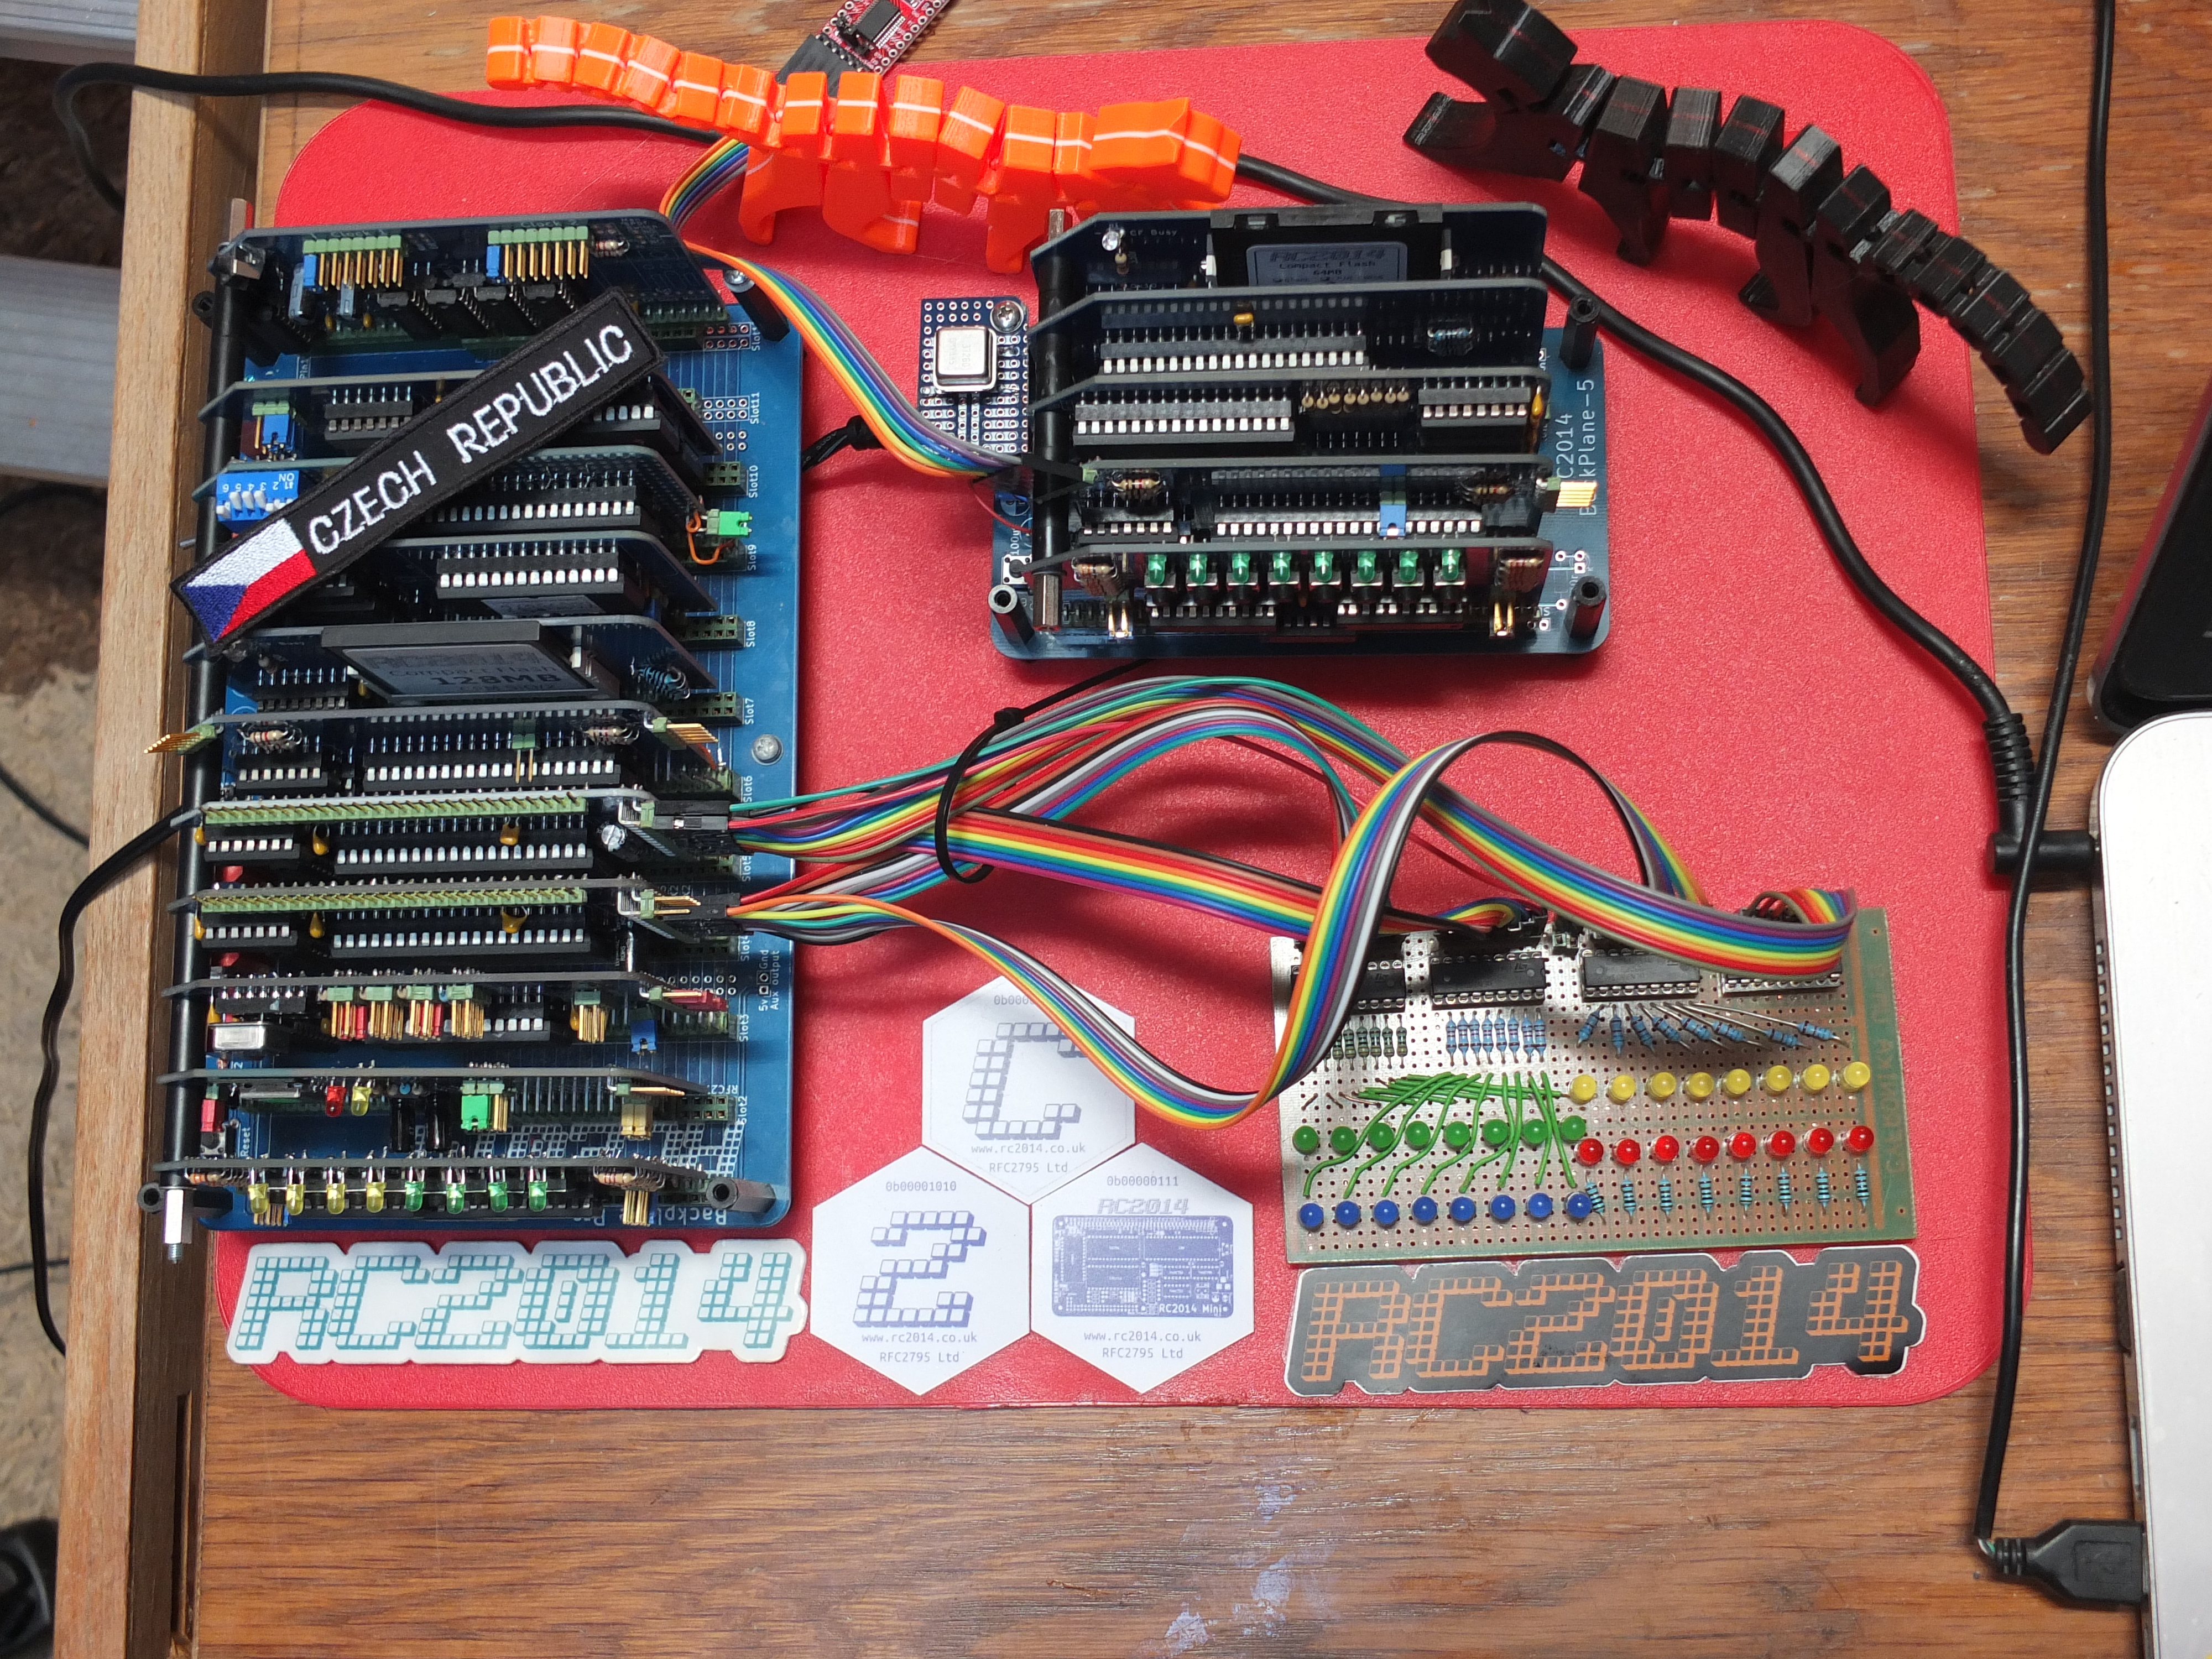
Z80 SIO/2
I moved official SIO/2 module to another computer and built
SC104
Z80 SIO module.

Channel B is routed to enhanced bus (green and yellow jumpers) and is used by WiFi module. IEO is routed to bus #38 using wire jumper and used by CTC IEI.
WiFi module
Another interesting toy is WiFi module.
It's connected to channel B of SIO/2 module through enhanced bus. It allows connect to second channel remotely using Telnet session.
| WiFi module | ||
|---|---|---|
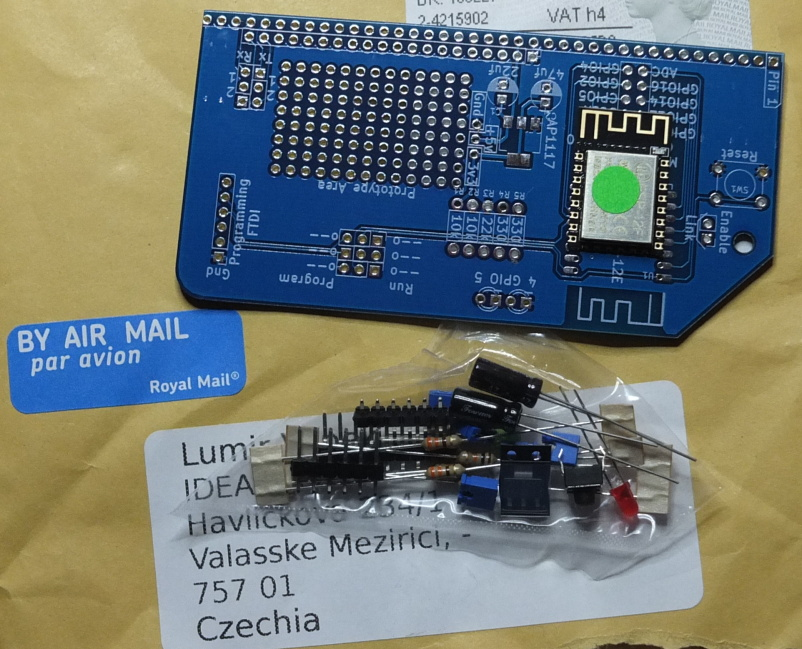
Delivery |
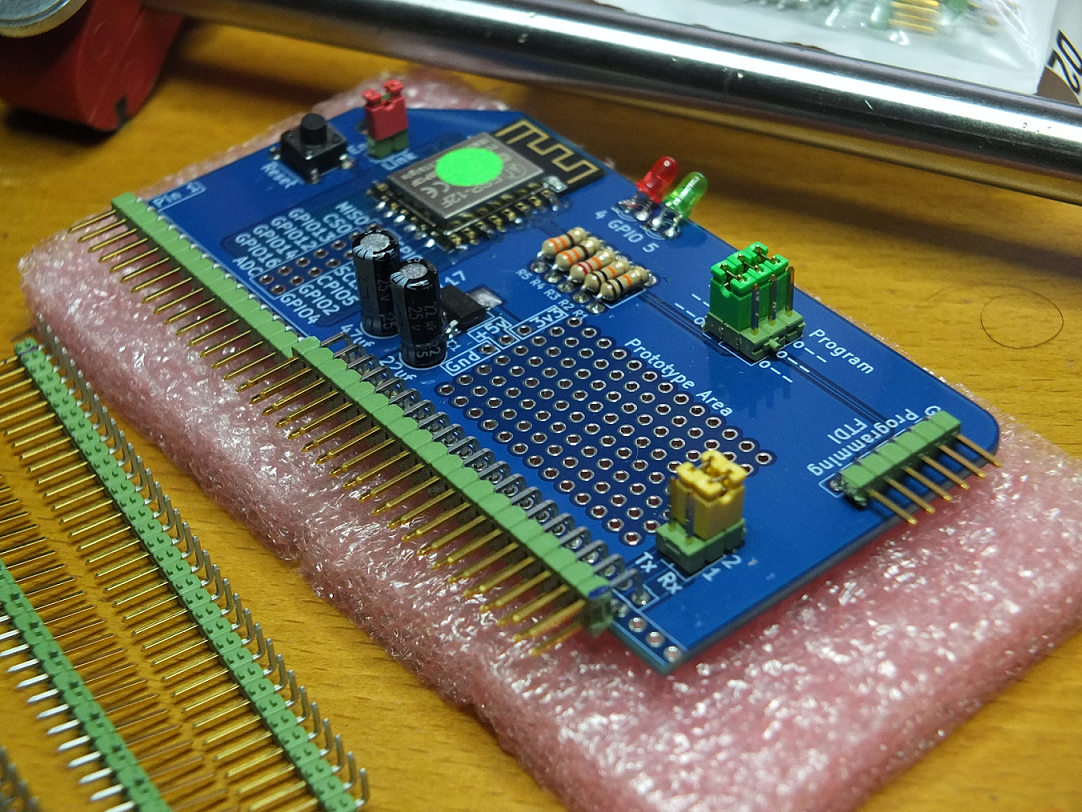
Building |
Final module |
ASM source |
Java source |
Running |
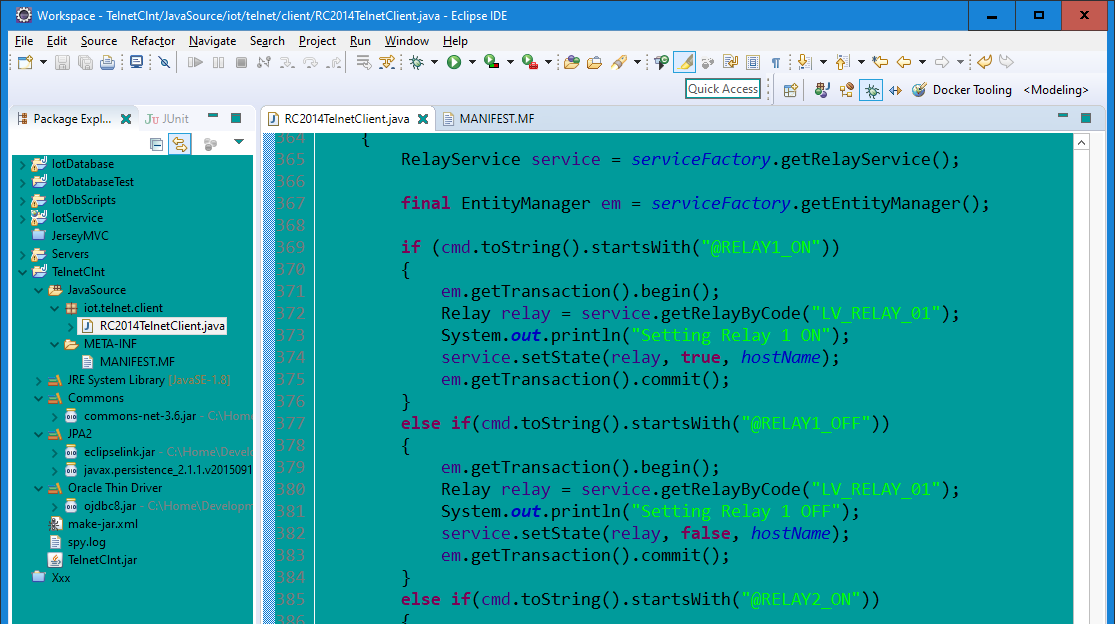
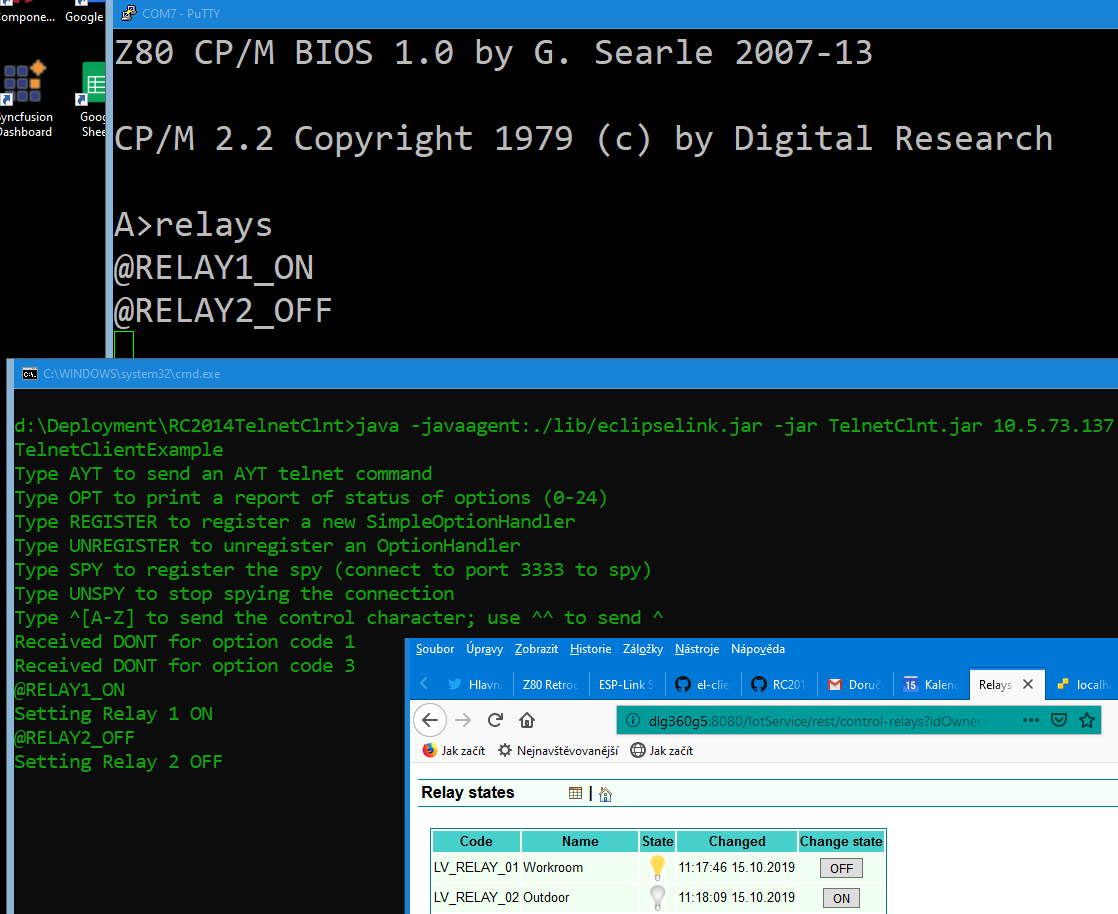
This video
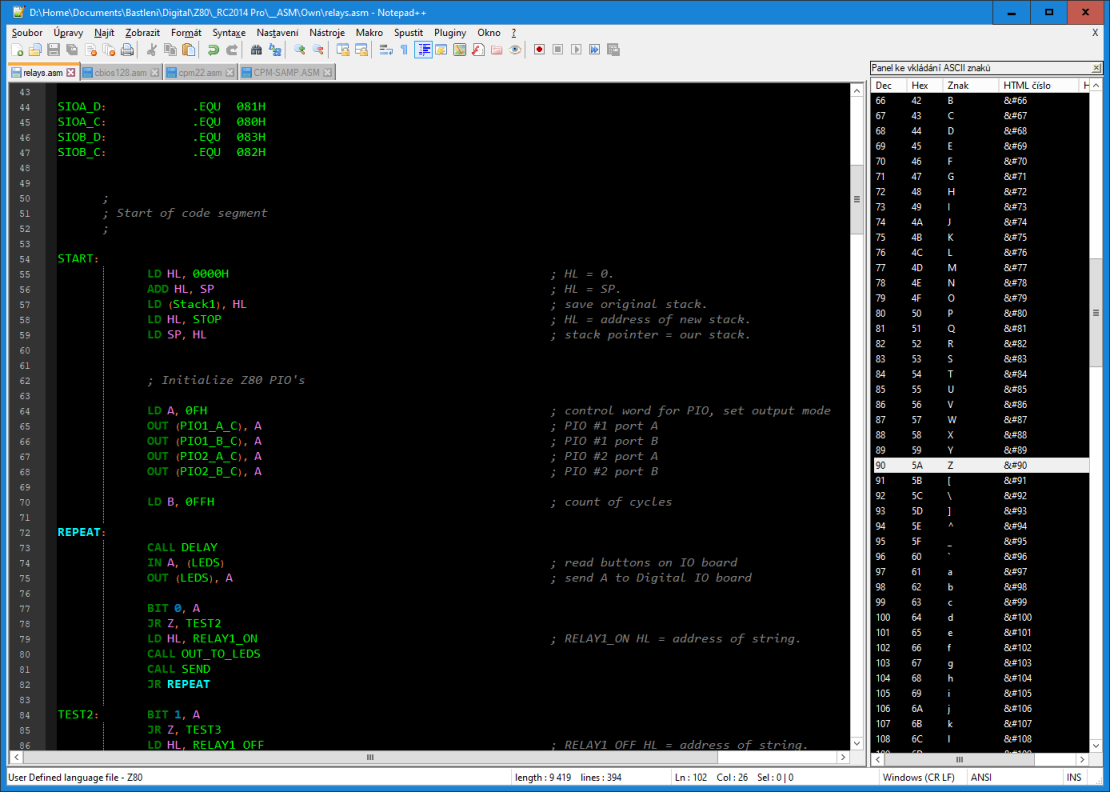
shows controlling two power relays over WiFi using JAVA Telnet client. Here is my program that's testing buttons on I/O board and sends commands to SIO channel B, which is connected to WiFi module. On another PC is running Java telnet
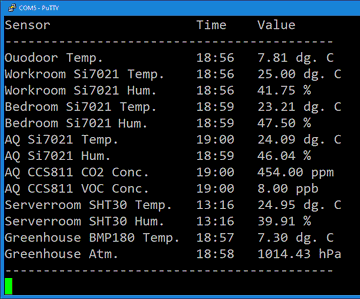
client, that's receiving those commands and switching ON/OFF my two power relays in my IOT solution. Also is possible read IOT sensors values and display it back on RC2014 console.
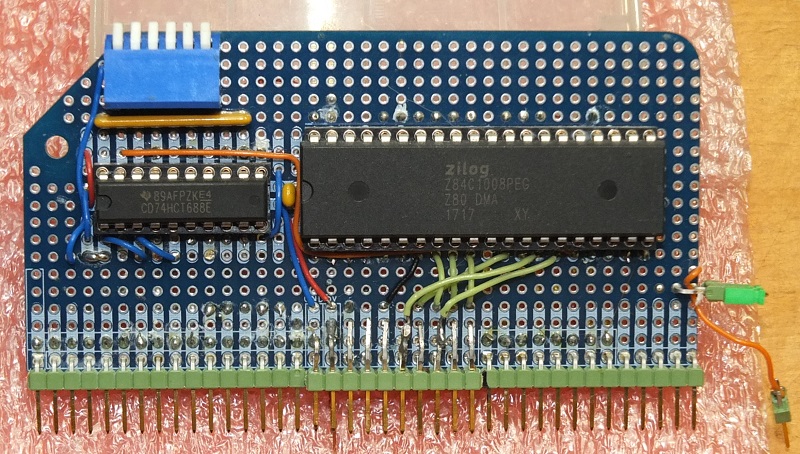
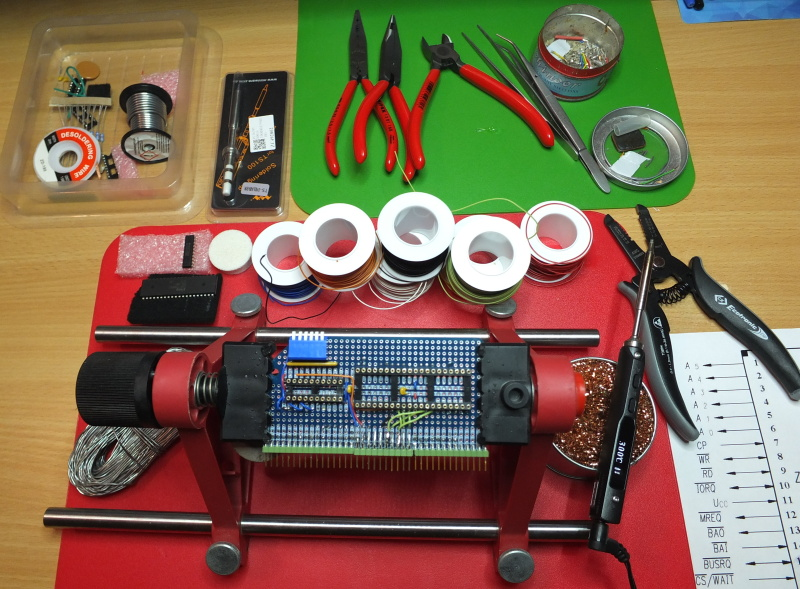
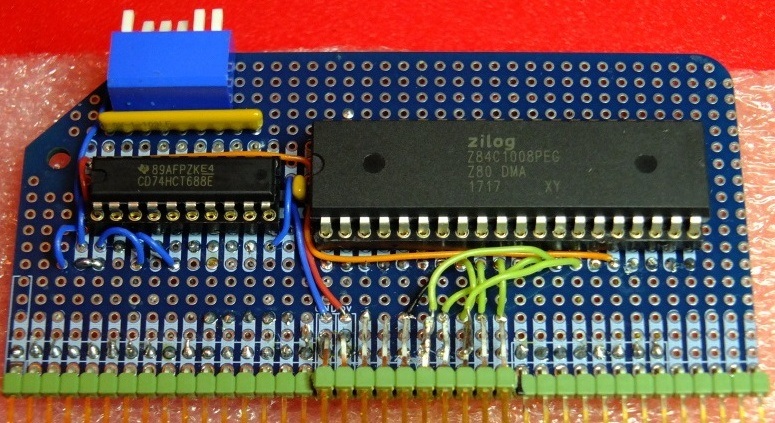
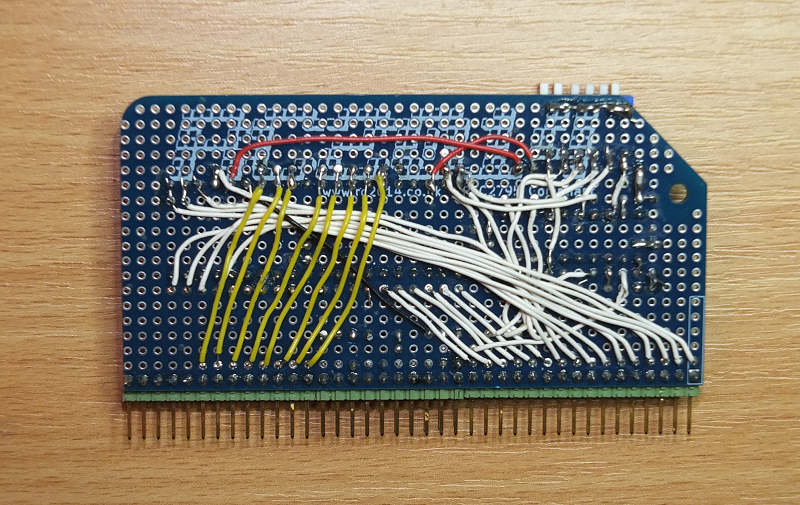
Z80 DMA
I built Z80 DMA module on
Prototype PCB.
| Z80 DMA module | ||
|---|---|---|
|
|
|
|
|
|
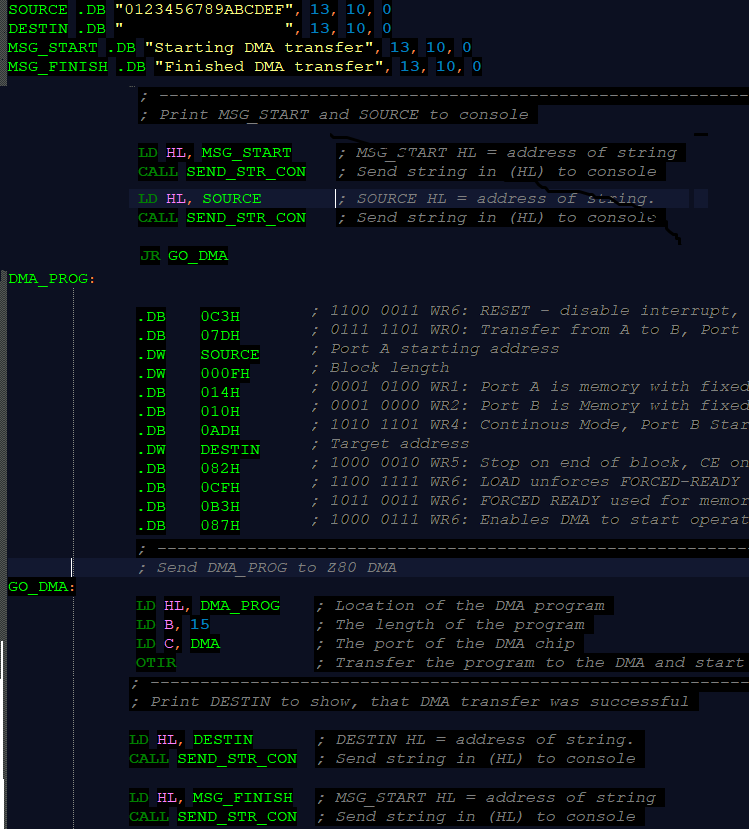
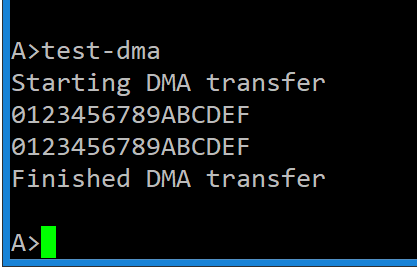
For testing DMA I wrote program that sends programming sequence to
Write Registers and starts memory-to-memory transfer.
I have also tested memory-to-I/O transfer by sending ASCII arts from
DMA 🡺 SIO/2 🡺 WiFi modules to remote telnet session.
Video here.
For memory-to-I/O transfer, SIO/2 W/!RDYB output #30 must be connected to DMA input RDY #25. I use RC2014 #40 bus line
for it.
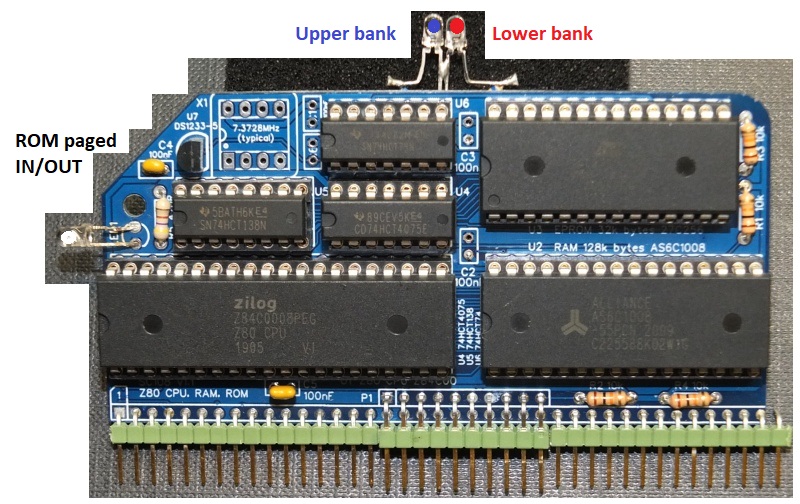
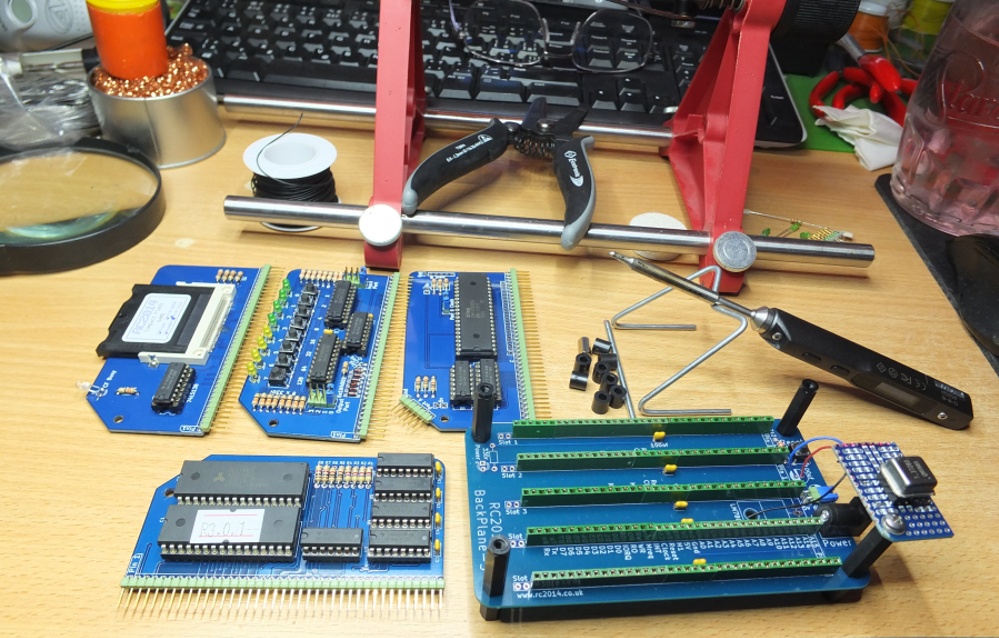
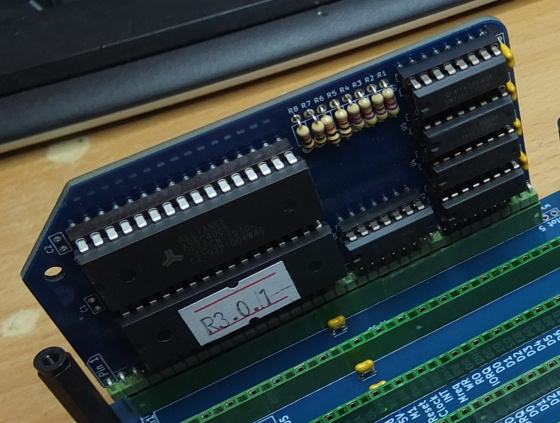
SC108 – Z80 CPU, ROM and RAM module
When I used up all the BackPlane Pro slots, I decided to buy
SC108
module. I removed original CPU, ROM and RAM modules and gained two free slots.
ROM on this board contains Small Computer Monitor which is able to load CP/M from standard RC2014
Compact Flash module. Then ROM is paged out and 64kB RAM is used. BTW this module has 128kB RAM, but second 64kB bank not easy to use.
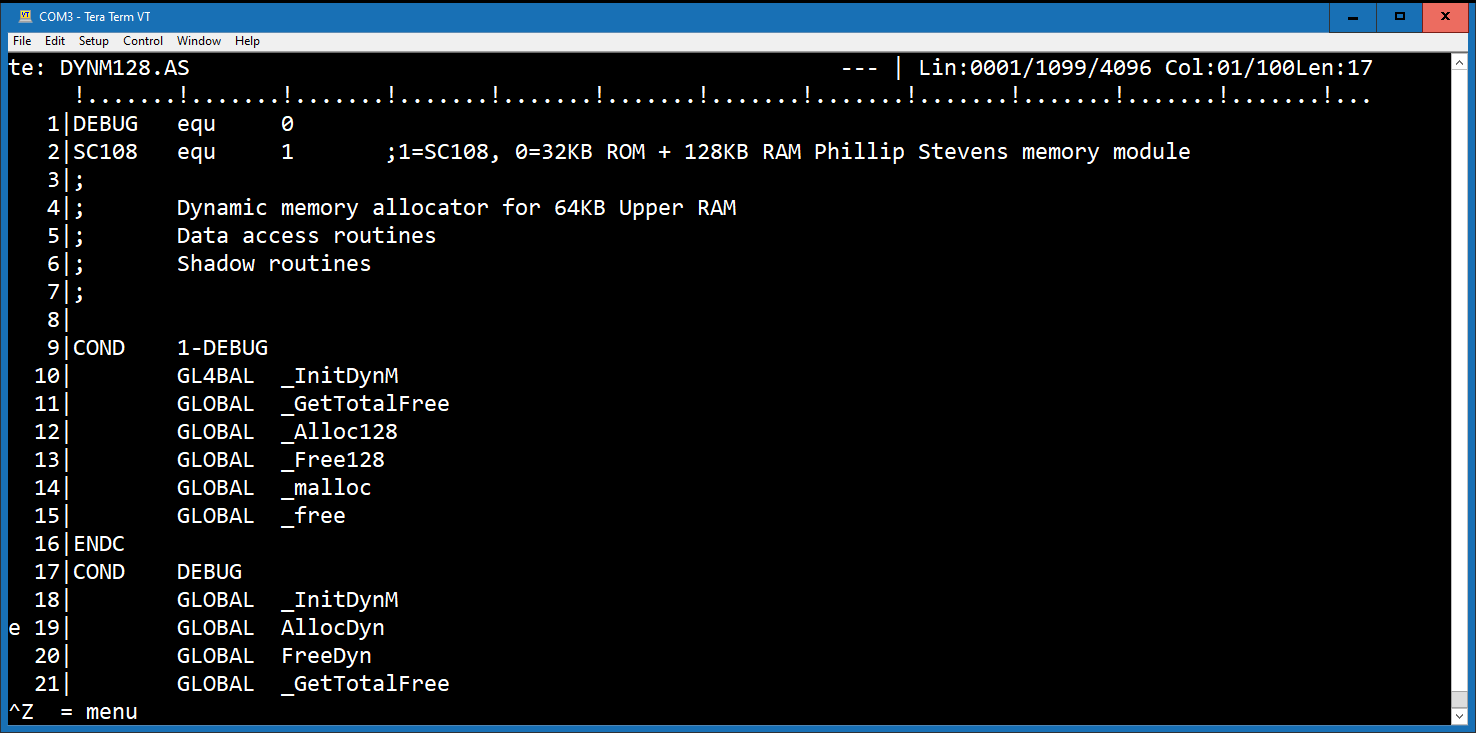
Only one software that I know to do it is
te editor and
HiTech C compiler enhancements
modified by Ladislau Szilagyi. It requires
modified CP/M.
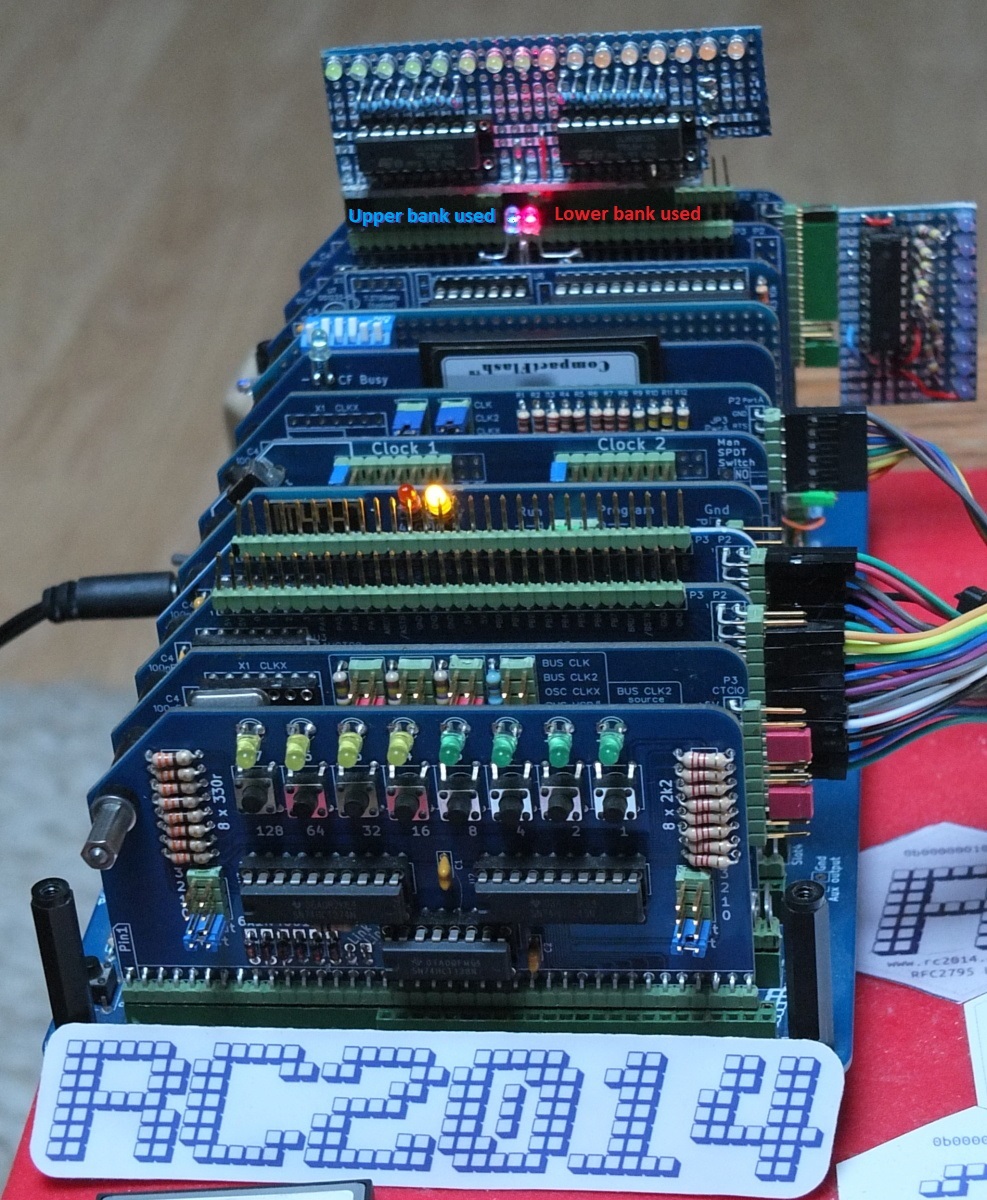
There is 74HCT74 dual flip-flop on this board (on 0x38H). First half is used to page IN/OUT ROM.
Second one is used for switching between RAM banks.
I have added two LEDs on unused output #8, so I can see
which bank is selected.
Running CP/M 2.2
I use
PuTTY
for connecting to CP/M terminal. On images you can see session setting.
| PuTTY Terminal | |||||
|---|---|---|---|---|---|
Finished computer |

Keyboard setting |
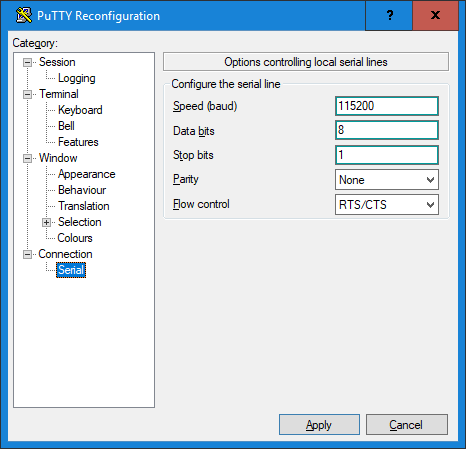
Serial setting |
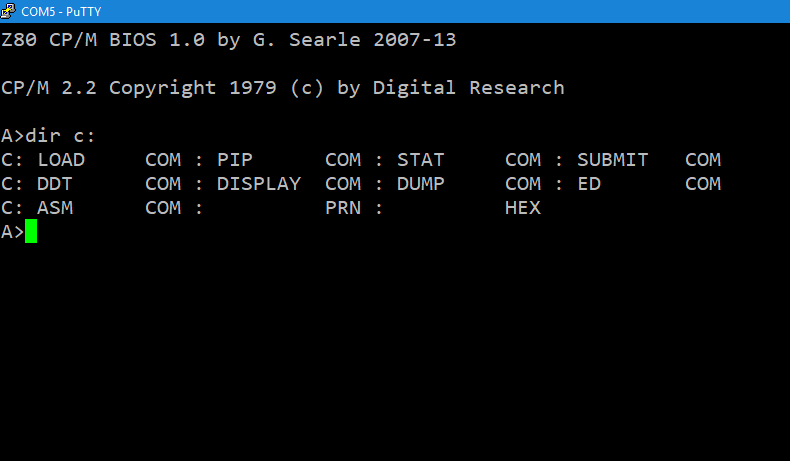
CP/M 2.2 |
||
MBASIC
On this archive
is possible to download Microsoft BASIC Interpreter v5.21 for CP/M.
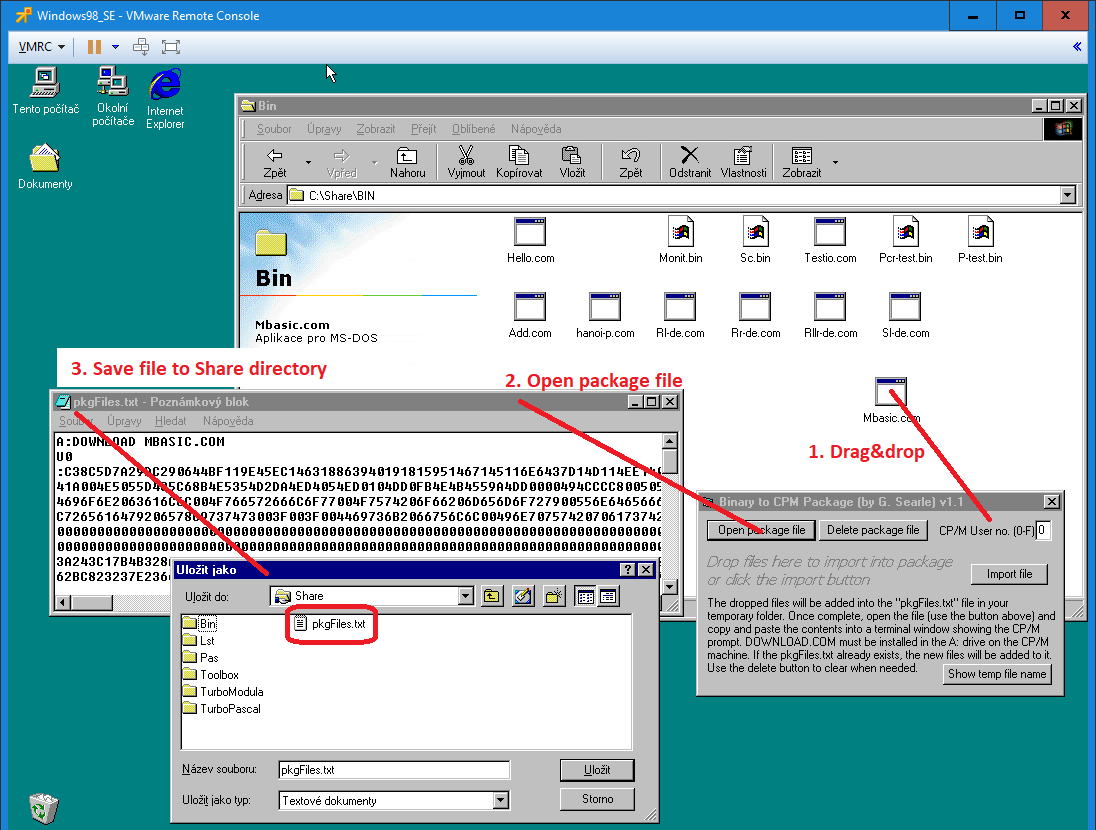
To load any COM file is necessary use Binary to CP/M Package.
It converts MBASIC.COM file to text and then it's possible to paste it to PuTTY terminal
(by mouse Right-click over window)
and store file to CP/M disc using download.com command.
| Installing and running MBASIC | |
|---|---|
Installing MBASIC |
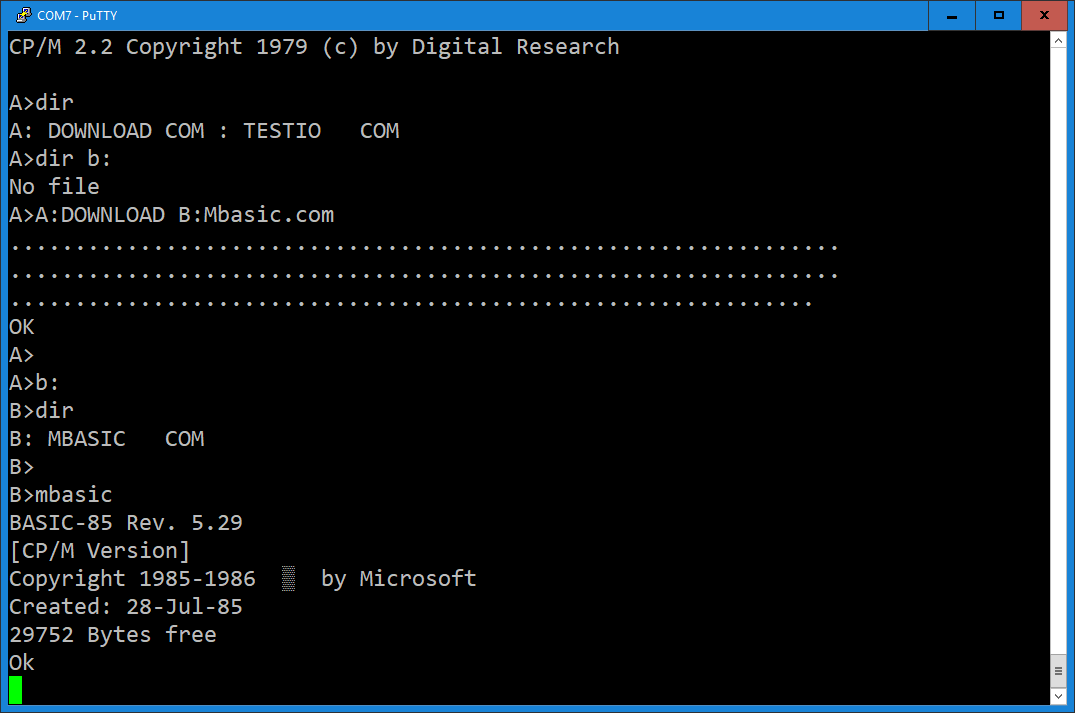
Running MBASIC |
Developing software in assembler
For developing software for RC2014 I use different ways - I've tried four assemblers:
-
CP/M Assembler
reads i8080 assembly-language
source
files from the disk and produces 8080 machine language in Intel hex format.
-
TASM
is assembler, that is able to compile code for many 8bit processors. It works on Windows environment.
-
ZAS - HI-TECH SOFTWARE Z80 Macro Assembler that's part of
HI-TECH C 3.09.
It works on CP/M or Emulator on Windows environment.
-
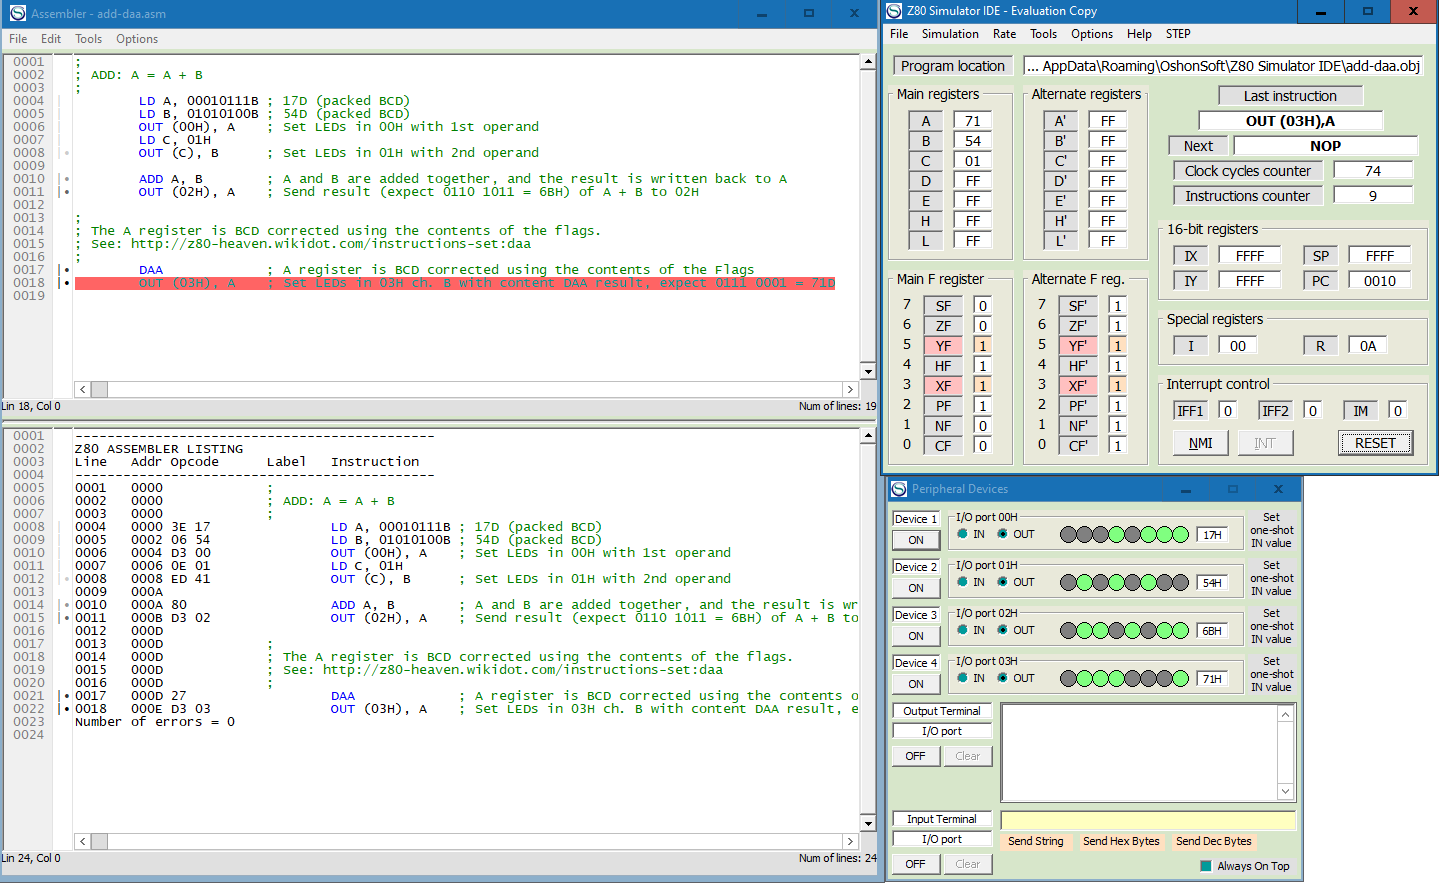
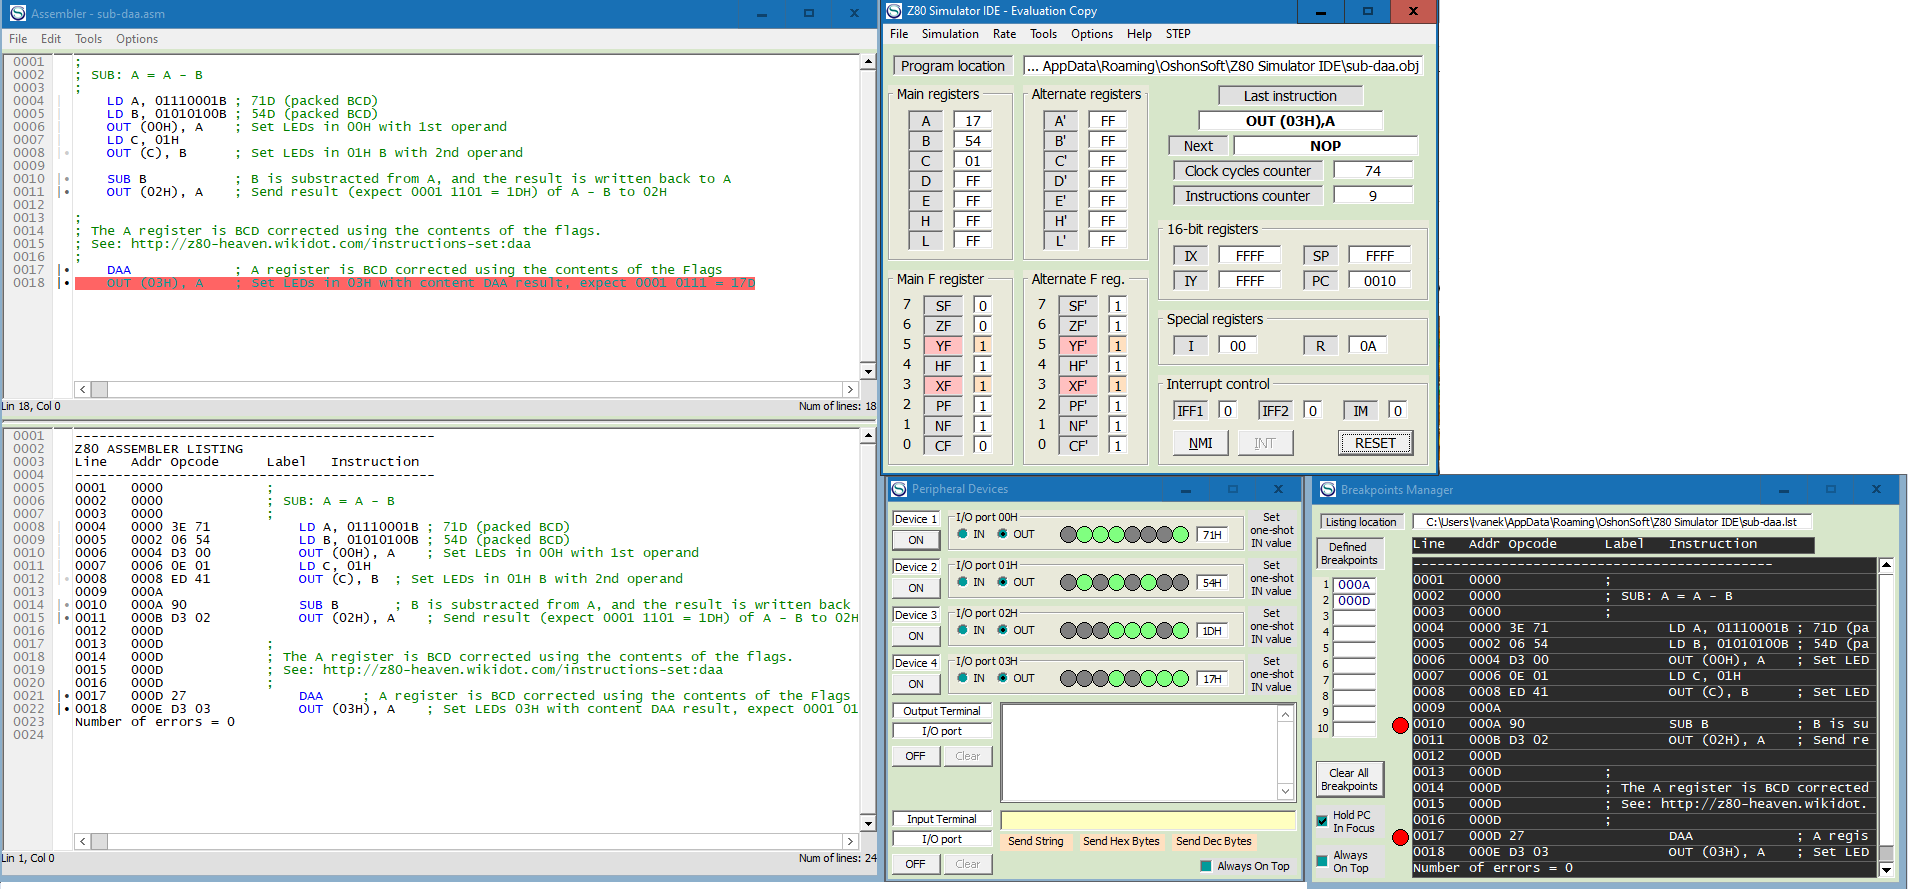
Z80 Simulator IDE
Editing ASM, AS and C sources
For editing sources I use
Notepad++
on PC or ZDE 1.6 editor
on CP/M.
Another good editor is te.
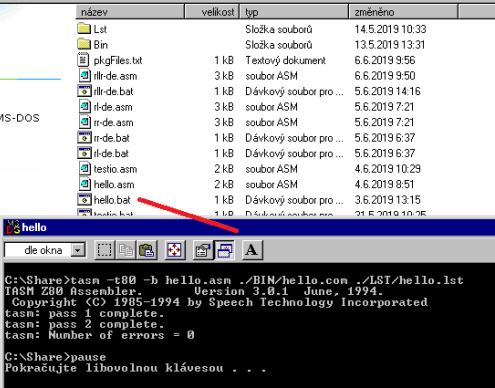
TASM Development environment
In source directory I have following files:
Tasm.exe+Tasm80.tab- assembler filesFilePackage.exe+msbvm60.dll+Comdlg32.ocx- converter from binary to text- *.asm files - assembler sources
- *.bat - scripts for compiling
- BIN directory, where compiled binaries are stored
- LST directory - listing outputs
Compiling: I run script like this:
tasm -t80 -b hello.asm ./BIN/hello.com ./LST/hello.lst.
If everything is OK, I can see result and compiled file is in BIN directory:
ZAS Development environment
- On RC2014 I have HI-TECH C Compiler 3.09 for CP/M installed on drive
I:and*.ASsources on driveH:. So I can run commands like:I:ZAS -L -W120 H:test-asm.asandI:LINK -Z -C100H -Otest-asm.com test-asm.OBJto buildH:test-asm.comand run
it.
- On PC I have HI-TECH C Compiler 3.09 for CP/M with emulator somewhere.
So I can run:
cpm_orig ZAS -L -W180 test-asm.asandcpm_orig LINK -Z -Pbss -C100H -Otest-asm.com test-asm.OBJto build it and then runcpm_orig test-asm. Note that emulator don't supportIN/OUTinstructions.
Transfering files from PC to RC2014
To store binary files (*.COM created by TASM or ZAS on emulator) to RC2014 using terminal, it needs convert
it to text like this:
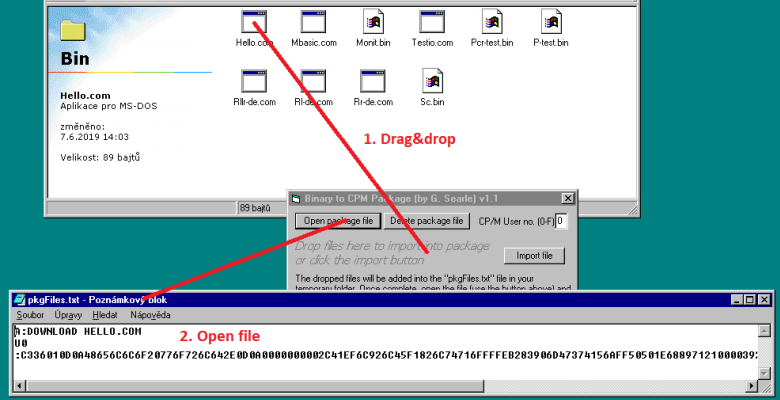
Open packaged file. You can see, that text contains three parts:
- Invoking
A:DOWNLOAD.COMprogram, parameter is filename to store,HELLO.COMin this case - User identity, don't care about it
- Hexadecimal code of stored binary file and CRC
I usually modify first line like A:DOWNLOAD.COM X:filename.ext (where X: is a target drive),
copy file to clipboard (^A ^C) and then make right mouse click on PuTTY terminal.
DOWNLOAD.COM get file content from terminal and stores it to destination disc. It's work like a charm.
Z80 Simulator IDE
Z80 Simulator IDE
is not directly related to RC2014, but it's useful software to learn Z80 assembler in Windows environment.
It contains emulator, assembler, disassembler and debugger for the Zilog Z80 CPU, BASIC compiler and many more features.
| Z80 Simulator IDE | |
|---|---|
|
|
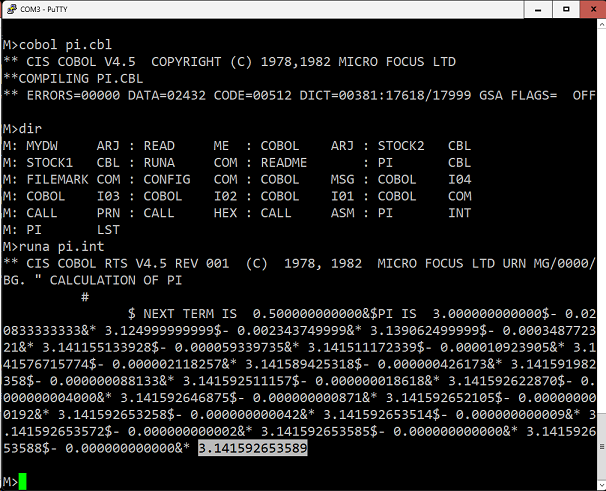
HI-TECH C Compiler 3.09 for CP/M
On this page
is info about C compiler for CP/M.
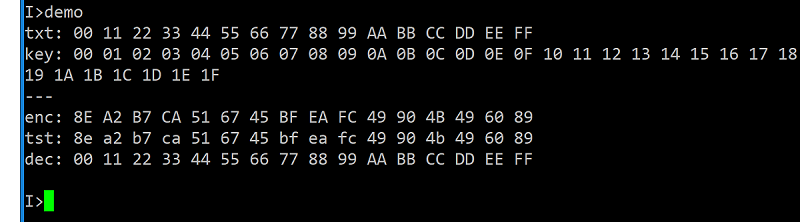
Building and running AES-256 demo
In subdirectory examples/aes256 there is very interesting demo. I compiled it by following command:
I:c -V H:demo.c H:aes256.c
And here is screenshot that shows torturing Z80 CPU with this demanding computation:
- I have installed C compiler on disc
I:and sources onH:so building command is e.g.:I:c -V H:hello.c. - If you compile a program which uses floating point arithmetic (i.e. real numbers) you MUST specify to the compiler that the
floating point library should be searched. This is done with a
–LFoption at the END of the command line, e.g.:I:c -V H:quadr-eq.c -LF. - For editing C sources I use ZDE 1.6 editor.
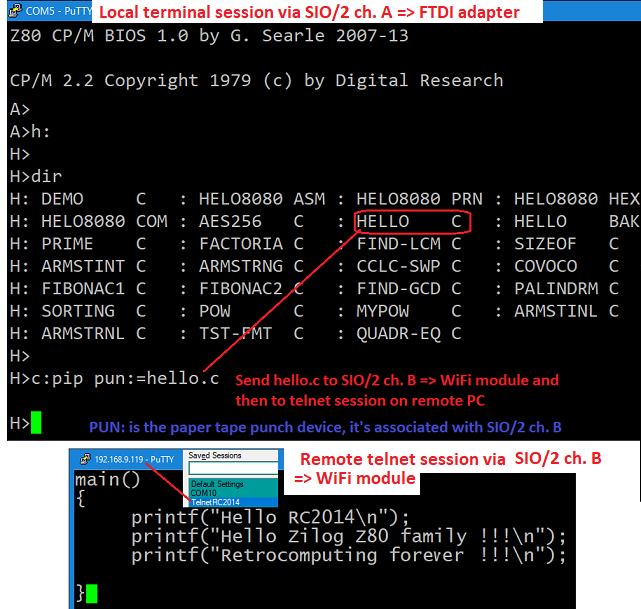
- If I need send source file to PC, I run PuTTY on it and connect via telnet to
WiFi module
(that's connected to SIO/2 module channel B)
and use
PIPcommand like this:C:PIP PUN:=H:filename.c. Source appears in PuTTY and it's possible to select it and press^Cto copy it to clipboard.
HI-TECH C Compiler 3.09 with emulator
On this GIT repository
is HI-TECH-C-V3.09 with CP/M emulator. So it's easy to compile C sources on PC and then run COM's
on emulator. As usually I use
Windows packager
by Grant Searle to move COM's to my RC2014.
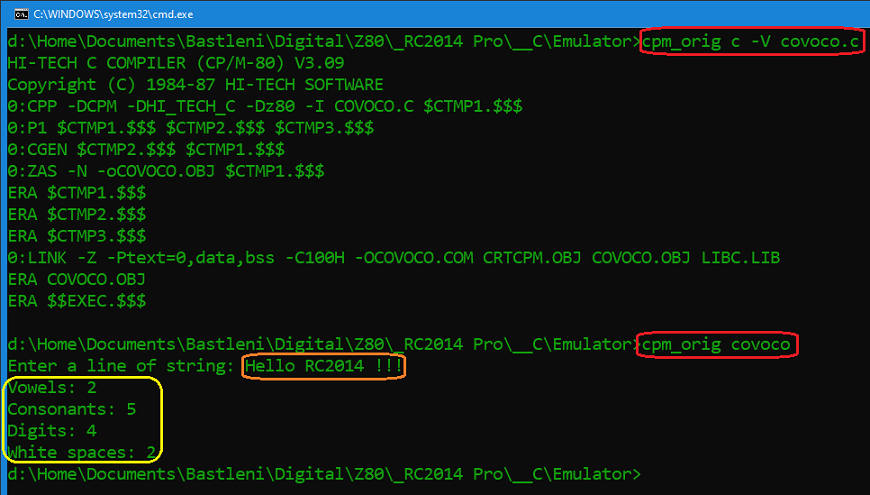
Using inline assembler in C sources
I have simple C source that mix assembler code using #asm and #endasm
compiler directives.
It can be compiled on PC using emulator like cpm_orig c -V hello.c, but can't be run,
because there are OUT instructions - unsuported by emulator.
On native CP/M (like on RC2014) it can be compiled and it
runs
without problems: I:c -V H:hello.c.
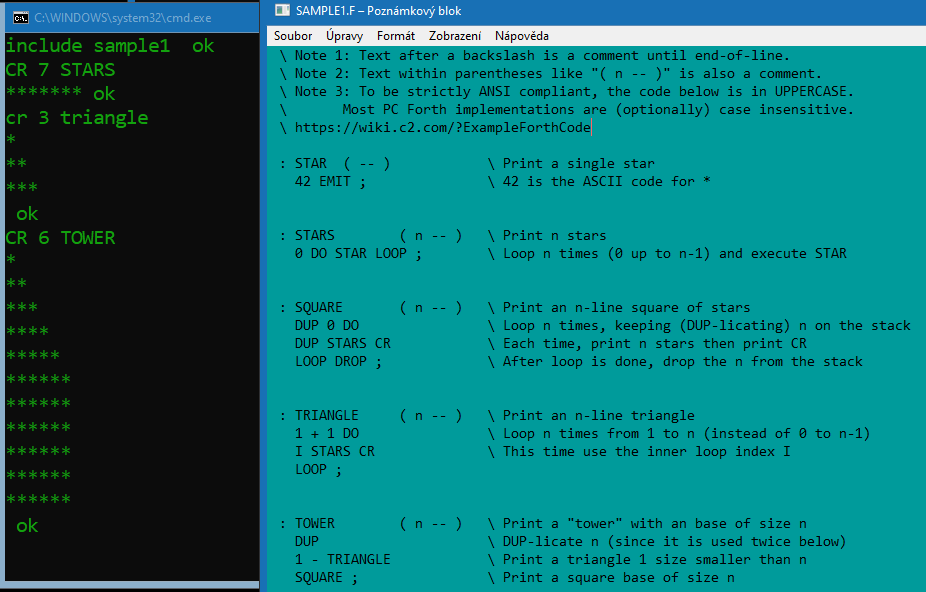
DX-Forth (with emulator)
Here
is DX-Forth 4.45. It's possible run it on RC2014 or on emulator by the same way as HI-TECH C.
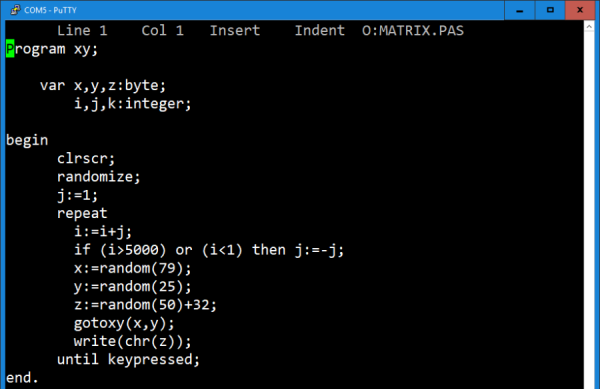
Borland Turbo Pascal
On this archive
is possible download
Borland Turbo Pascal 3.01a
for CP/M-80. Installation is same as MBASIC, I used FilePackage and modified text file to have pascal in drive P:.
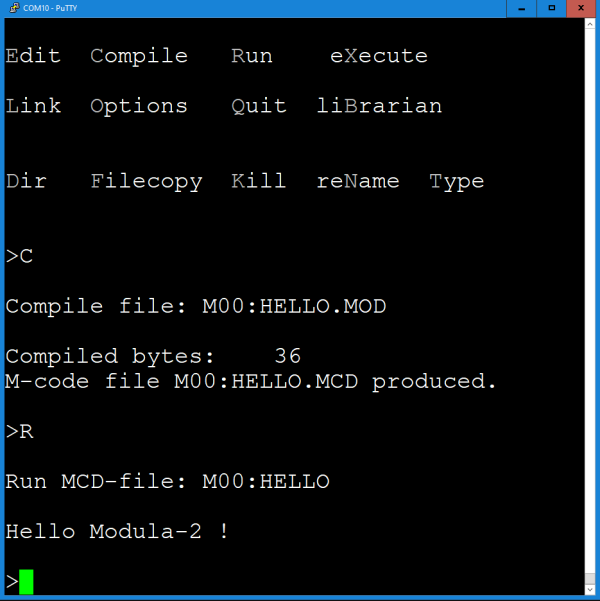
Borland Turbo Modula
On this archive
is possible download
Borland Turbo Modula-2
for CP/M-80. Installation is same as MBASIC, I used FilePackage and modified text file to have modula in drive M:.
Digital Research PL/I Compiler for CP/M-80
On this page is possible download
PL/I Compiler
for CP/M-80. PL/I
is a programming language oriented towards scientific and business programming.
Digital Research provided implementations for their CP/M operating system as well as MS-DOS.
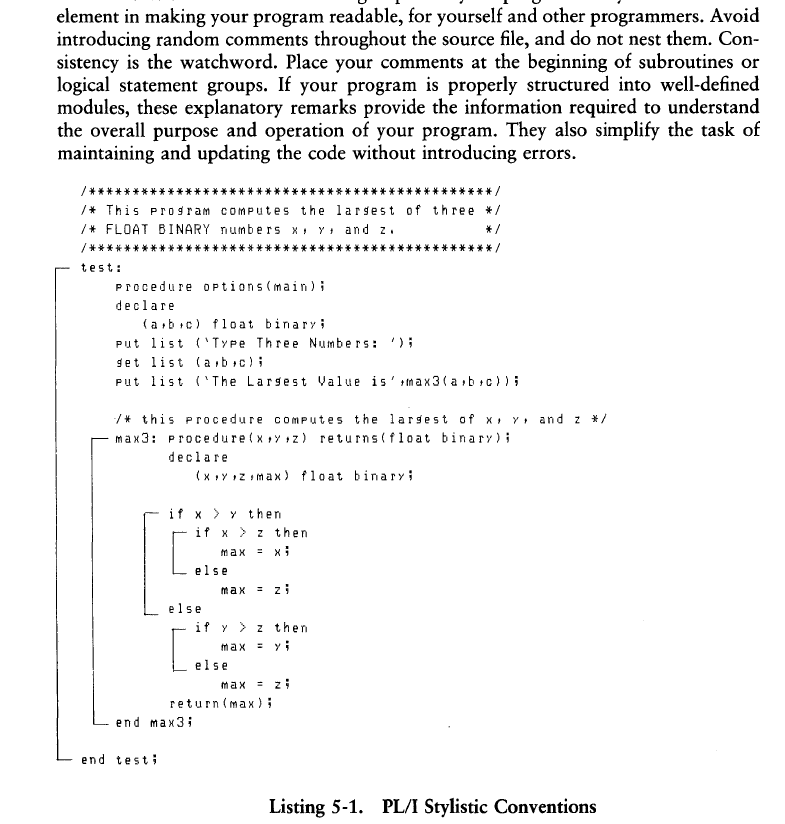
This PL/I program computes the largest of three numbers:
/**********************************************/
/* This program computes the largest of three */
/* FLOAT BINARY numbers x, y, and z.          */
/**********************************************/

test:
	procedure options(main);
	declare
		(a,b,c) float binary;

	put list ('Type Three Numbers:');
	get list (a,b,c);
	put list ('The Largest Value is',max3(a,b,c));

/* this procedure computes the largest of x, y, and z */
max3: procedure(x,y,z) returns(float binary);

	declare
		(x,y,z,max) float binary;

	if x > y then
		if x > z then
			max = x;
		else
			max = z;
	else
		if y > z then
			max = y;
		else
			max = z;
	return(max);
end max3;

end test;
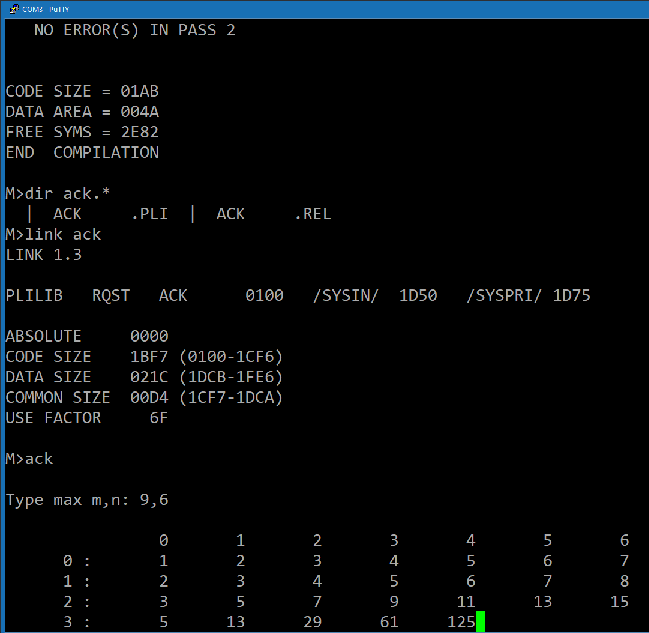
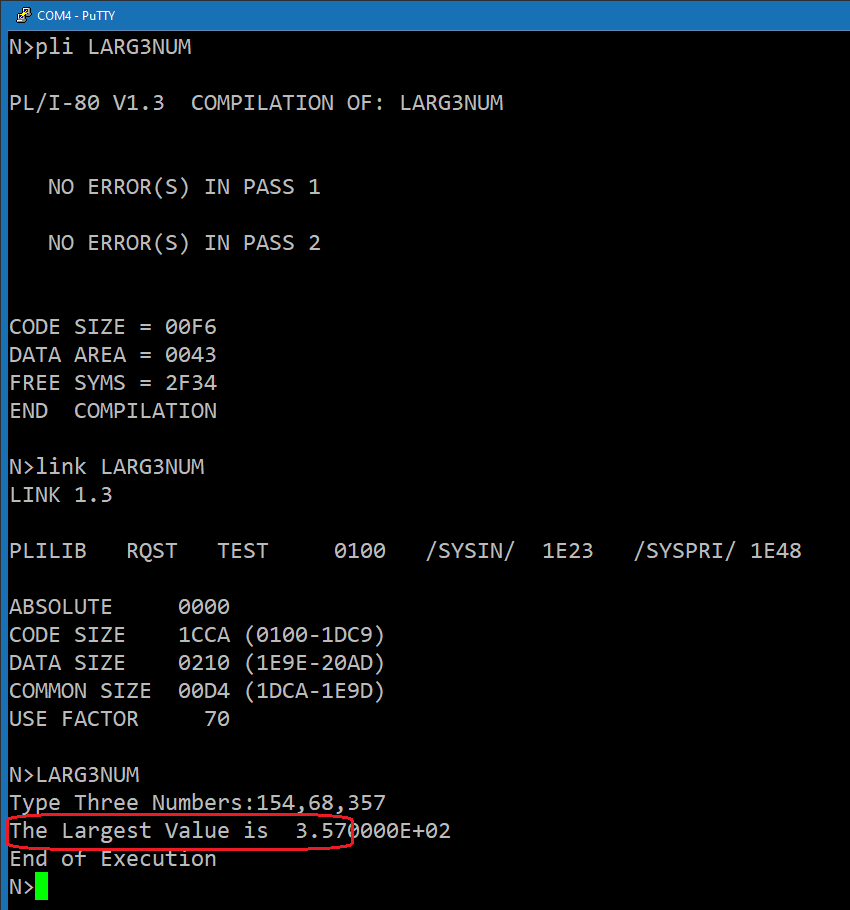
To build LARG3NUM.PLI use following approach:
- Compiling:
pli LARG3NUM - Linking:
link LARG3NUM - Then run it:
LARG3NUM
| Building and running PL/I sample | ||
|---|---|---|
|
|
|
I you are familiar with C language, good start point to learn PL/I is
this page.
MicroPro office software
Company MicroPro
created
office package
with text editor
WordStar
, spreadsheet CalcStar and another applications:
DataStar, ReportStar, InfoStar, SuperSort etc.
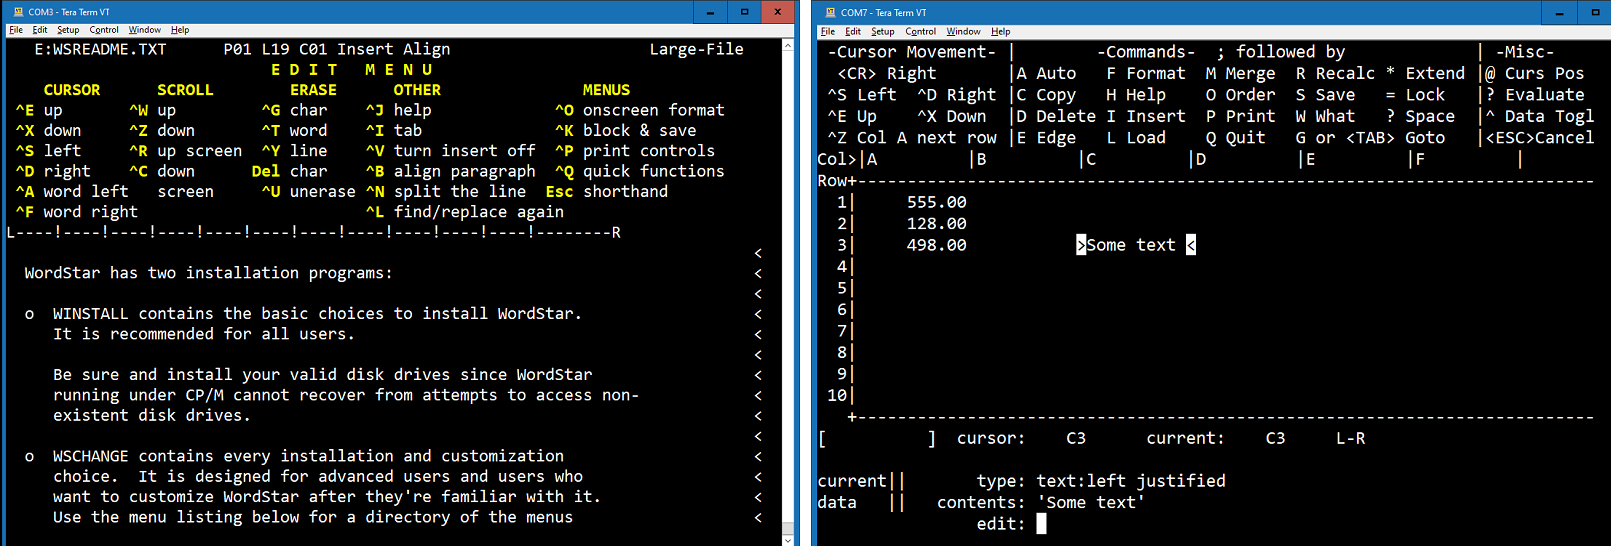
When running with TerraTerm WordStar 4.0 have nice highlighted menu. Unfortunately CalcStar 1.45 not have it.
Games
On this page
is possible to download games for CP/M.
For CatChum (like "Pac-Man") it's necessary to slow down CPU speed to not be eaten in one second.

RTM/Z80 - Retro Tiny Multitasking system for Z80
On this page
is announced RTM/Z80 - a multitasking kernel, built for Z80. Here I have collected some notes about getting it
to work.
Z80-SIM
For build RTM/Z80 is necessary to install
Z80-SIM.
Preparing Z80-SIM on Linux (Debian 10.4 in my case): Download z80pack-1.37.tgz and
extract in your home directory. Follow instructions on chapter "Quickstart to run the Digital Research OS's".
I doing this as root. Then:
cd z80pack-1.37/cpmsim/
In cpmsim directory:
ln disks/library/hd-tools.dsk disks/drivei.cpm
cpmls -f z80pack-hd disks/drivei.cpm
mkdskimg i
mkdskimg j
./cpm2
Note: Make cpm2 eXecutable before to try run it. If everything is OK, Z80-SIM is started and you can see CP/M console.
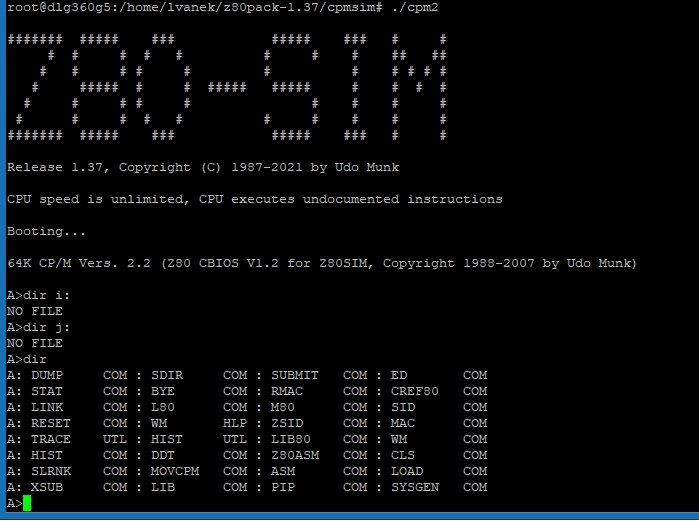
On CP/M shell explore drives:
A>dir
A>dir B
A>dir I
A>dir J
Use A:bye command to exit CP/M emulator.
Cpmtools 2.21
This package allows to access CP/M file systems and transer files between Linux filesystem and CP/M drives.
Download
cpmtools-2.21.tar.gz.
and extract it in your Linux home directory to cpmtools-2.21 and folllow instrunctions in INSTALL. I doing this as root.
Read
this
to understand, how it works. Linux CP/M tools manpages for commands important for as:
Note: CP/M emulator doesn't like, when disc content is changed outside.
So before using Cpmtools commands, use A:bye command to exit CP/M emulator
and after doing Cpmtools work, use ./cpm2 to run it again.
Building and running an RTM/Z80 application on CP/M
Follow instructions in chapter Building and running an RTM/Z80 application on CP/M in RTM-Z80 User manual.
I use drive J: for build things for CP/M emulated on Z80-SIM.
- Create directories
HTC309andRTM-Z80_CPMin[homedir]/z80pack-1.37/cpmsim - Copy HiTech C Compiler 3.0.9 to directory
[homedir]/z80pack-1.37/cpmsim/HTC309 - Copy
RTM-Z80-main/SOURCES + RESOURCES + DEMOto directory[homedir]/z80pack-1.37/cpmsim/RTM-Z80_CPM - Place
xsubat 1st. line ofmake.subandmakelib.sub. Check if you have inconfig.mac:
	DEBUG	equ 0	;1=debug mode ON: verify task SP, task TCB, dealloc, lists, etc.
	SIM	equ 1	;1=Runs under Z80SIM, 0=Runs on RC2014(SC108+SC110)
	DIG_IO	equ 0	;1=RC2014 Digital I/O module is used
	CMD	equ 0	;1=CON CMD task is included
	RSTS	equ 0	;1=use RST for list routines (not for SIM)
	WATSON	equ 0	;1=Watson is used (not for SIM)
	C_LANG	equ 1	;1=Support for C language API
	IO_COMM	equ 1	;1=Support for async communications I/O
	SC108	equ 0	;1=SC108 is used (32KB ROM, 128KB RAM)
	MM	equ 0	;1=Memory Module is used (32KB ROM, 128KB RAM)
	M512	equ 0	;1=512KB ROM & RAM module is used (512KB ROM, 512KB RAM)
	BDOS	equ 1	;1=BDOS disk file support
	LPT	equ 0	;1=Parallel Printer (Compatibility mode)
	DYNM512	equ 0	;1=Extended dynamic memory support for M512 (set-it to 0 if M512=0)
Then copy (On Linux) content of [homedir]/z80pack-1.37/cpmsim/RTM-Z80_CPM + HTC309 to CP/M drive J:
cpmrm -f z80pack-hd ./disks/drivej.dsk *.*

# Copy HiTech C compiler 3.0.9 to J:
cpmcp -f z80pack-hd ./disks/drivej.dsk HTC309/*.COM 0:
cpmcp -f z80pack-hd ./disks/drivej.dsk HTC309/*.OBJ 0:
cpmcp -f z80pack-hd ./disks/drivej.dsk HTC309/*.LIB 0:
cpmcp -t -f z80pack-hd ./disks/drivej.dsk HTC309/*.H 0:
cpmcp -t -f z80pack-hd ./disks/drivej.dsk HTC309/OPTIONS 0:

# Copy RTM-Z80 to J:
cpmcp -t -f z80pack-hd ./disks/drivej.dsk RTM-Z80_CPM/*.sub 0:
cpmcp -t -f z80pack-hd ./disks/drivej.dsk RTM-Z80_CPM/*.as 0:
cpmcp -t -f z80pack-hd ./disks/drivej.dsk RTM-Z80_CPM/*.h 0:
cpmcp -t -f z80pack-hd ./disks/drivej.dsk RTM-Z80_CPM/*.c 0:
cpmcp -t -f z80pack-hd ./disks/drivej.dsk RTM-Z80_CPM/*.mac 0:
cpmcp -f z80pack-hd ./disks/drivej.dsk RTM-Z80_CPM/*.hex 0:
On CP/M shell:
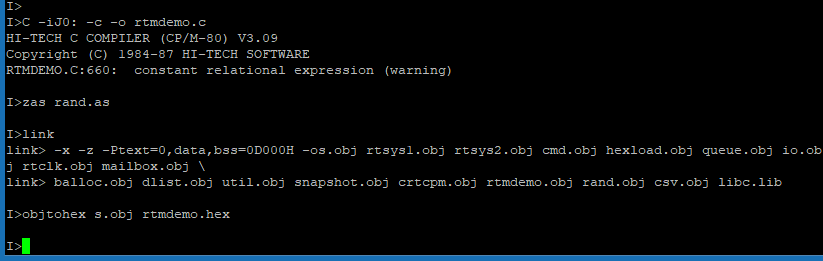
J>A:pip J:=A:xsub.com
J>A:submit make
J>A:submit makelib

J>c -iJ0: -o rtmdemo.c rand.as rt.lib
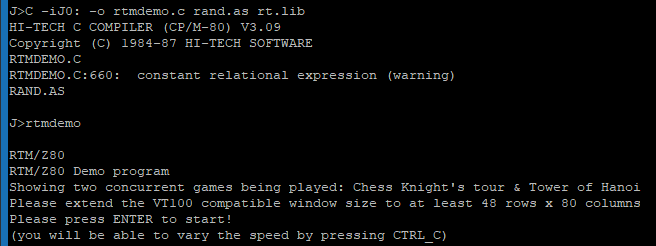
J>rtmdemo
Running an RTM/Z80 applications on RC2014
Follow instructions in chapter Running an RTM/Z80 application on RC2014 in RTM-Z80 User manual.
I use drive I: for build things for RC2014 Pro with SC108 + SC102 + SIO/2.
RTM/Z80 uses CTC channel #2. Recomended board is
SC110
– Z80 Serial+CTC board. Because I use dedicated CTC (SC102) board,
jumper on it must be set to feed ch. #2 from xtal Oscillator 7.3728 MHz.
Also note that Interrupt-daisy-chain must be established between SIO/2 and CTC as described above.
- Create directory
RTM-Z80_RC2014in[homedir]/z80pack-1.37/cpmsim - Copy
RTM-Z80-main/SOURCES + RESOURCES + DEMOto directory[homedir]/z80pack-1.37/cpmsim/RTM-Z80_RC2014 - Place
xsubat 1st. line ofmake.subandmakelib.sub. Check if you have inconfig.mac:
	DEBUG		equ 0	;1=debug mode ON: verify task SP, task TCB, dealloc, lists, etc.
	SIM		equ 0	;1=Runs under Z80SIM, 0=Runs on RC2014(SC108+SC110)
	DIG_IO		equ 1	;1=RC2014 Digital I/O module is used
	CMD		equ 0	;1=CON CMD task is included
	RSTS		equ 1	;1=use RST for list routines (not for SIM)
	WATSON		equ 0	;1=Watson is used (not for SIM)
	C_LANG		equ 1	;1=Support for C language API
	IO_COMM		equ 1	;1=Support for async communications I/O
	SC108		equ 1	;1=SC108 is used (32KB ROM, 128KB RAM)
	MM		equ 0	;1=Memory Module is used, 0=SC108 is used
	BDOS		equ 1	;1=BDOS disk file support
	LPT		equ 0	;1=Parallel Printer (Compatibility mode) (not for SIM)
	;
	;	ROM/RAM options (only if SIM=0)
	;
	RAM128K		equ 1	;0=only 64K RAM, 1= 2 x 64K RAM available
Then copy (On Linux) content of [homedir]/z80pack-1.37/cpmsim/RTM-Z80_RC2014 + HTC309 to CP/M drive I:
cpmrm -f z80pack-hd ./disks/drivei.dsk *.*

# Copy HiTech C compiler 3.0.9 to I:
cpmcp -f z80pack-hd ./disks/drivei.dsk HTC309/*.COM 0:
cpmcp -f z80pack-hd ./disks/drivei.dsk HTC309/*.OBJ 0:
cpmcp -f z80pack-hd ./disks/drivei.dsk HTC309/*.LIB 0:
cpmcp -t -f z80pack-hd ./disks/drivei.dsk HTC309/*.H 0:
cpmcp -t -f z80pack-hd ./disks/drivei.dsk HTC309/OPTIONS 0:

# Copy RTM-Z80 to I:
cpmcp -t -f z80pack-hd ./disks/drivei.dsk RTM-Z80_RC2014/*.sub 0:
cpmcp -t -f z80pack-hd ./disks/drivei.dsk RTM-Z80_RC2014/*.as 0:
cpmcp -t -f z80pack-hd ./disks/drivei.dsk RTM-Z80_RC2014/*.h 0:
cpmcp -t -f z80pack-hd ./disks/drivei.dsk RTM-Z80_RC2014/*.c 0:
cpmcp -t -f z80pack-hd ./disks/drivei.dsk RTM-Z80_RC2014/*.mac 0:
cpmcp -f z80pack-hd ./disks/drivei.dsk RTM-Z80_RC2014/*.hex 0:
On CP/M shell (run those commands one-by-one line, don't use copy/paste whole content):
I>A:pip I:=A:xsub.com
I>A:submit make
I>A:submit makelib
I have three scripts for building various demos, such as rtmdemo.
On CP/M shell I run:
On Linux shell:
cpmcp -f z80pack-hd ./disks/drivei.dsk 0:HEXBOOT.HEX hexboot.hex
cpmcp -f z80pack-hd ./disks/drivei.dsk 0:RTMDEMO.HEX rtmdemo.hex
cpmcp -f z80pack-hd ./disks/drivei.dsk 0:MSORT.HEX msort.hex
cpmcp -f z80pack-hd ./disks/drivei.dsk 0:TESTXR.HEX testxr.hex
cpmcp -f z80pack-hd ./disks/drivei.dsk 0:TESTXS.HEX testxs.hex
cpmcp -f z80pack-hd ./disks/drivei.dsk 0:TBDOS.HEX tbdos.hex
cpmcp -f z80pack-hd ./disks/drivei.dsk 0:GETXFILE.HEX getxfile.hex
Then use WinSCP to copy hexboot.hex and some program, e.g. rtmdemo.hex to your local directory.
Open hexboot.hex and copy content to clipboard. Then switch to Putty connected to RC2014 and reset SC108.
Make right-mouse-click over terminal to send content of hexboot.hex to RC2014.
Type *gE000 and when you can see Ready to read RTM/Z80 HEX file
do this same with rtmdemo.hex. Type dot . to omit breakpoint and
Y to
run demo.
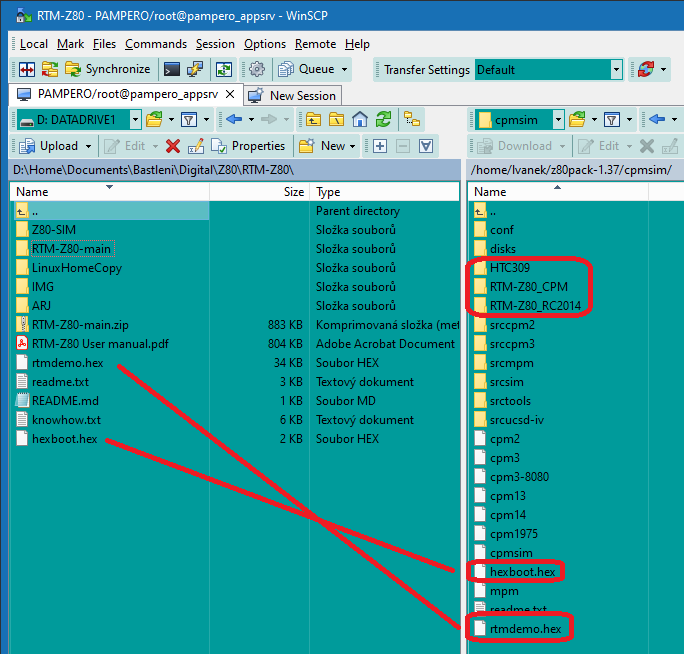
Local Windows and remote Linux directory structure. Note: when you use WinSCP to upload C, H, AS,
MAC, SUB and other from Windows to Linux - be sure that you have set Transfer setting
as Text for those types.
Running own RTM/Z80 application on RC2014
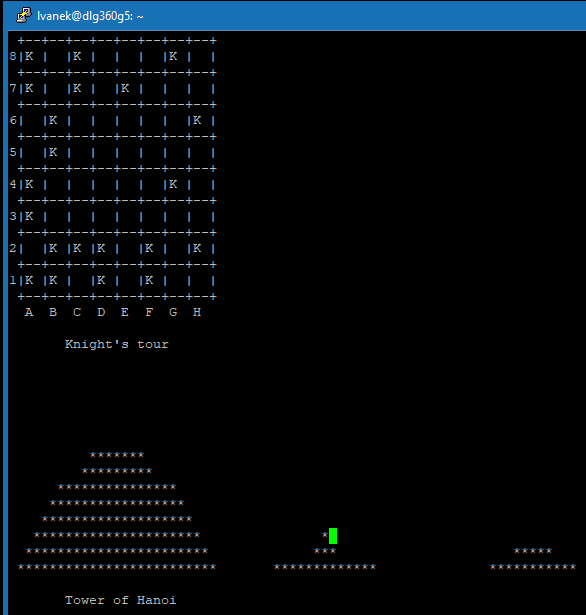
I created simple demo
application. Four independent tasks
drive
four Z80 PIO's.
On Linux shell (when CP/M is logged out using A:bye):
cpmrm -f z80pack-hd ./disks/drivei.dsk TESTPIOS.*
cpmcp -t -f z80pack-hd ./disks/drivei.dsk RTM-Z80_RC2014/testpios.c 0:
On CP/M shell I run I>A:SUBMIT mymake4.
On Linux shell:
cpmcp -f z80pack-hd ./disks/drivei.dsk 0:TESTPIOS.HEX testpios.hex
Next steps are the same as rtmdemo.
RC2014-CPM, te editor and other stuff
Ladislau Szilagyi created very interesting project,
RC2014-CPM.
This CP/M version is able to use
SC108
or
512k ROM 512k RAM
extended memory and some programs as HiTech C or te editor can use it.
I tried version for SC108 with RC2014 Pro. Here is some my experiences:
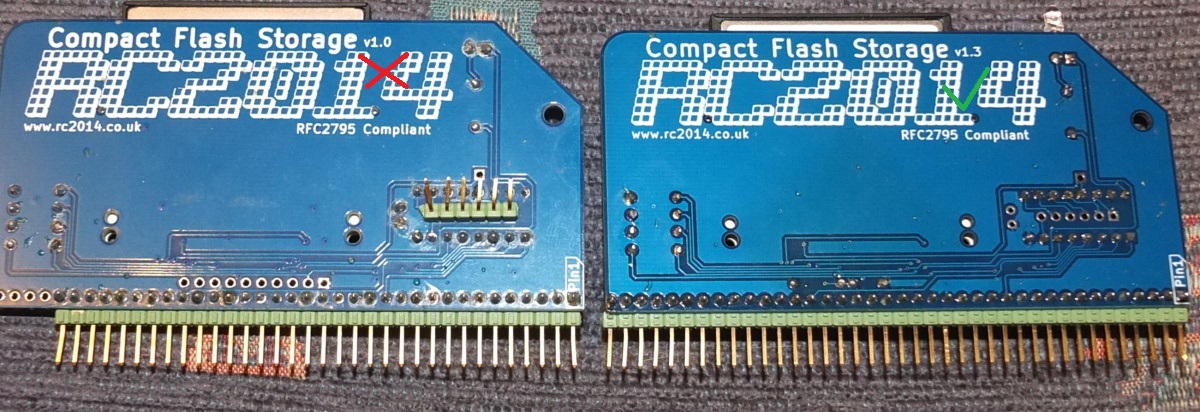
- I had problems with CF cards. It was possible to format, but start CP/M lead to froze computer. I got advice, that old version 1.0 of CF module has compatibility issues. Fortunately I found that RC2014 Zed have new version 1.3 so I swapped CF modules between Pro and Zed.
-
It's necessary to have burned last SC108 firmware
in SC108 ROM.
-
Then is necessary prepare CF card with
CP/M 2.2
- Next step is download 'te' sources and HI-TECH C with Ladislau enhancements.
-
Now apply SIO_PutSys_CF64_CPM_DA00H.hex or SIO_PutSys_CF128_CPM_DA00H.hex using SCM. Copy content to clipboard after boot and paste to terminal and then run it by *
g8000 - After this step, don't use putty with Cut/Paste, because stripped down CP/M is't interrupt driven and this leads to buffer overflow. Instead use Terraterm with 1ms delay after every chars.
-
Now we have 'stripped down' CP/M. Compile 'te' editor by running
makete.suband link bylinkte.sub. BTWsubmitcommand on my system is crappy, so I run .SUB content line by line. -
Finally is possible to run
TE128.COM.
Compact Flash modules |
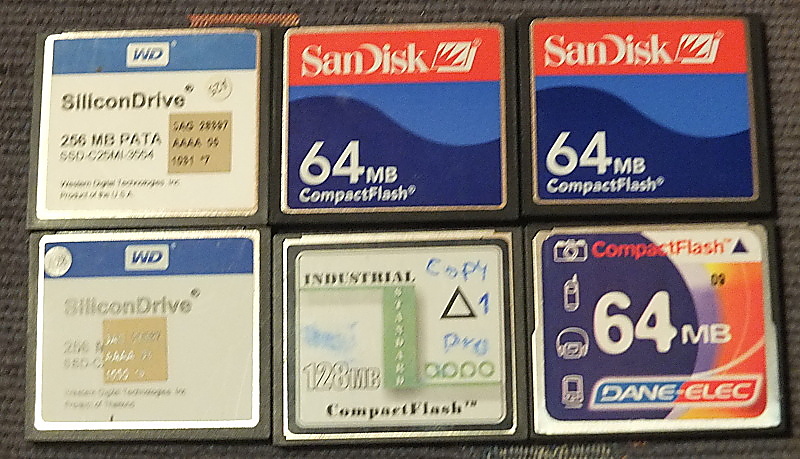
CF cards |

Preparing CF |
Memory banks switching |
te editor |
Conclusion
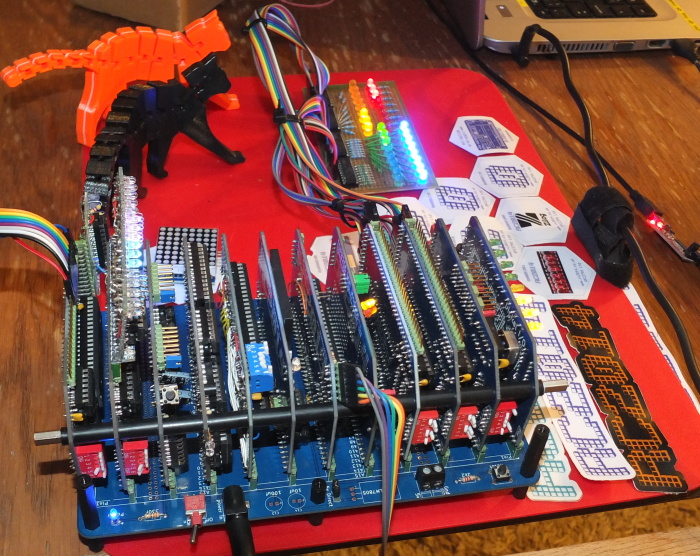
RC2014 is amazing project. I had a lot of fun while building it and exploring possibilities of retrocomputing. That brought me back 30 years to 8 bit era when I built my first computer.
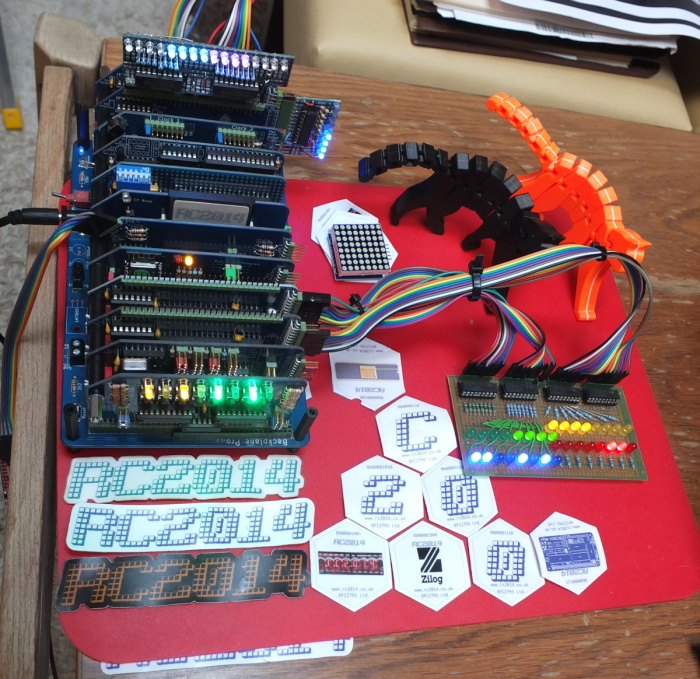
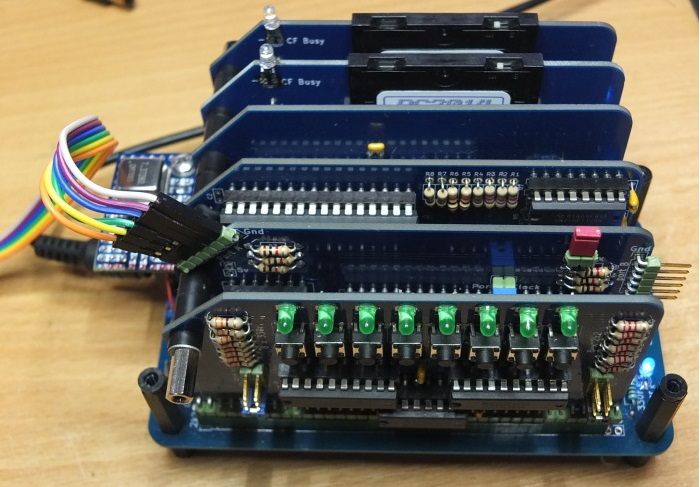
Finished RC2014 Pro. There is: Clock + SC108 [CPU-RAM-ROM] + DMA + CF + SIO/2 + 4 x PIO + CTC + WiFi + I/O.
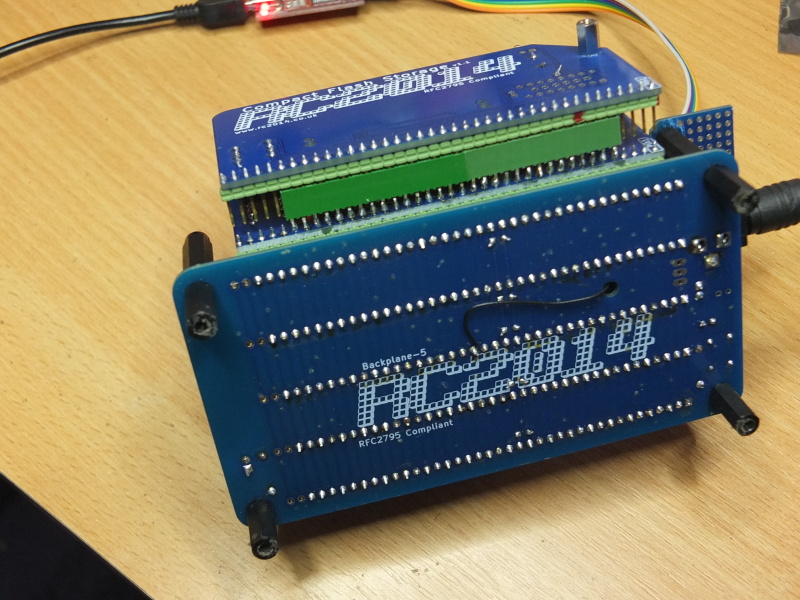
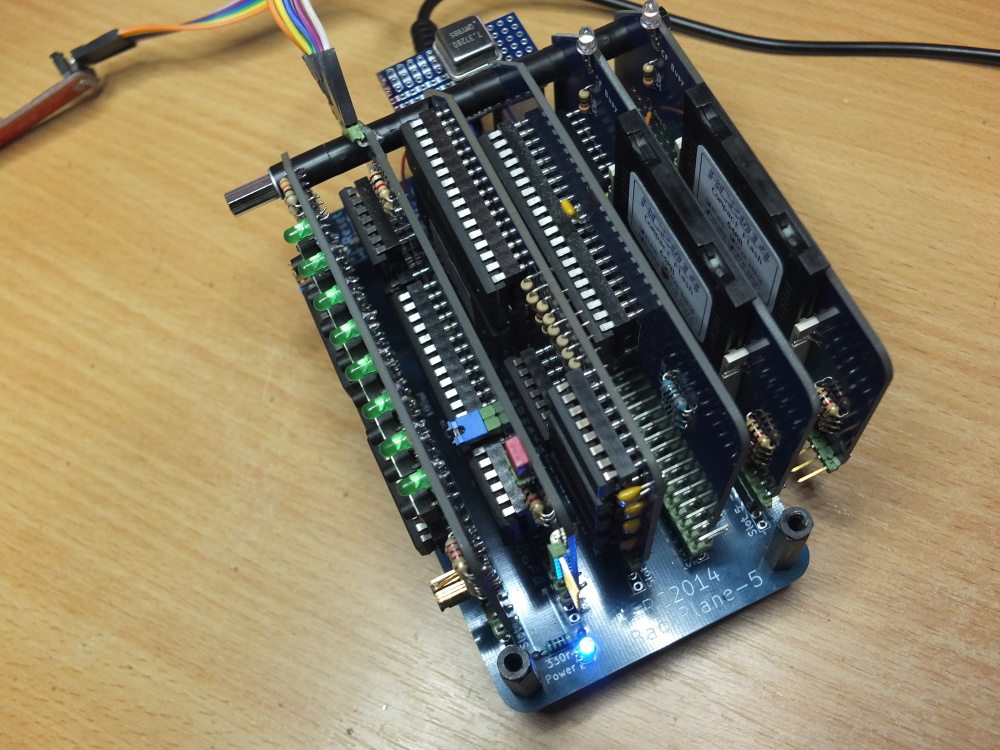
RC2014 - Little Brother
Later I decided to build second small one - on
BackPlane-5 +
CPU +
512k ROM 512k RAM
RomWBW +
SIO/2 +
2 x CF +
Digital IO.
CPU and SIO/2 modules are gained from RC2014 Pro, where is SC108+SC104 modules now.
BackPlane-5 + modules |
BackPlane-5 + 512kB RAM+ROM |
both RC2014 |
RomWBW starting screen |
512k ROM 512k RAM RomWBW Module
512k ROM 512k RAM
has been designed to run RomWBW operating system on the RC2014 with a Z80 CPU. Due to the 64k of addressable memory limitation of the Z80,
the memory in this module is divided up in to multiple 32k pages.
With RomWBW
you can boot ROM based CP/M-80 2.2, Z-System or run MONITOR, BASIC, FORTH, play game or run custom ROM content.
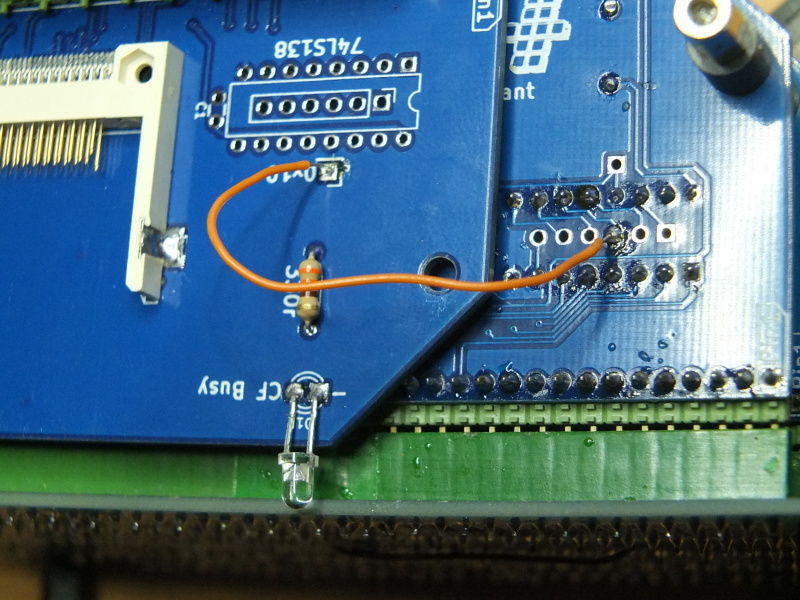
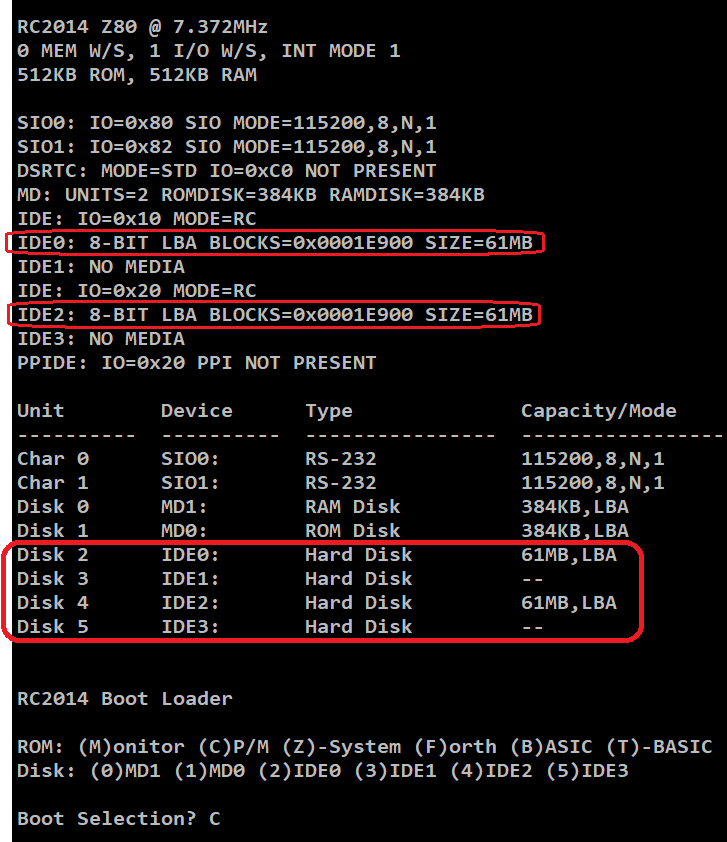
Using two Compact Flash modules with RomWBW
Using two Compact Flash modules is little bit tricky. 1st CF is addressed on 0x10.
If you have 2nd CF, it must use address 0x20. I solved it by routing pin #11 of 74LS138
decoder to 2nd card, where decoder isn't soldered. Because my BackPlane-5 is full, I stacked 2nd CF to 1st one.
|
|
|
|
Since we have added a second IDE interface, we will need to activate this interface using a custom ROM build:
- Buy TL866II programmer
- Install
git,make,gcc,lib-ncurses.dev,srecordandg++packages (I use Linux Debian) mkdir RomWBWin your home directorygit clone https://github.com/wwarthen/RomWBW.git RomWBW- Modify
RomWBW/blob/master/Source/HBIOS/cfg_rcz80.asm:
IDECNT		.SET	2		; IDE: NUMBER OF IDE INTERFACES TO DETECT (1-3), 2 DRIVES EACH
IDE1MODE	.SET	IDEMODE_RC	; IDE 1: DRIVER MODE: IDEMODE_[DIO|DIDE|MK4|RC]
IDE1BASE	.SET	$20		; IDE 1: IO BASE ADDRESS
cd RomWBW, runmakecommand- Program RCZ80_std.rom to ST39SF040
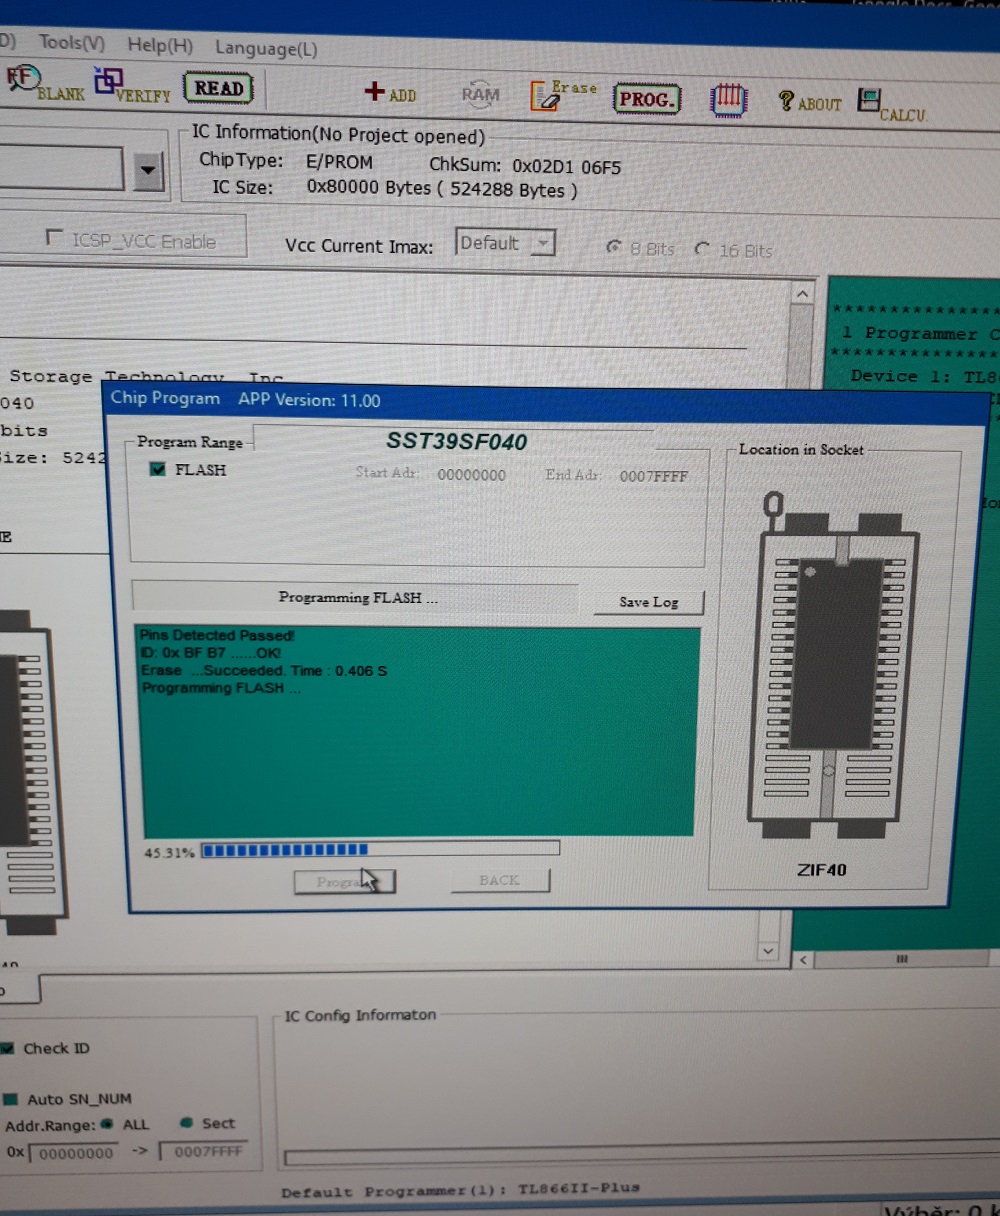
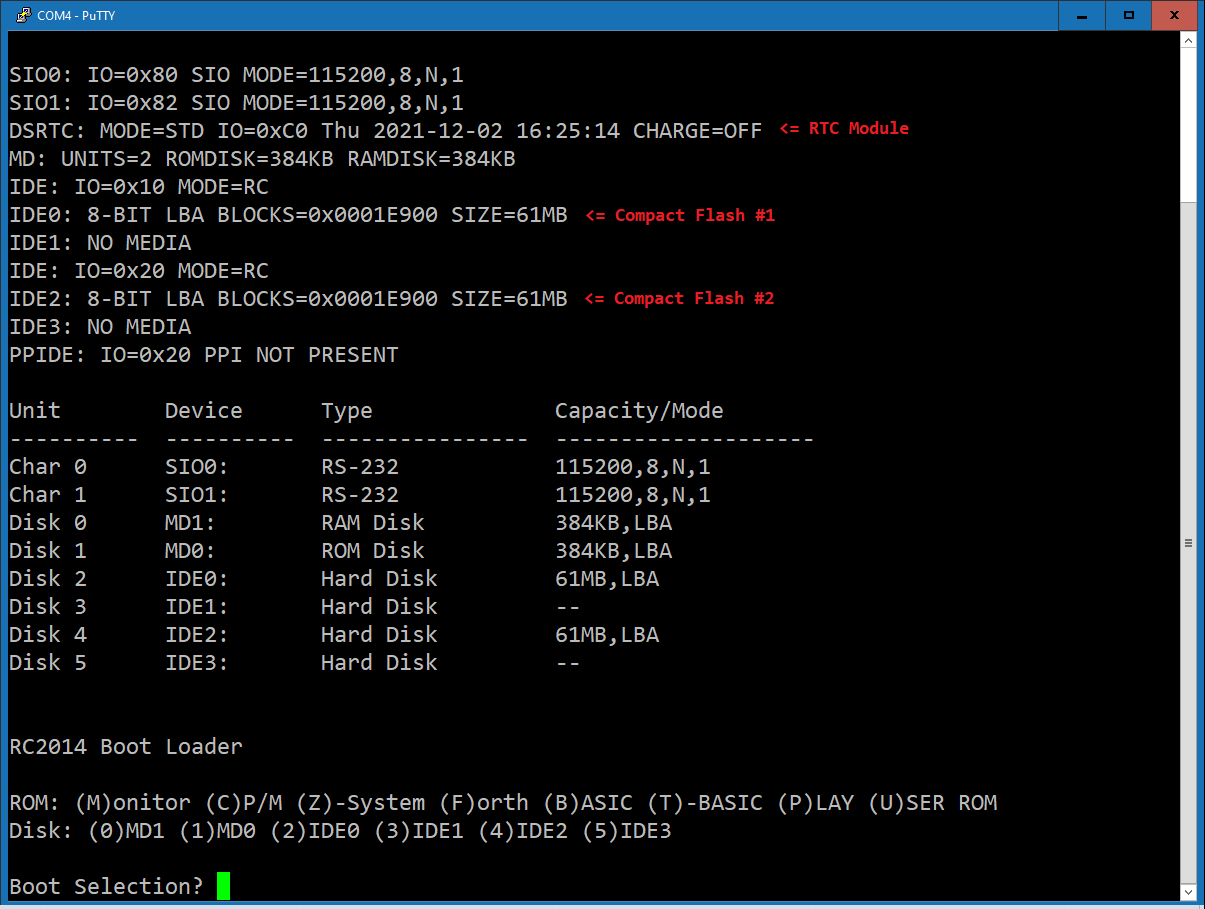
With this change you can see this on startup screen:
IDE: IO=0x10 MODE=RC
IDE0: 8-BIT LBA BLOCKS=0x0001E900 SIZE=61MB
IDE1: NO MEDIA
IDE: IO=0x20 MODE=RC
IDE2: 8-BIT LBA BLOCKS=0x0001E900 SIZE=61MB
IDE3: NO MEDIA
PPIDE: IO=0x20 PPI NOT PRESENT

   A:=MD1:0
   B:=MD0:0
   C:=IDE0:0
   D:=IDE0:1
   E:=IDE0:2
   F:=IDE0:3
   G:=IDE2:0
   H:=IDE2:1
   I:=IDE2:2
   J:=IDE2:3
For accessing other drives, you need to use ASSIGN command. You can create .SUB
file and use B:SUBMIT for it:
ASSIGN K:=IDE0:4 ASSIGN L:=IDE0:5 ASSIGN M:=IDE0:6 ASSIGN N:=IDE0:7 ASSIGN O:=IDE2:4ASSIGN P:=IDE2:5
Note: Due to memory limit, ASSIGN drive P: fails to error: 'Disk buffer exceeded in CBIOS, aborted'.
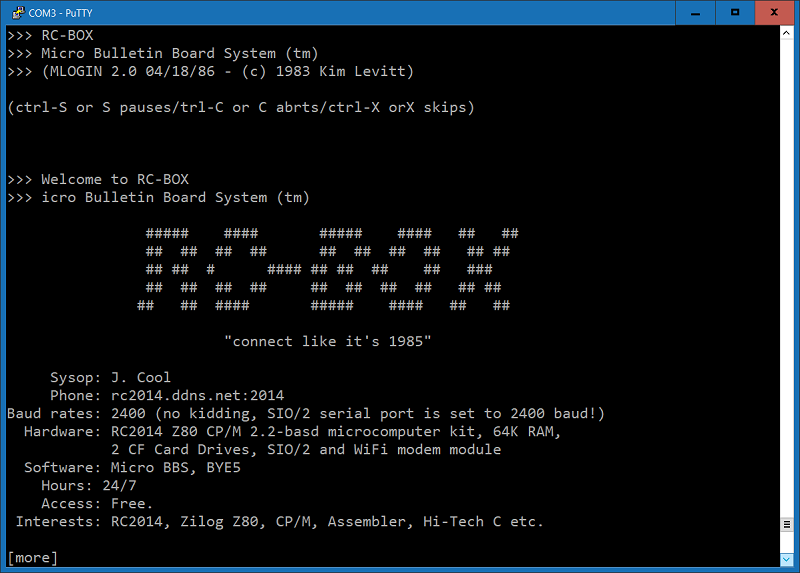
Connecting to BBS
I use following approach to connect Wintermute BBS, which operates on rc2014.ddns.net:2014:
- Because my Little Bro doesn't have free slot for official WiFi card, I use WEMOS D1 Mini
- If you haven't Arduino IDE
download and install it
- Download Zimodem firmware
- Open
zimodem.inowith Arduino and near line 96 do following change:
# define RS232_INVERTED 0 // l.v.: was 1
- Compile and upload to connected WEMOS module.
- Use Serial monitor and after
ATcommand you must get replyOK. - Then use
AT+CONFIGand configure WiFi, and other options like this:
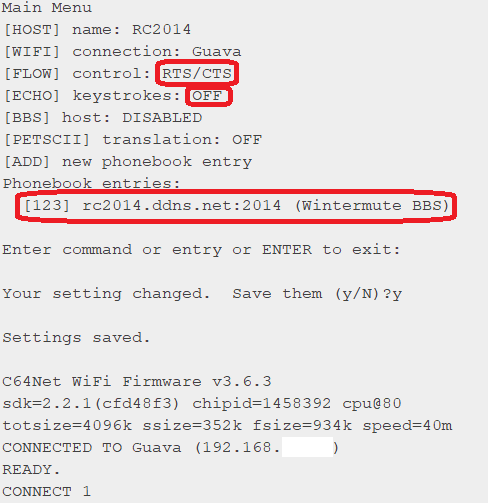
- As you may see, I have Wintermute BBS stored in phone book under
123number. Save changes and disconnect module. - Now is needed to remove FTDI chip from WEMOS - I used brute-force method with thin needle and soldering iron. Of course now is not possible to upgrade firmware.
- Get WEMOS universal shield and solder two 10k/22k voltage dividers for
RXandCTSsignals. It's the same approach as R2/R3 used in official WiFi module.
Alternatively it's possible to use
MOSFET Level Converter.
-
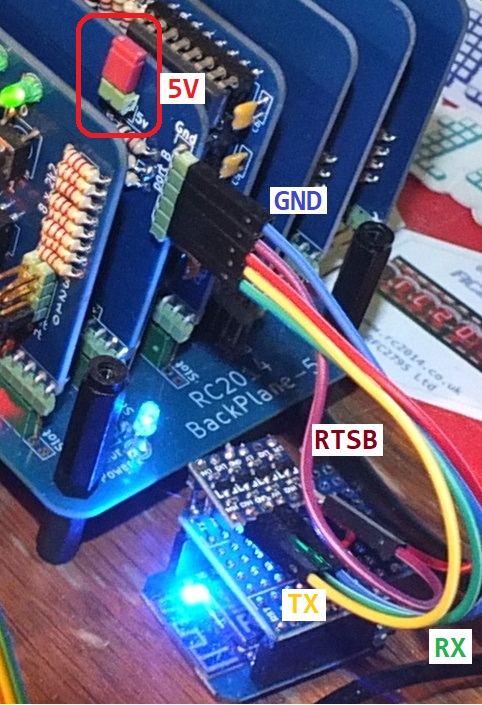
Stack both boards together and make connection to SIO/2 module port B. Note that 5V must be linked
to connector using
JP3jumper on SIO/2 board. So SIO/2 🡺 ESP module:- GND 🡺 GND
- RTSB 🡺 Digital pin #5 (CTS)
- 5V 🡺 5V
- RXB 🡸 TX
- TXB 🡺 RX
- unconnected
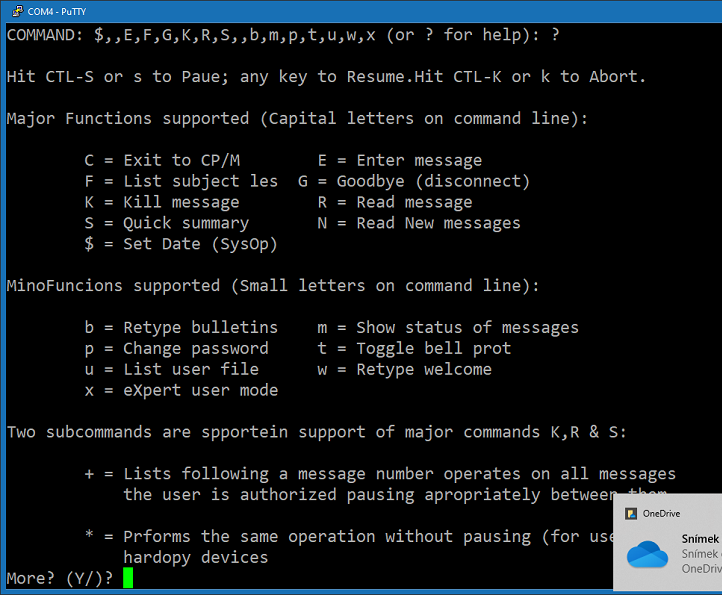
- Start Qterm
-
QTERM82.COM. Use^Y?and you will see Help message. - Reset WEMOS and wait for message which informs you that WiFi is connected.
Use
ATD123and if everything is OK, you will be connected to BBS.
|

|
|
|
Extending Little Bro
Now my RC2014 Little Brother is extended with second BackPlane-5. There is another Digital I/O module and two modules for LED matrixes.

|
|
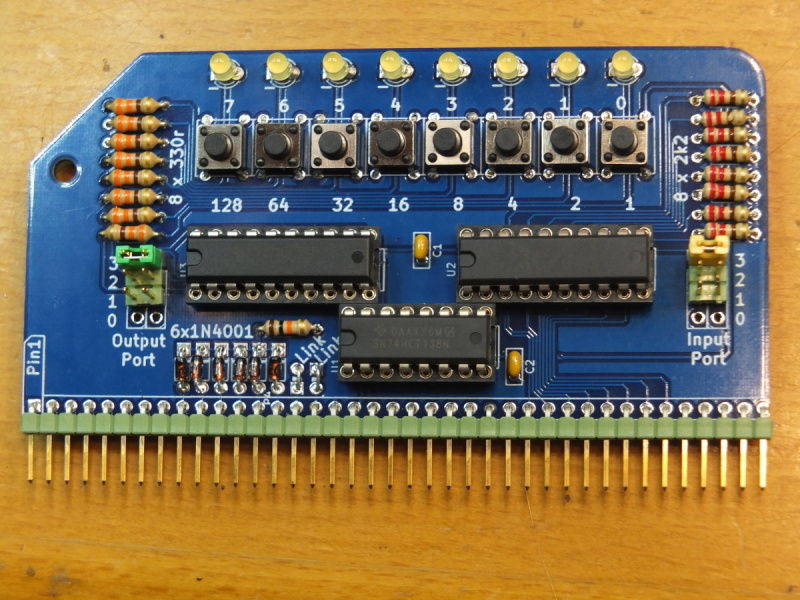
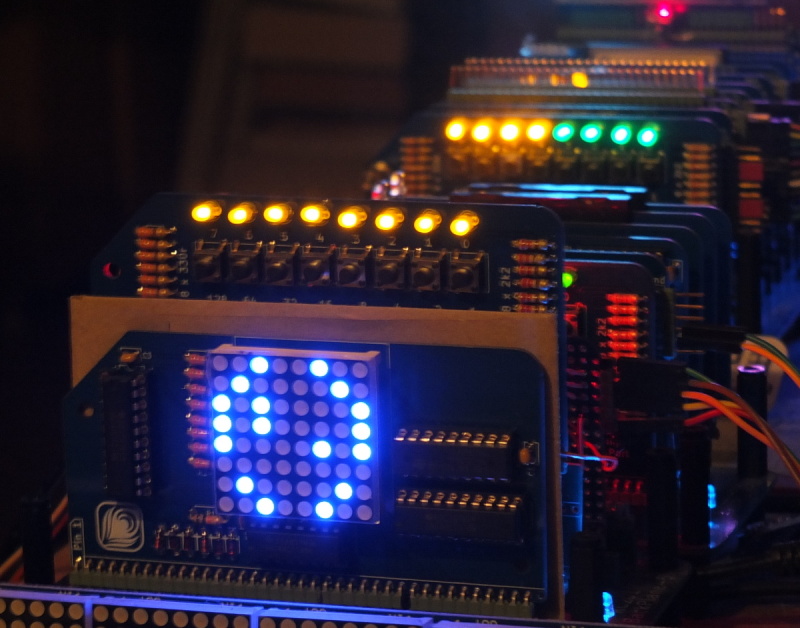
8x8 LED matrixes with MAX7219
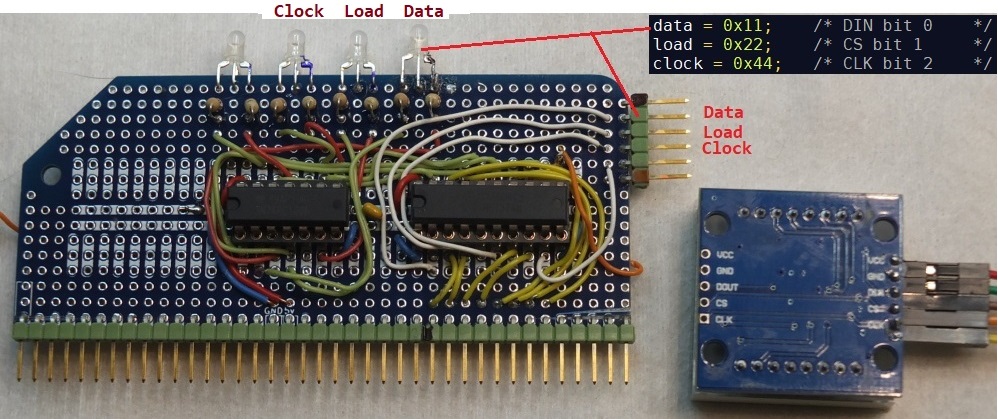
Driver module |
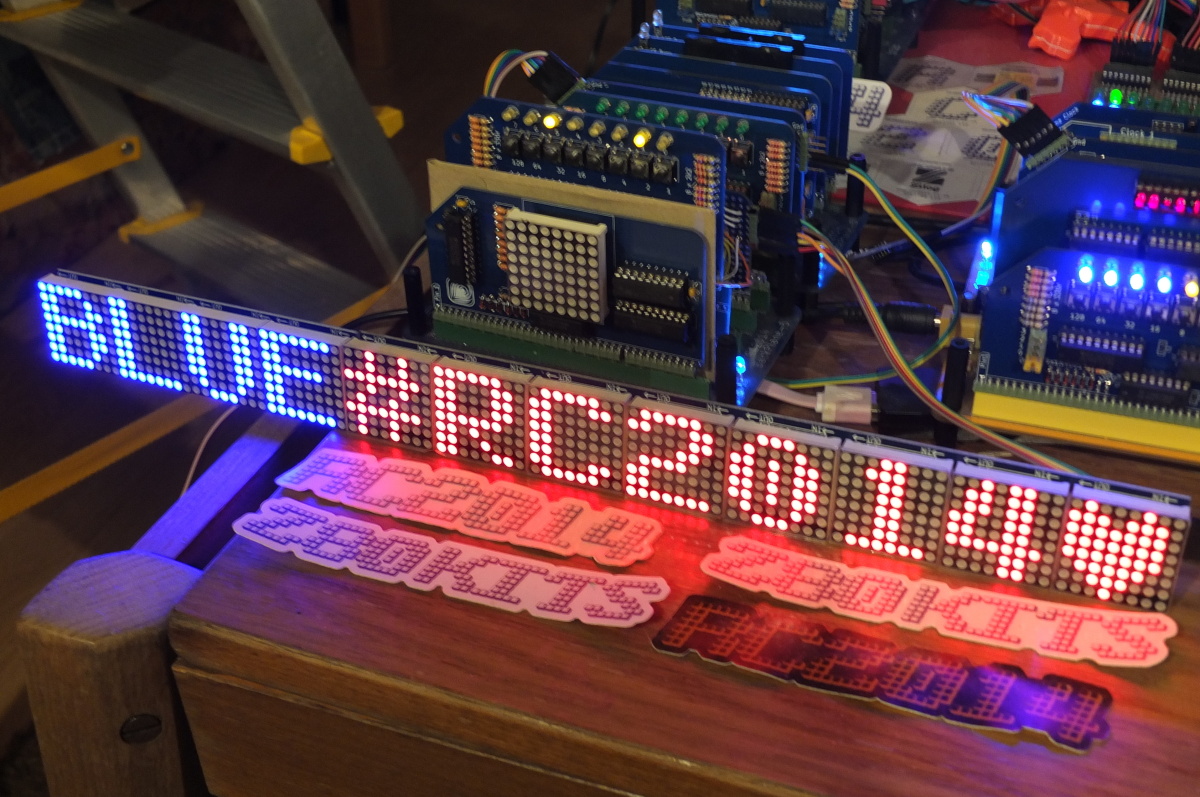
12x8x8 LED Matrix |
I have
ported
Arduino
MaxMatrix library
for
driving 8x8 LED matrixes
with MAX7219 to HI-TECH C Compiler syntax.
Driver board uses 74HCT374 - circuit is same as official I/O board. There are also four
two-color LED's for easier debugging.
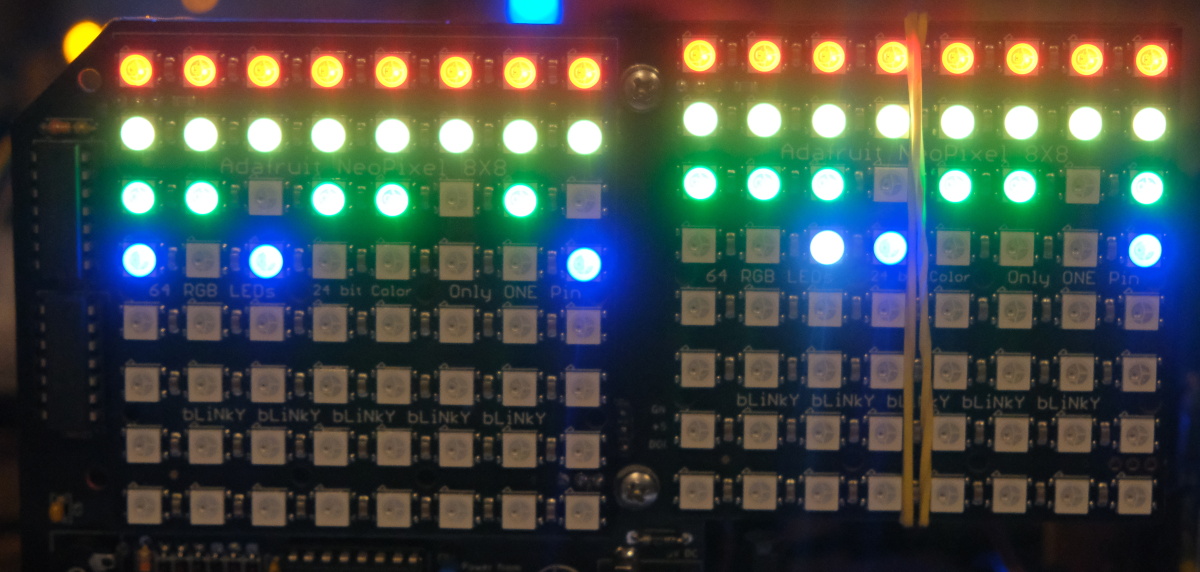
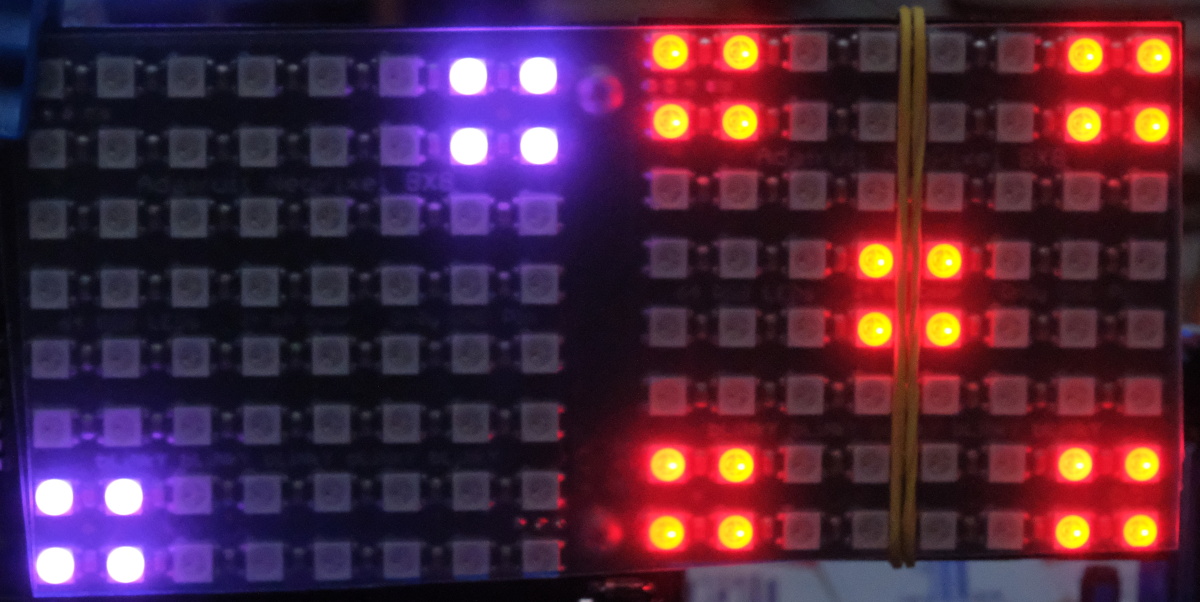
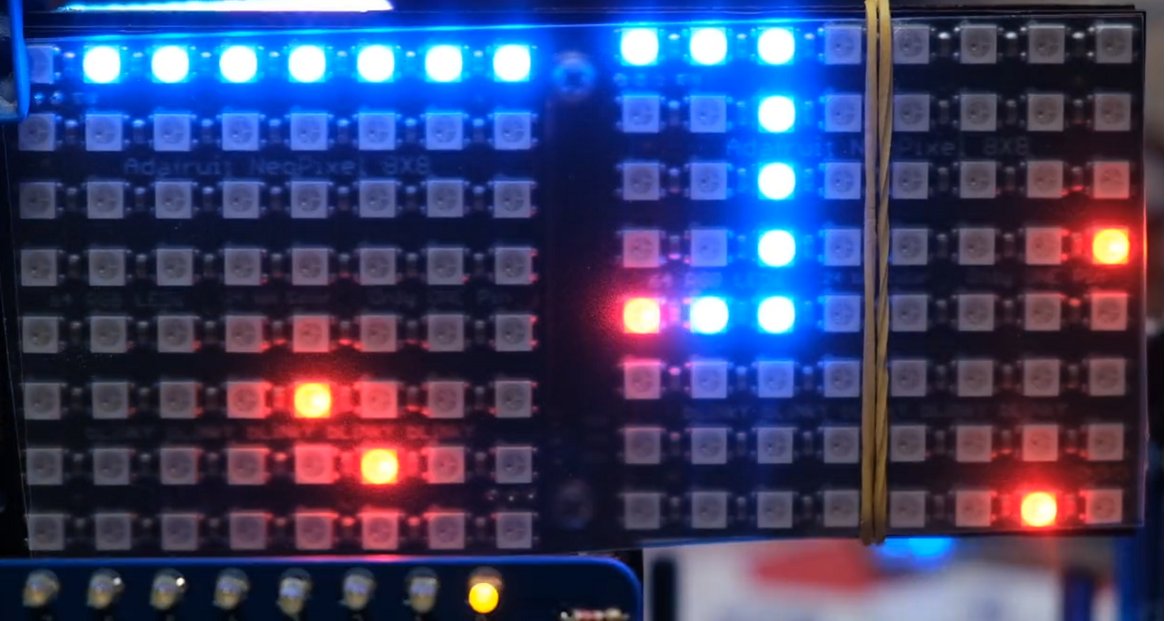
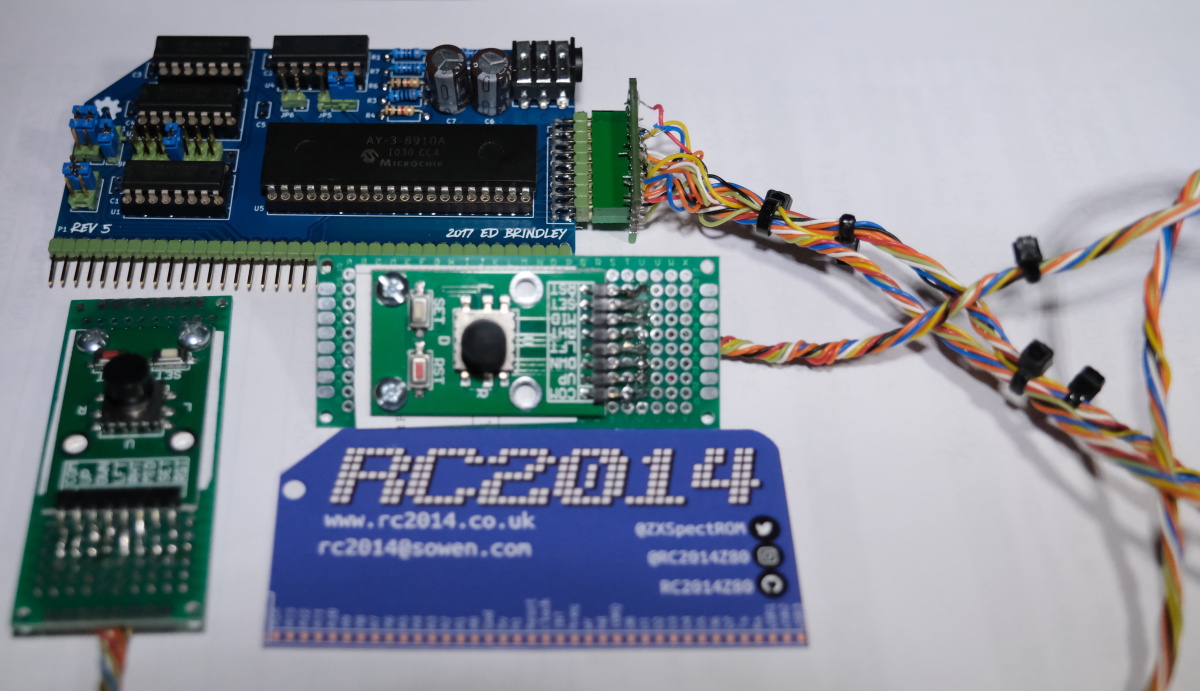
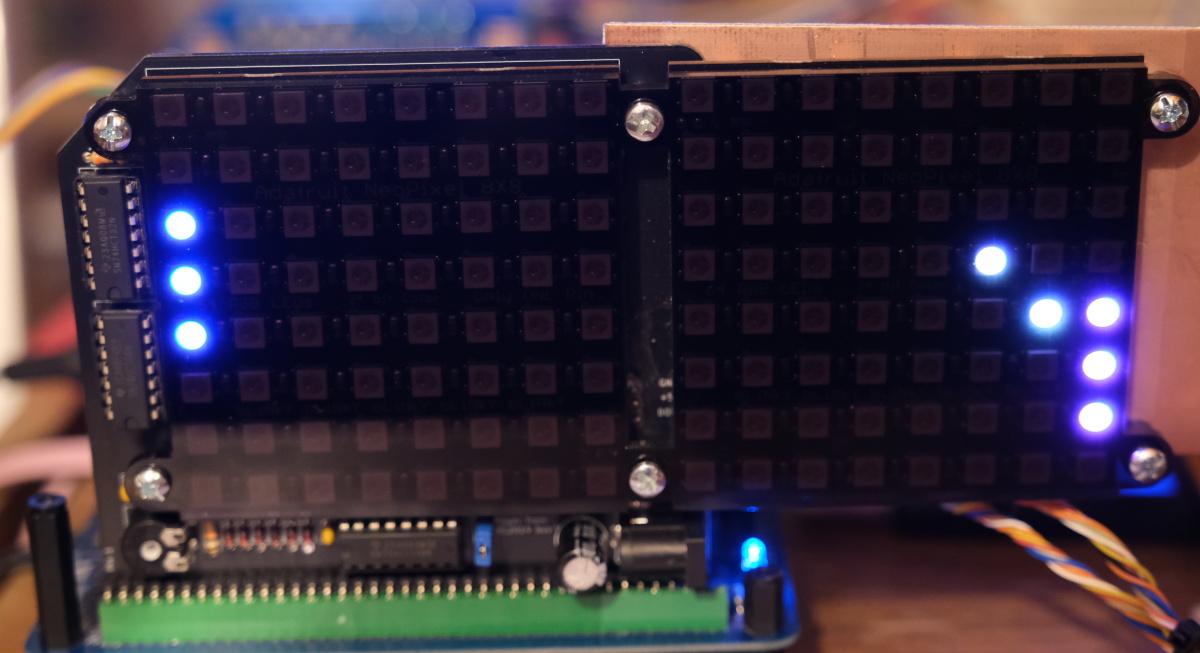
NeoPixel Module – 8×8 Matrix"
This is absolutely awesome
module.
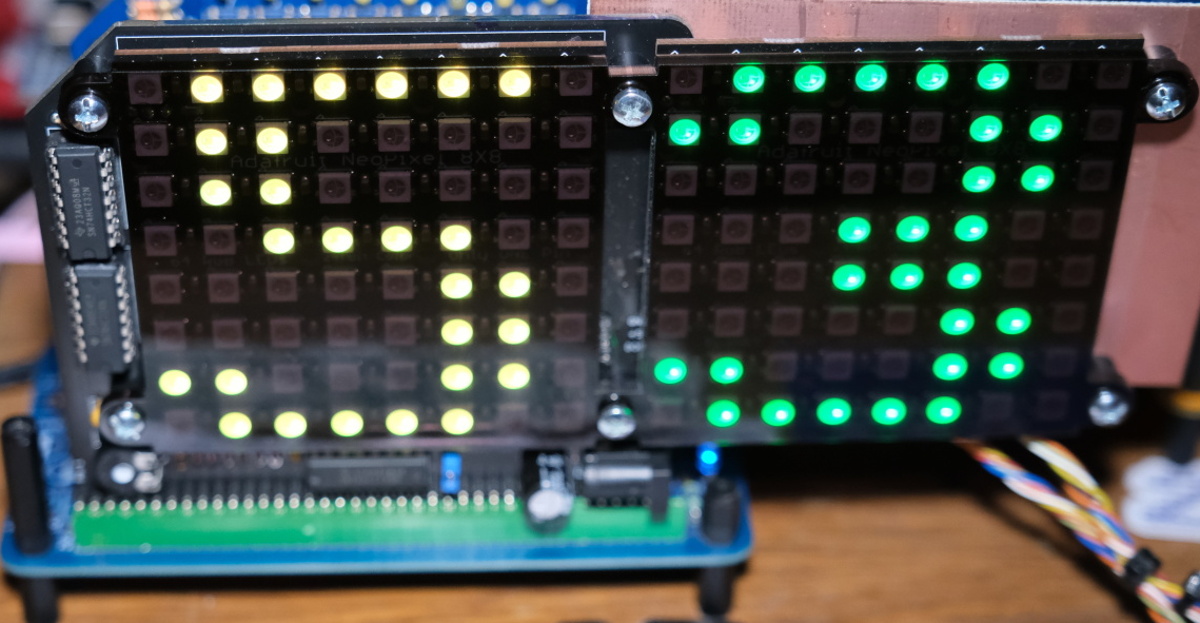
It contains 8x8 RGB LED matrix. I have extended it with second matrix.
- Snake game driven by joystick. It allows create extra apples and speed-up by buttons.
- Neodie demo from SDK
- My Sprites demo
- Breakout from SDK extended to two matrixes
- Ping-Pong
|
Board delivery |
Board completed |
Breakout |
Neodie |
R sprite |

Hearts |
Joystick |
Snake game |
For compiling ASM and C sources I use
Z88dk
which works perfectly. If you are interested about source code, feel free to contact me.
YM2149 Sound Card
This
module.
is based around the YM2149 / AY-3-8910 3 channel sound chip.
It's supported by RomWBW, but similarly as with two CF cards, there is needed to build custom ROM.
It's not absolutely necessary, most applications have own support for chip.
So if you want it, follow those intstructions but use this modifications in source code:
Modify RomWBW/blob/master/Source/HBIOS/cfg_rcz80.asm:
AY38910ENABLE	.EQU	TRUE		; AY: ENABLE AY-3-8910 / YM2149 SOUND DRIVER
AY_CLK		.EQU	1843200		; AY: PSG CLOCK FREQ, ASSUME 7.3728 MHz / 4
AYMODE		.EQU	AYMODE_RCZ80	; AY: DRIVER MODE: AYMODE_[SCG|N8|RCZ80|RCZ180|MSX|LINC|MBC]
And also modify RomWBW/blob/master/Source/HBIOS/Config/RCZ80_std.asm:
AY38910ENABLE	.SET	TRUE		; AY: AY-3-8910 / YM2149 SOUND DRIVER
AYMODE		.SET	AYMODE_RCZ80	; AY: DRIVER MODE: AYMODE_[SCG|N8|RCZ80|RCZ180|MSX|LINC]
For playing music is possible to use TUNE
application.
I have created
PingPong
that uses sound card. Two 8-bit I/O ports on AY-3-8910 are utilized for joysticks.
Board with joystick |
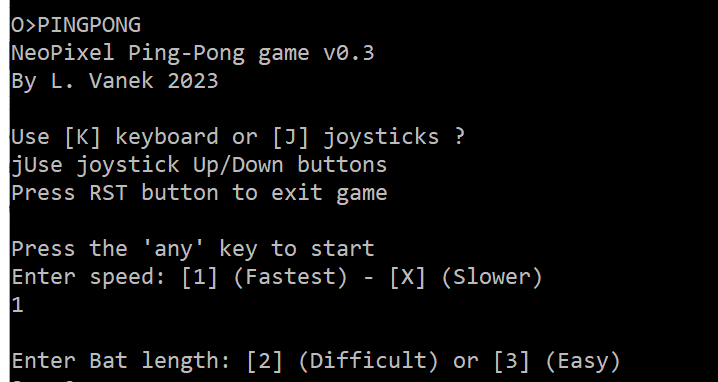
Starting screen |
Playing |
Score |
Conclusion
Now RC2014 Little Brother is ready to discover possibilites of 8-bits retrocomputing.

Ukraine Red Cross Fundraiser RC2014 Zed
My 3rd one is RC2014 Zed Fundraiser kit for Red Cross Ukraine.
DS1302 RTC Module
On RC2014 Zed I have DS1302 Real Time Clock Module.
It is based around the DS1302 chip and is supported using RomWBW.

|
|
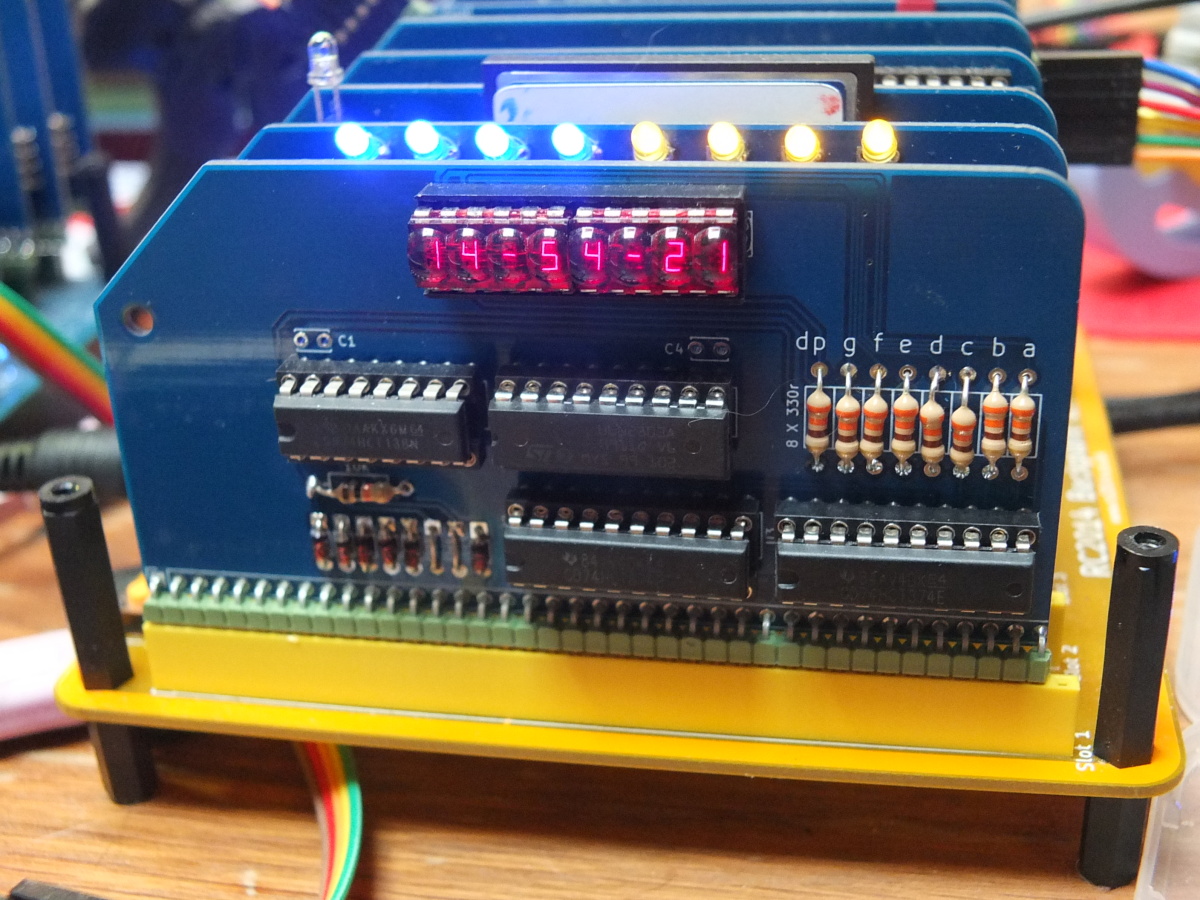
Bubble Display Module
Another interesting module is
7 Segment Bubble LED Display.
You can play with it with some various
programs in different languages.
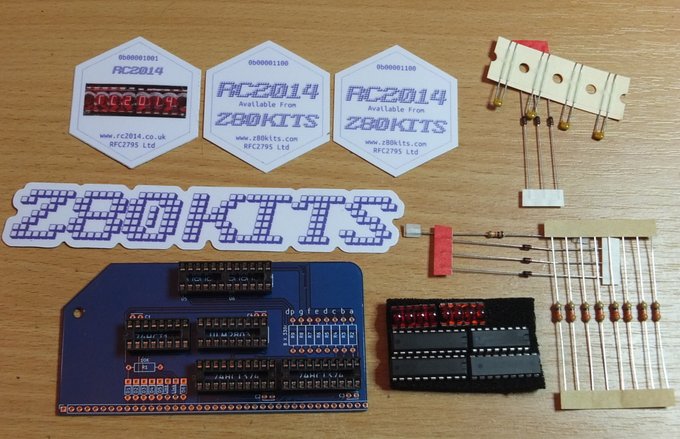
Bubble Display Kit |
Digital Clock |
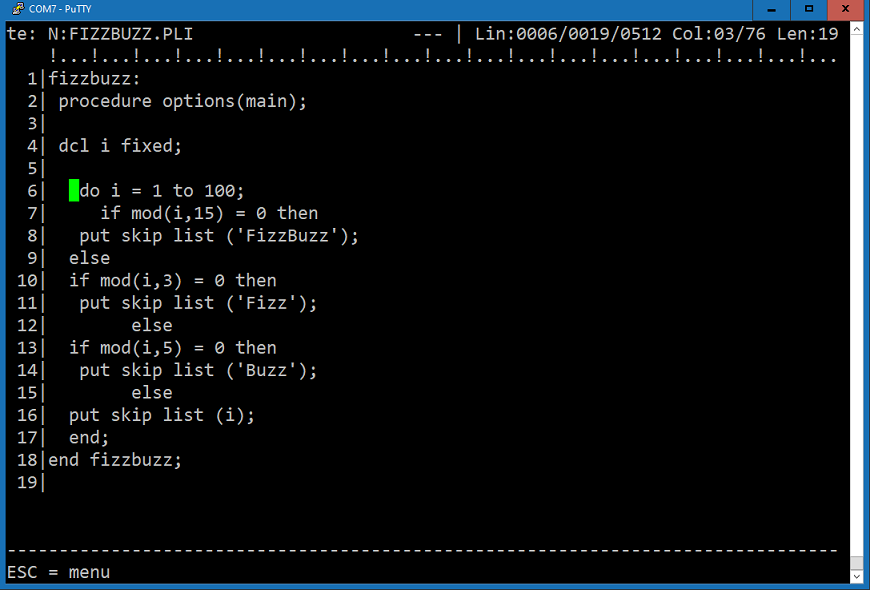
I wrote FizzBuzz
sample.
My another
program
utilizes both RTC and Bubble Display Modules to turn RC2014 to
digital clock.
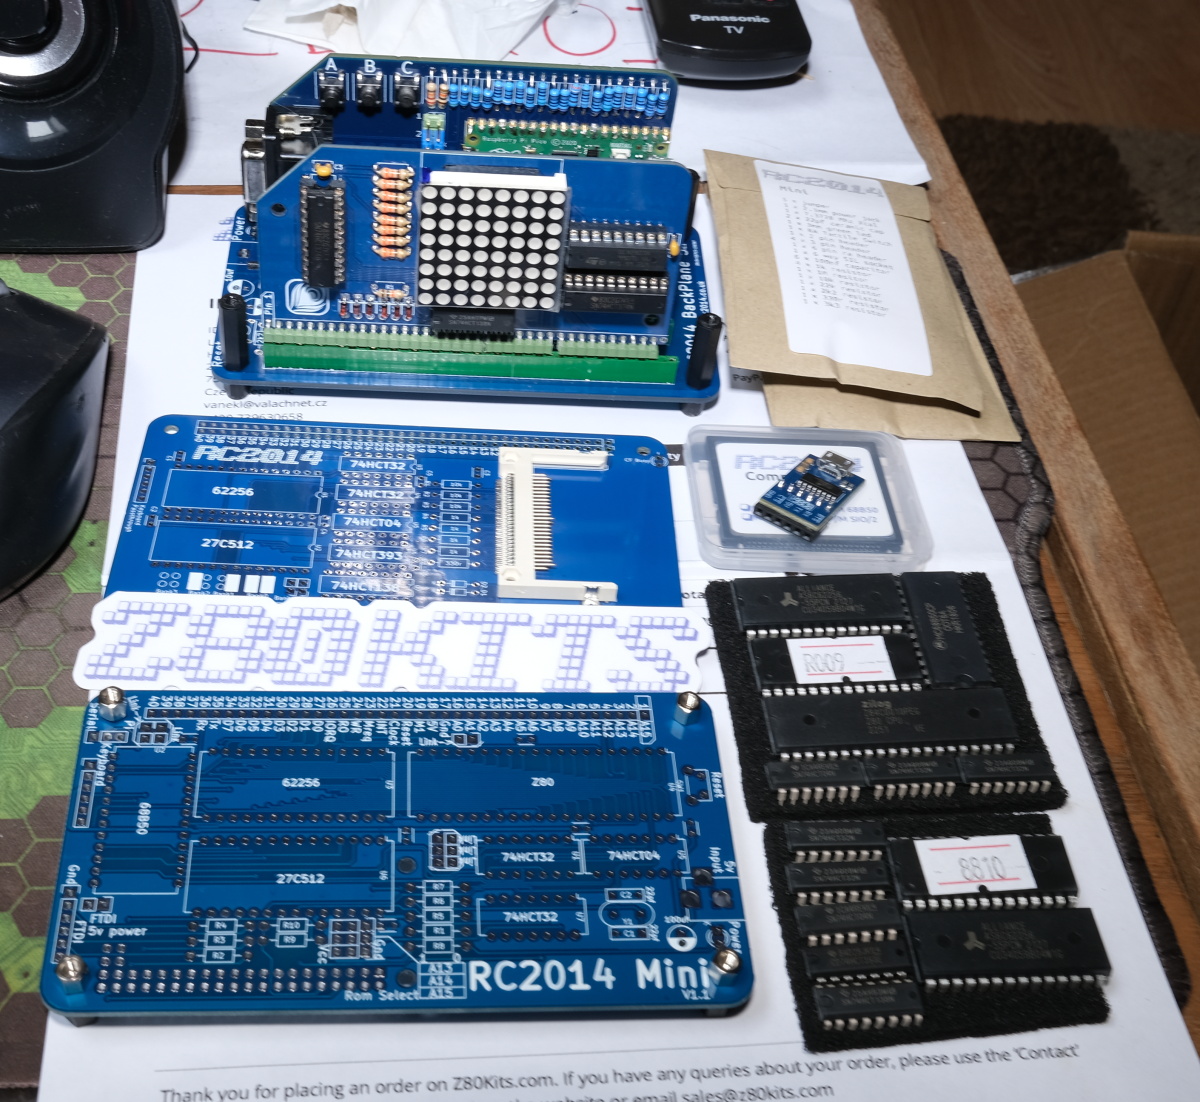
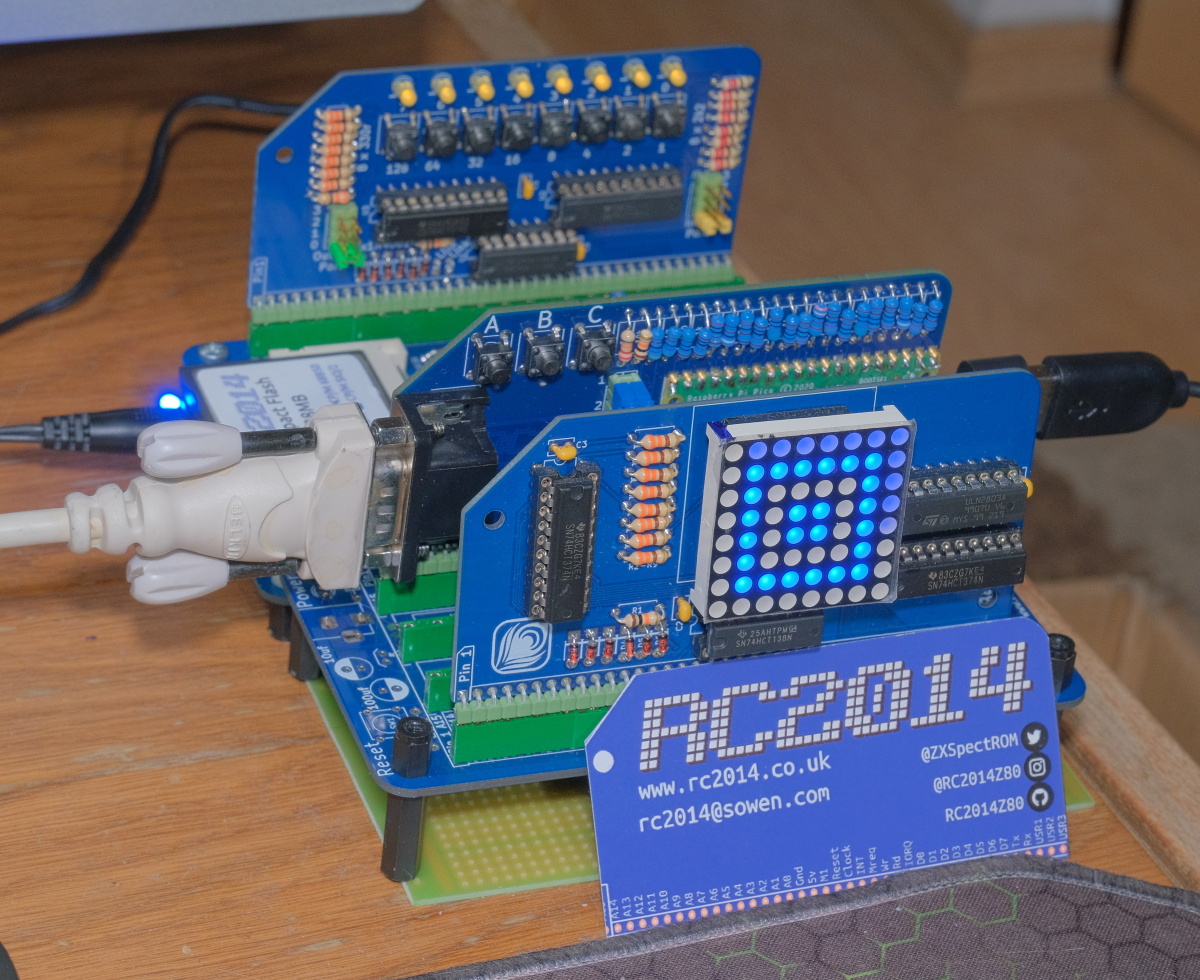
RC2014 Mini
My (I hope definitely) last one is
Mini
with
CP/M Upgrade Kit
. I have extended it with BackPlane-5.
Delivery |
Extending |
Running |
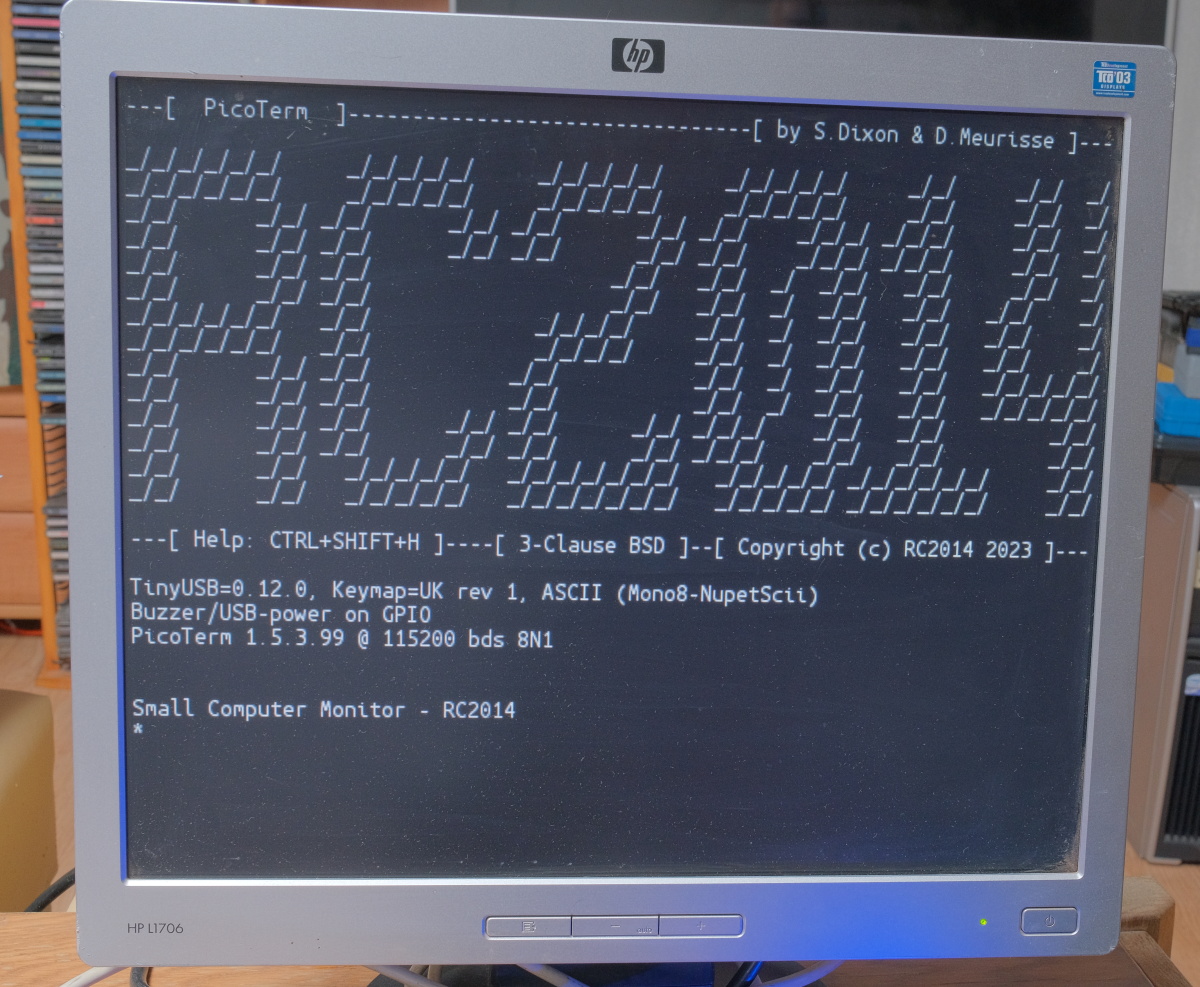
PicoTerm |
RC2014 Pi Pico VGA Terminal
RC2014 Pi Pico VGA Terminal
is a simple terminal for the RC2014 to allow it to be used standalone. It connects to a regular VGA monitor and accepts a USB keyboard.
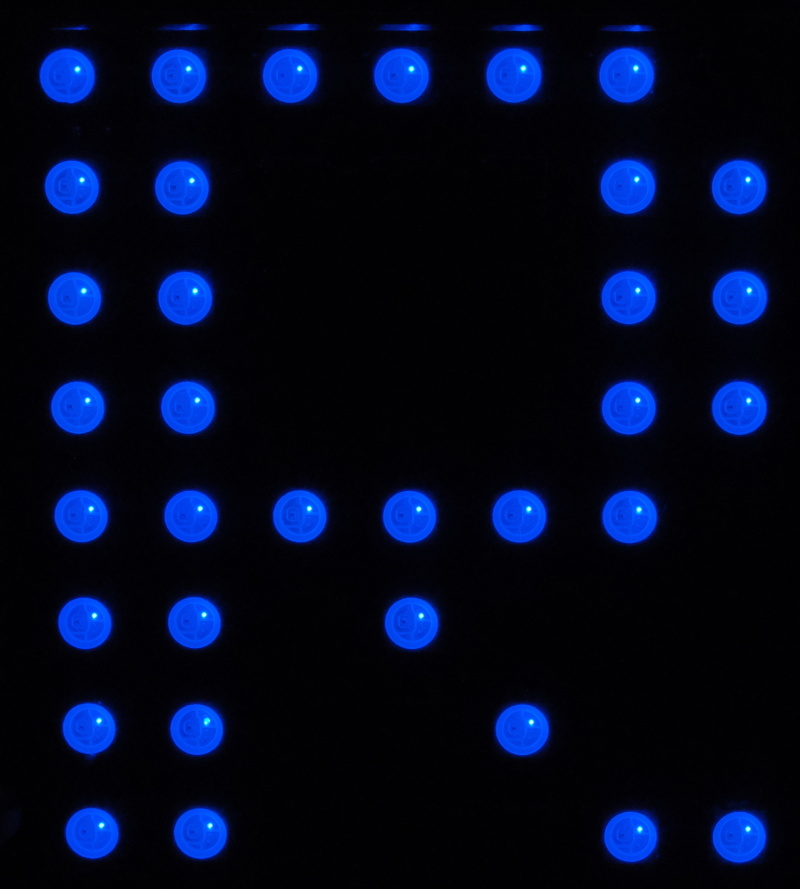
8×8 LED Matrix Display Module
This
module
contains one 8x8 LED matrix.
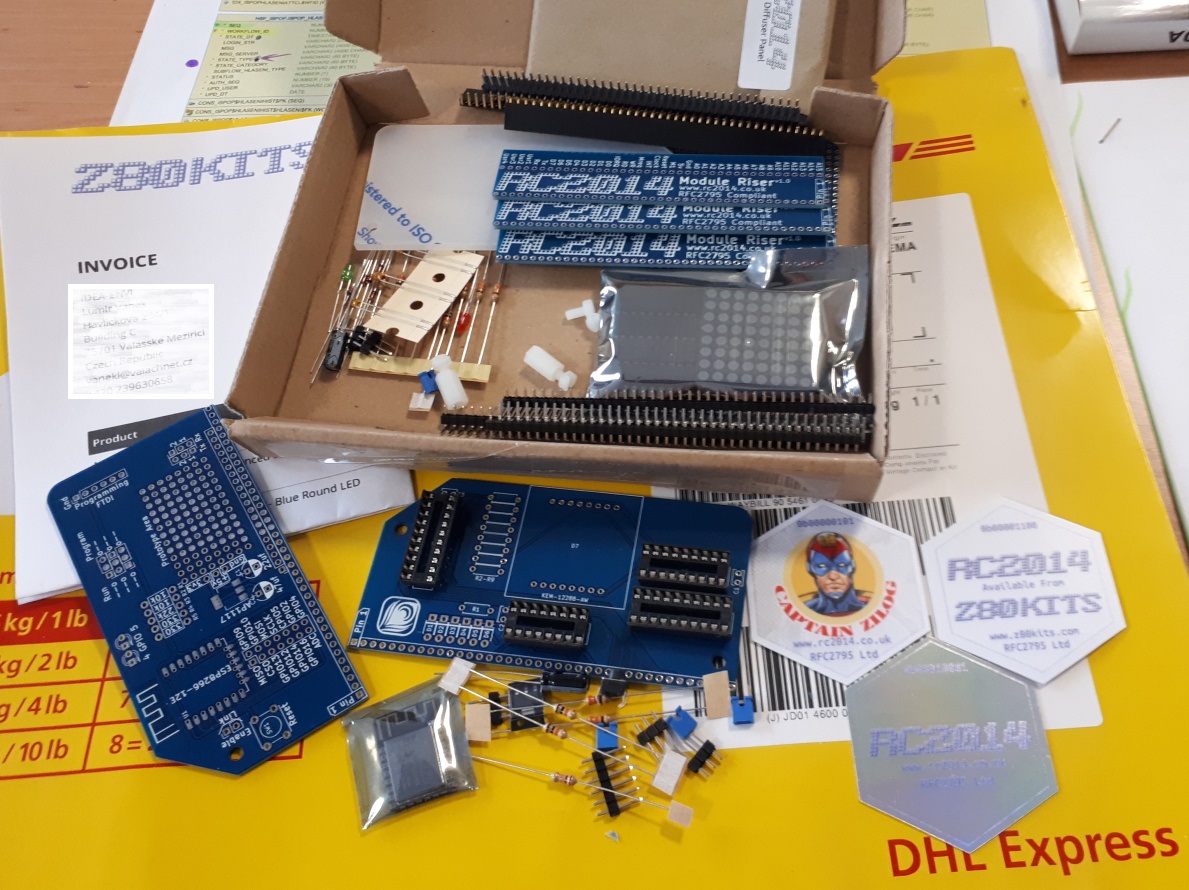
Delivery |
Building |
Running |
Links
- RC2014 Website
- Mailing list
- Twitter: @ZXSpectrom or find tag #RC2014
- Instagram: @RC2014Z80
- Z80KITS
- RC2014 Infobase
- Thomas Scherrer Z80-Family Official Support Page
- CP/M Builtin Commands
- z80 Heaven - Instructions Set
- Z80 PIO User Manual
- Zilog History
- Obsolescence Guaranteed
- Z80 CPU opcodes
Original Zilog documents
Mario Blunks tutorial set
- How To Program the Z80 Periphery Tutorial (How to program the z80 SIO)
- How To Program the Z80 Periphery Tutorial (How to program the z80 CTC)
- How To Program the Z80 Periphery Tutorial (I²C programming using the Z80 PIO)
Ken Shirriff's blog
This blog contains interesting informations about Z80 CPU internals.
- Why the Z-80's data pins are scrambled
- The Z-80 has a 4-bit ALU. Here's how it works
- Down to the silicon: how the Z80's registers are implemented
- Reverse engineering ARM1 instruction sequencing, compared with the Z-80 and 6502
Learning algorithms
- Z80 advanced math
- Retro Programming
- Programiz - Learn to Code for Free
- BeginnersBook.com – Tutorials For Beginners
Other
- bramm.dk blog
- Visual Z80 remix
- Z80 CPU timing explained
-
A new cycle-stepped Z80 emulator
My own experiences with it:
My own things
- RC2014 Images gallery
- Some videos with my RC2014 in action
- Assembler sources - playing with LED's, etc... for TASM
- Assembler source for ZAS - HI-TECH SOFTWARE Z80 Macro Assembler
- Assembler sources - for Z80 Simulator IDE
- C sources collection for learning algorithms like sorting, primes, factorial, etc...
- C sources and other things for RTM/Z80
- BASIC sources collection
- Photo gallery